Homemade Harissa Recipe
This post may contain affiliate links.
Homemade harissa is one of those recipes that completely changed the way I cook. Once I started making it from scratch, I almost stopped buying the store-bought version altogether. The flavor is richer, fresher, and much more balanced, and one of the best parts is that you can customize the heat exactly the way you like it.
This North African chili paste is made with dried chilies, garlic, warm spices, olive oil, and lemon juice. It’s bold, smoky, slightly tangy, and incredibly versatile. I love using it as a marinade for my Baked Chicken Skewers, spread inside Homemade Pita Bread with Falafel, or stirred into Homemade Hummus for an instant flavor boost.
If you open my fridge, chances are you’ll find a jar of homemade harissa inside. I use it so often that making a fresh batch has become part of my regular kitchen routine.
What Is Harissa?
Harissa is a flavorful chili paste that originated in Tunisia and has become a staple throughout North African cuisine, especially in Algeria, Morocco, and Libya. While every region, and often every family, has its own version, the foundation is usually the same: dried chilies blended with garlic, spices, olive oil, and lemon juice or vinegar.
Unlike many hot sauces that focus mainly on heat, harissa is all about balance. It should be smoky, earthy, slightly tangy, garlicky, and only as spicy as you want it to be. The chilies provide the heat, while the toasted spices add depth and complexity.
One of my favorite things about homemade harissa is that no two batches have to be exactly the same. Changing the chili varieties can completely transform the flavor, from fruity and mildly sweet to deeply smoky or intensely spicy.
Today, harissa is enjoyed far beyond North Africa. It’s a versatile condiment that adds bold flavor to everything from grilled meats and roasted vegetables to soups, sandwiches, eggs, and dips.
Ingredients & Substitutions
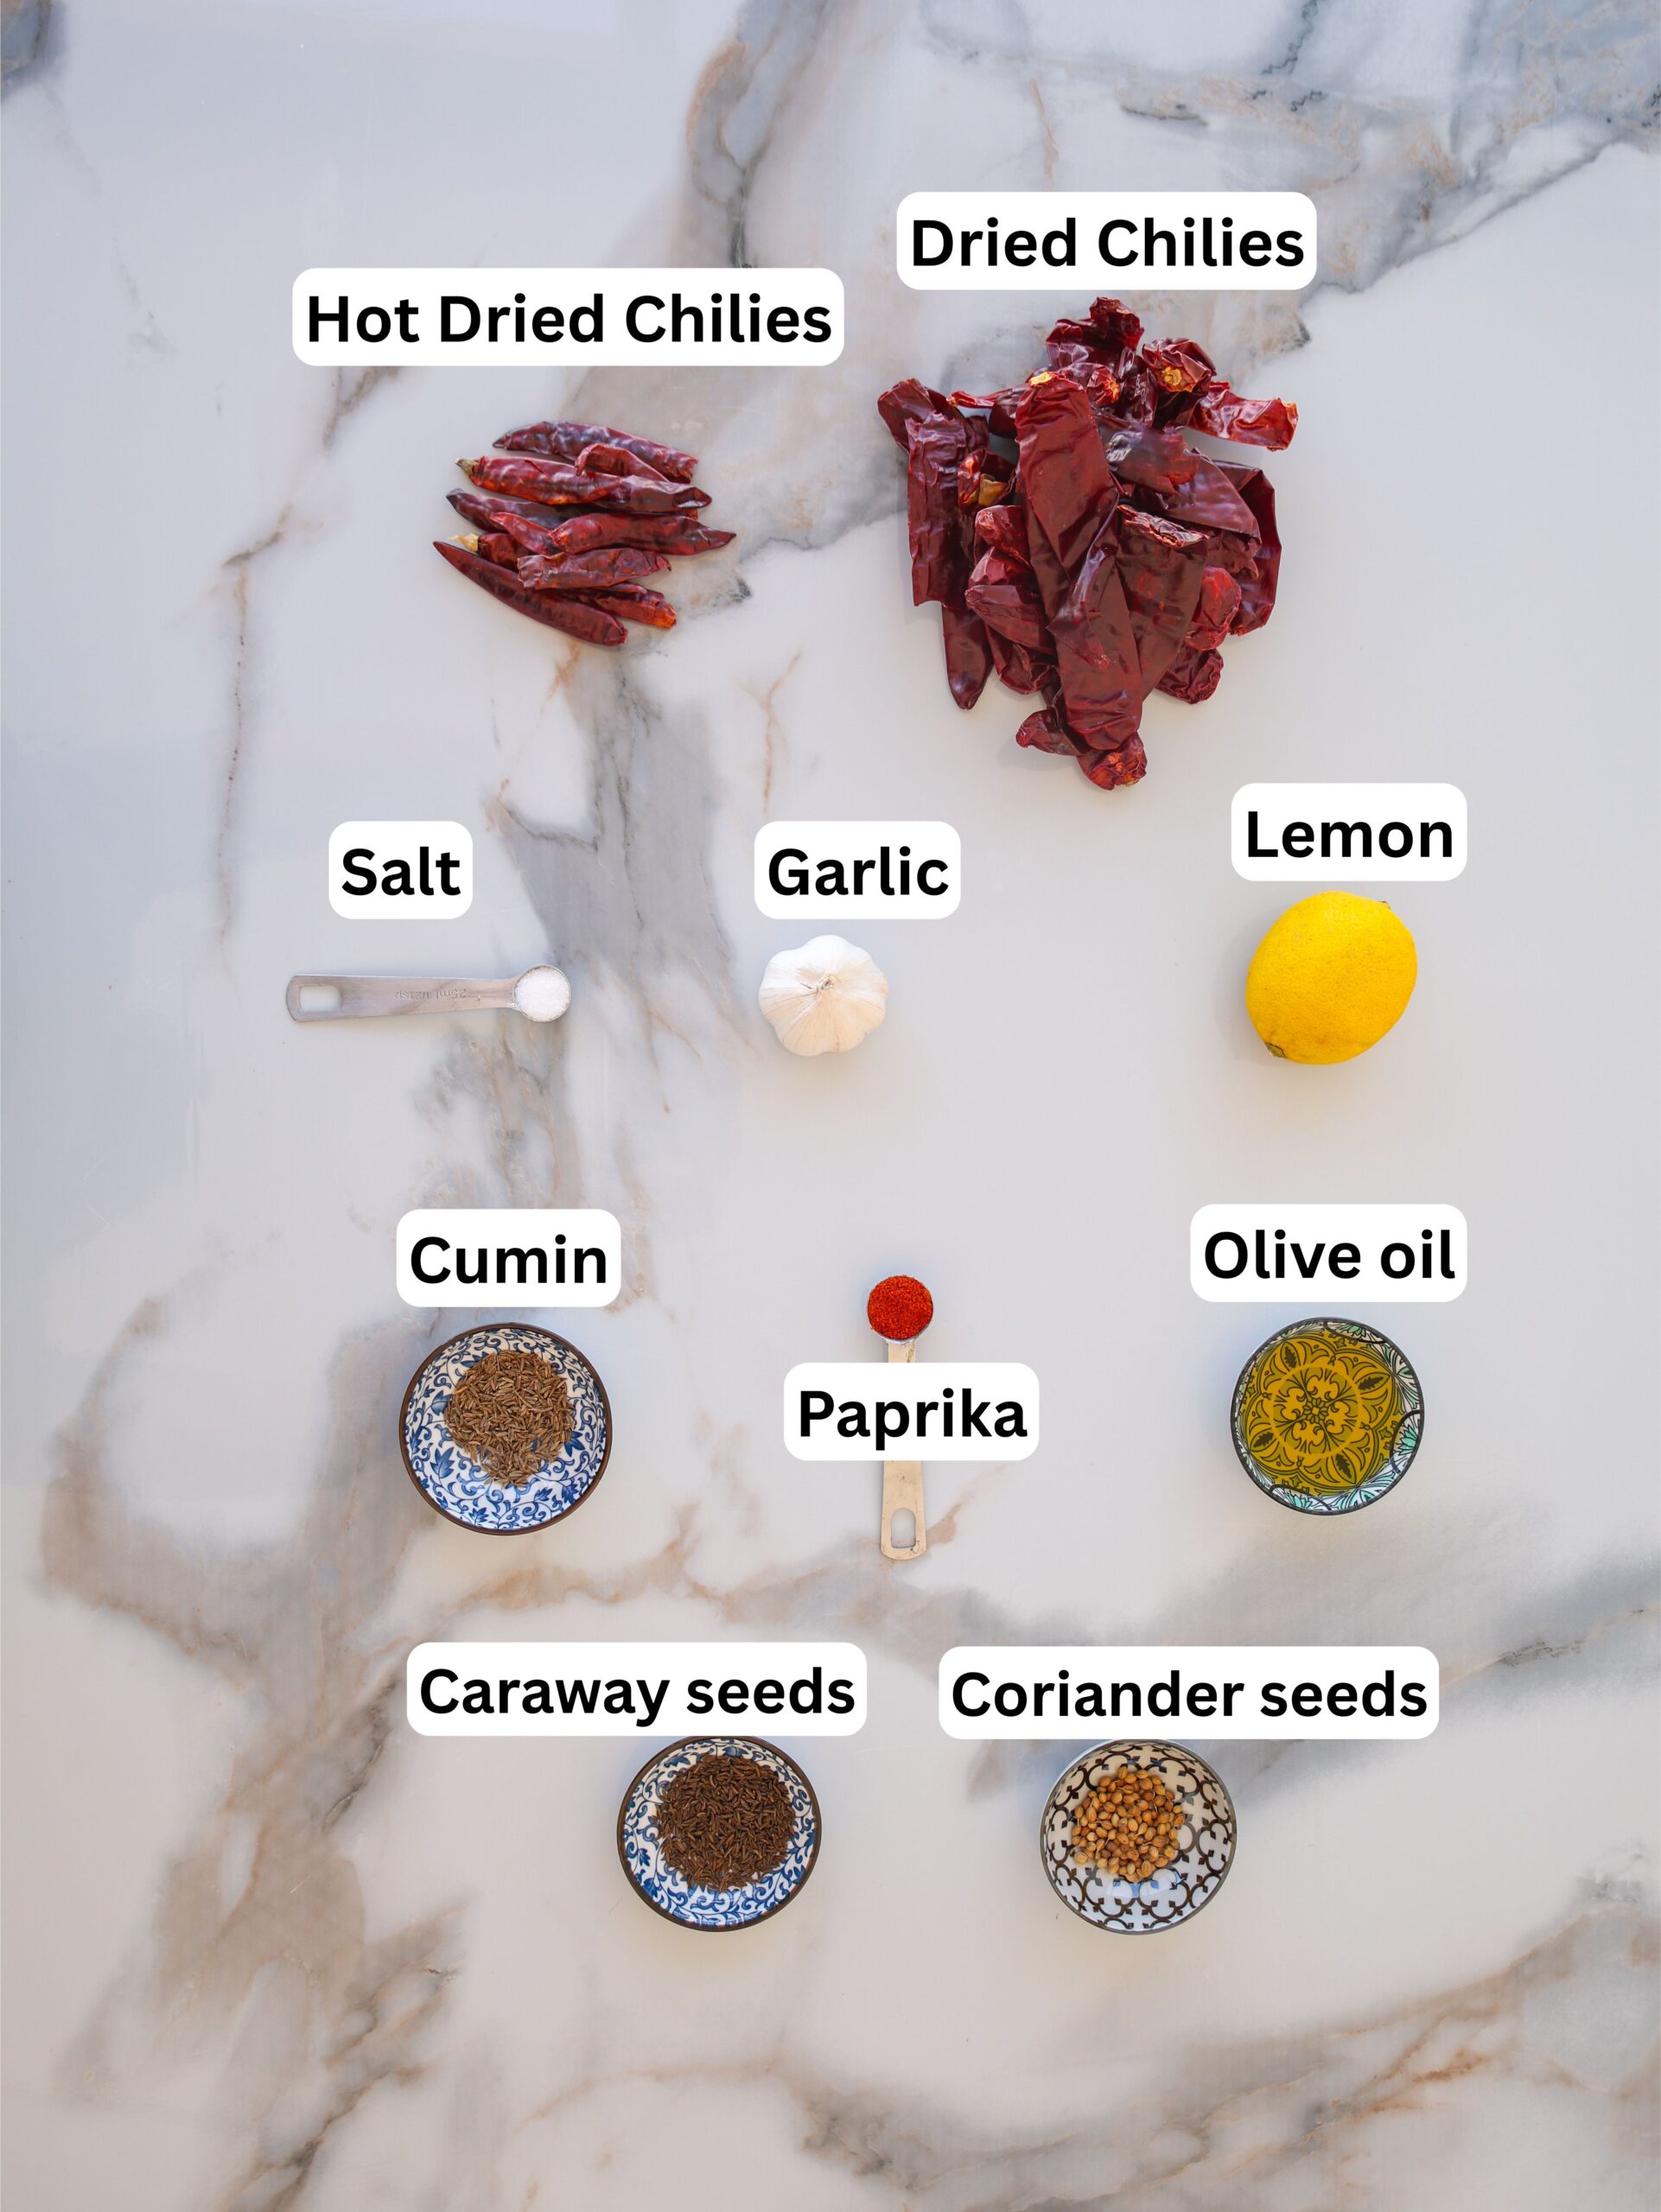
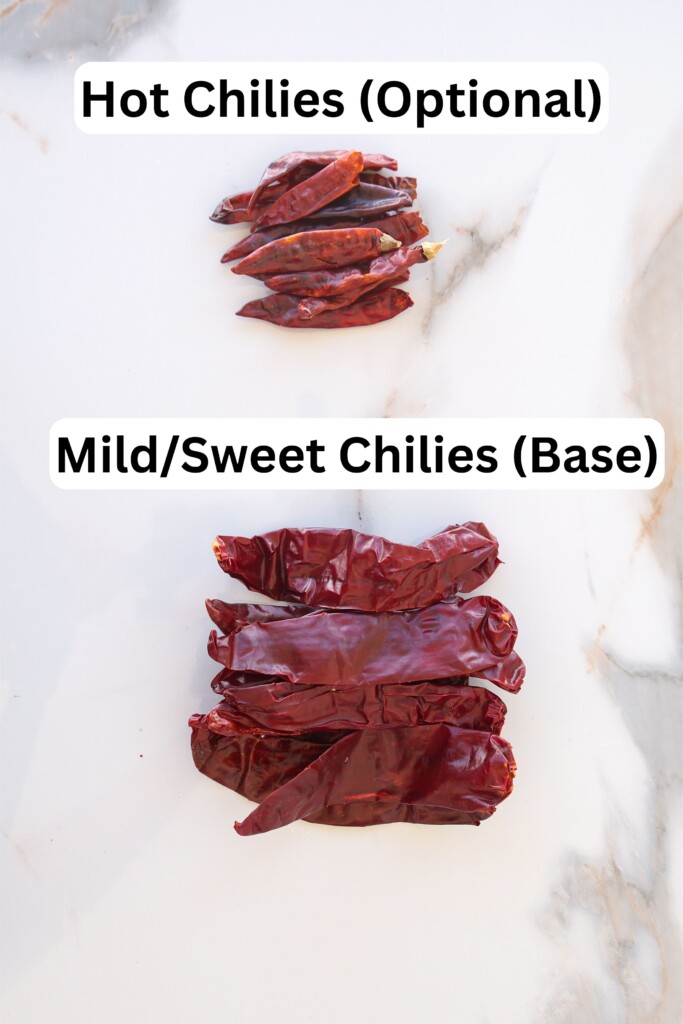
- Dried Chilies – These are the heart of any harissa recipe. I like using mostly mild dried chilies for the base, then adding a few hot chilies to control the spice level. Guajillo, New Mexico, Ancho, and Kashmiri chilies are all excellent choices. If you can’t find the exact varieties I use, don’t worry, most dried chilies will work.
- Hot Dried Chilies – Completely optional, but highly recommended if you enjoy a little heat. Árbol chilies are one of my favorites, but any dried hot chili will work. Start with a small amount—you can always make your next batch spicier.
- Garlic – Fresh garlic gives harissa its bold, classic flavor. If you prefer something a little sweeter and more mellow, garlic confit is a fantastic substitute.
- Cumin, Coriander & Caraway – This trio of spices gives harissa its signature warm, earthy flavor. I always recommend buying them whole, lightly toasting them, and grinding them yourself. It only takes a couple of extra minutes, and the difference in flavor is well worth it. That said, pre-ground spices work perfectly well if that’s what you already have.
- Smoked Paprika – Adds a subtle smoky flavor and deepens the beautiful red color. Regular paprika works too, but you’ll lose a little of that smoky depth.
- Lemon Juice – Fresh lemon juice brightens all the flavors and balances the richness of the olive oil. Some traditional recipes use vinegar instead, so feel free to substitute red wine vinegar if you prefer.
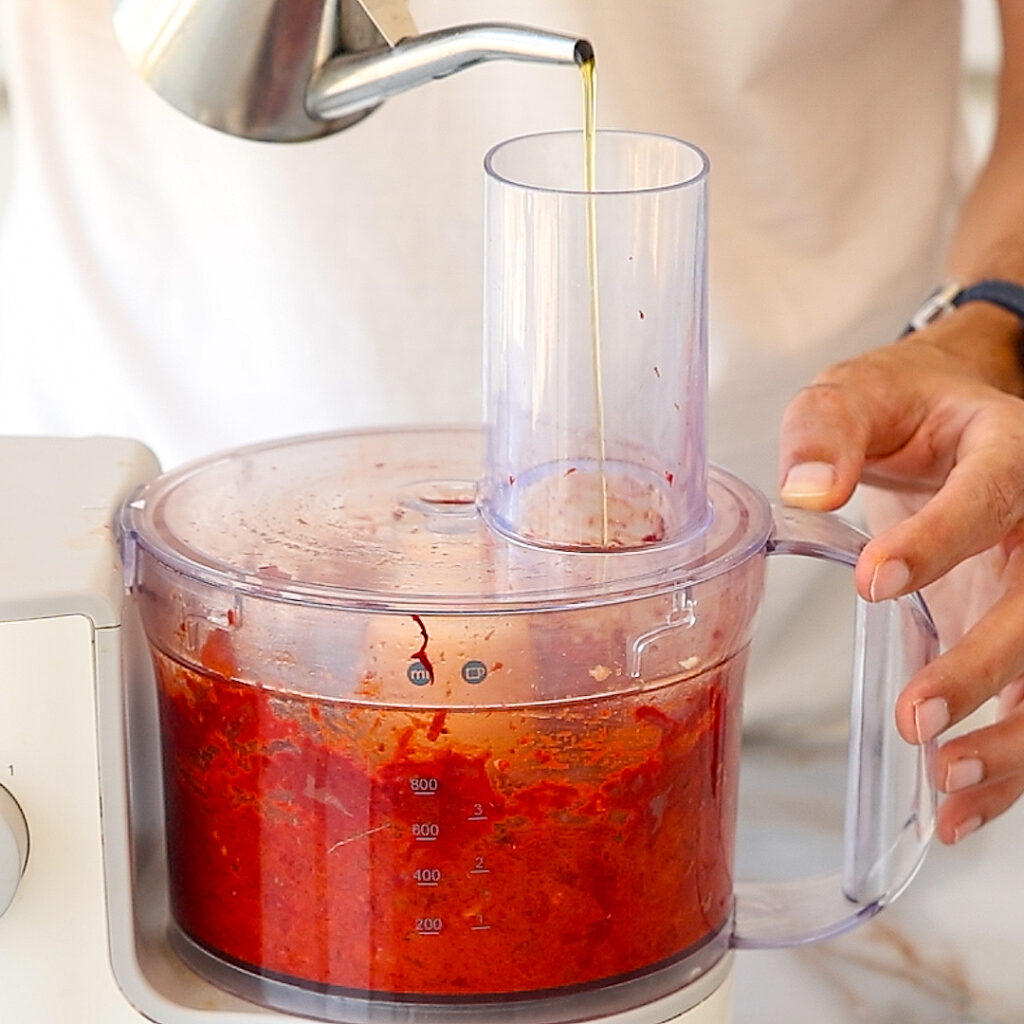
- Olive Oil – Use a good-quality extra virgin olive oil if you can, since you’ll taste it in the finished harissa. Add it gradually until the paste reaches your preferred consistency.
- Salt – Just enough to bring everything together. I always recommend tasting the finished harissa and adjusting the seasoning before storing it.
This is just a quick overview of the ingredients. Scroll down to the recipe card for the full recipe, including exact measurements. 👇
The Best Chilies for Homemade Harissa
One of the biggest advantages of making harissa at home is that you control both the flavor and the heat. Different dried chilies contribute much more than just spice—they each bring their own unique color, sweetness, smokiness, and aroma.
Here are some of my favorite varieties:
- Guajillo – Mild, slightly fruity, and one of my favorite choices for the base.
- New Mexico Chilies – Mild with an earthy flavor and beautiful deep red color.
- Ancho – Rich, smoky, and slightly sweet with notes of raisins and chocolate.
- Kashmiri Chilies – Mild heat with vibrant red color, making them perfect if you want a bright-looking harissa.
- Árbol Chilies – Small but very spicy. I usually add a few when I want extra heat without overpowering the other flavors.
Instead of relying on just one variety, I almost always combine two or three different chilies. Mixing varieties creates a much more complex and balanced harissa than using a single type alone.
If you’re making harissa for the first time, start with mostly mild chilies and add the hot ones gradually. You can always make it spicier next time, but it’s much harder to tone down an overly hot batch.
Homemade Harissa: Video Recipe
Watch the full video recipe to learn how to make the BEST homemade harissa.
Prefer the written recipe? Scroll down to the recipe box 👇
How to Make Homemade Harissa (Step-by-Step)

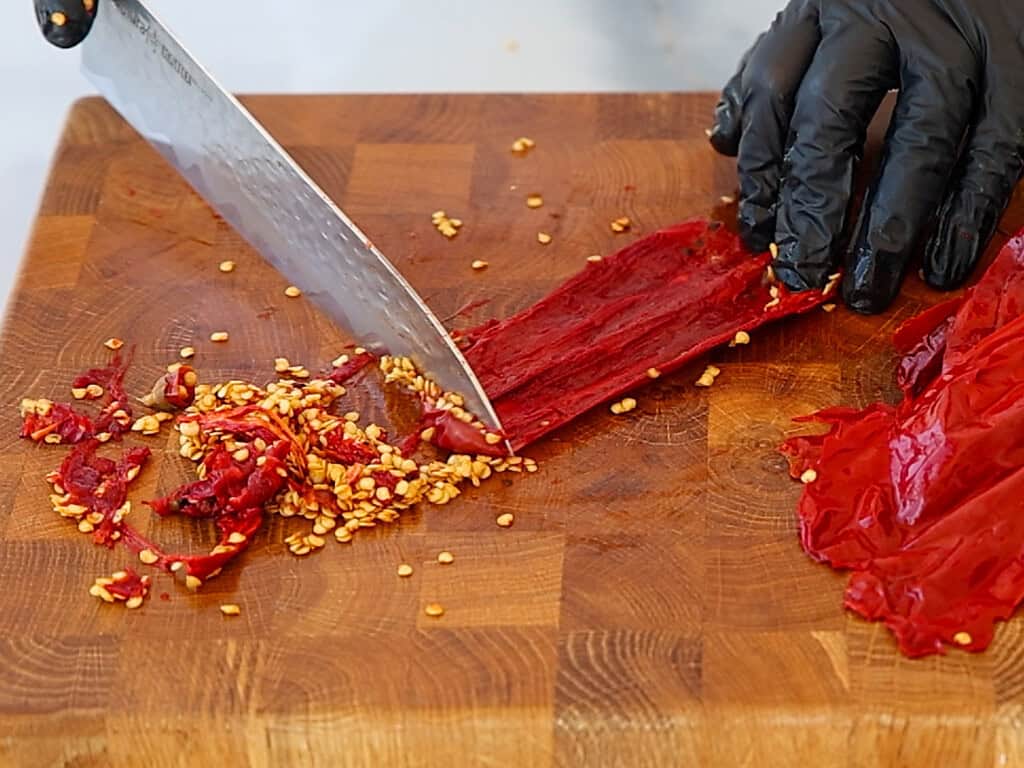
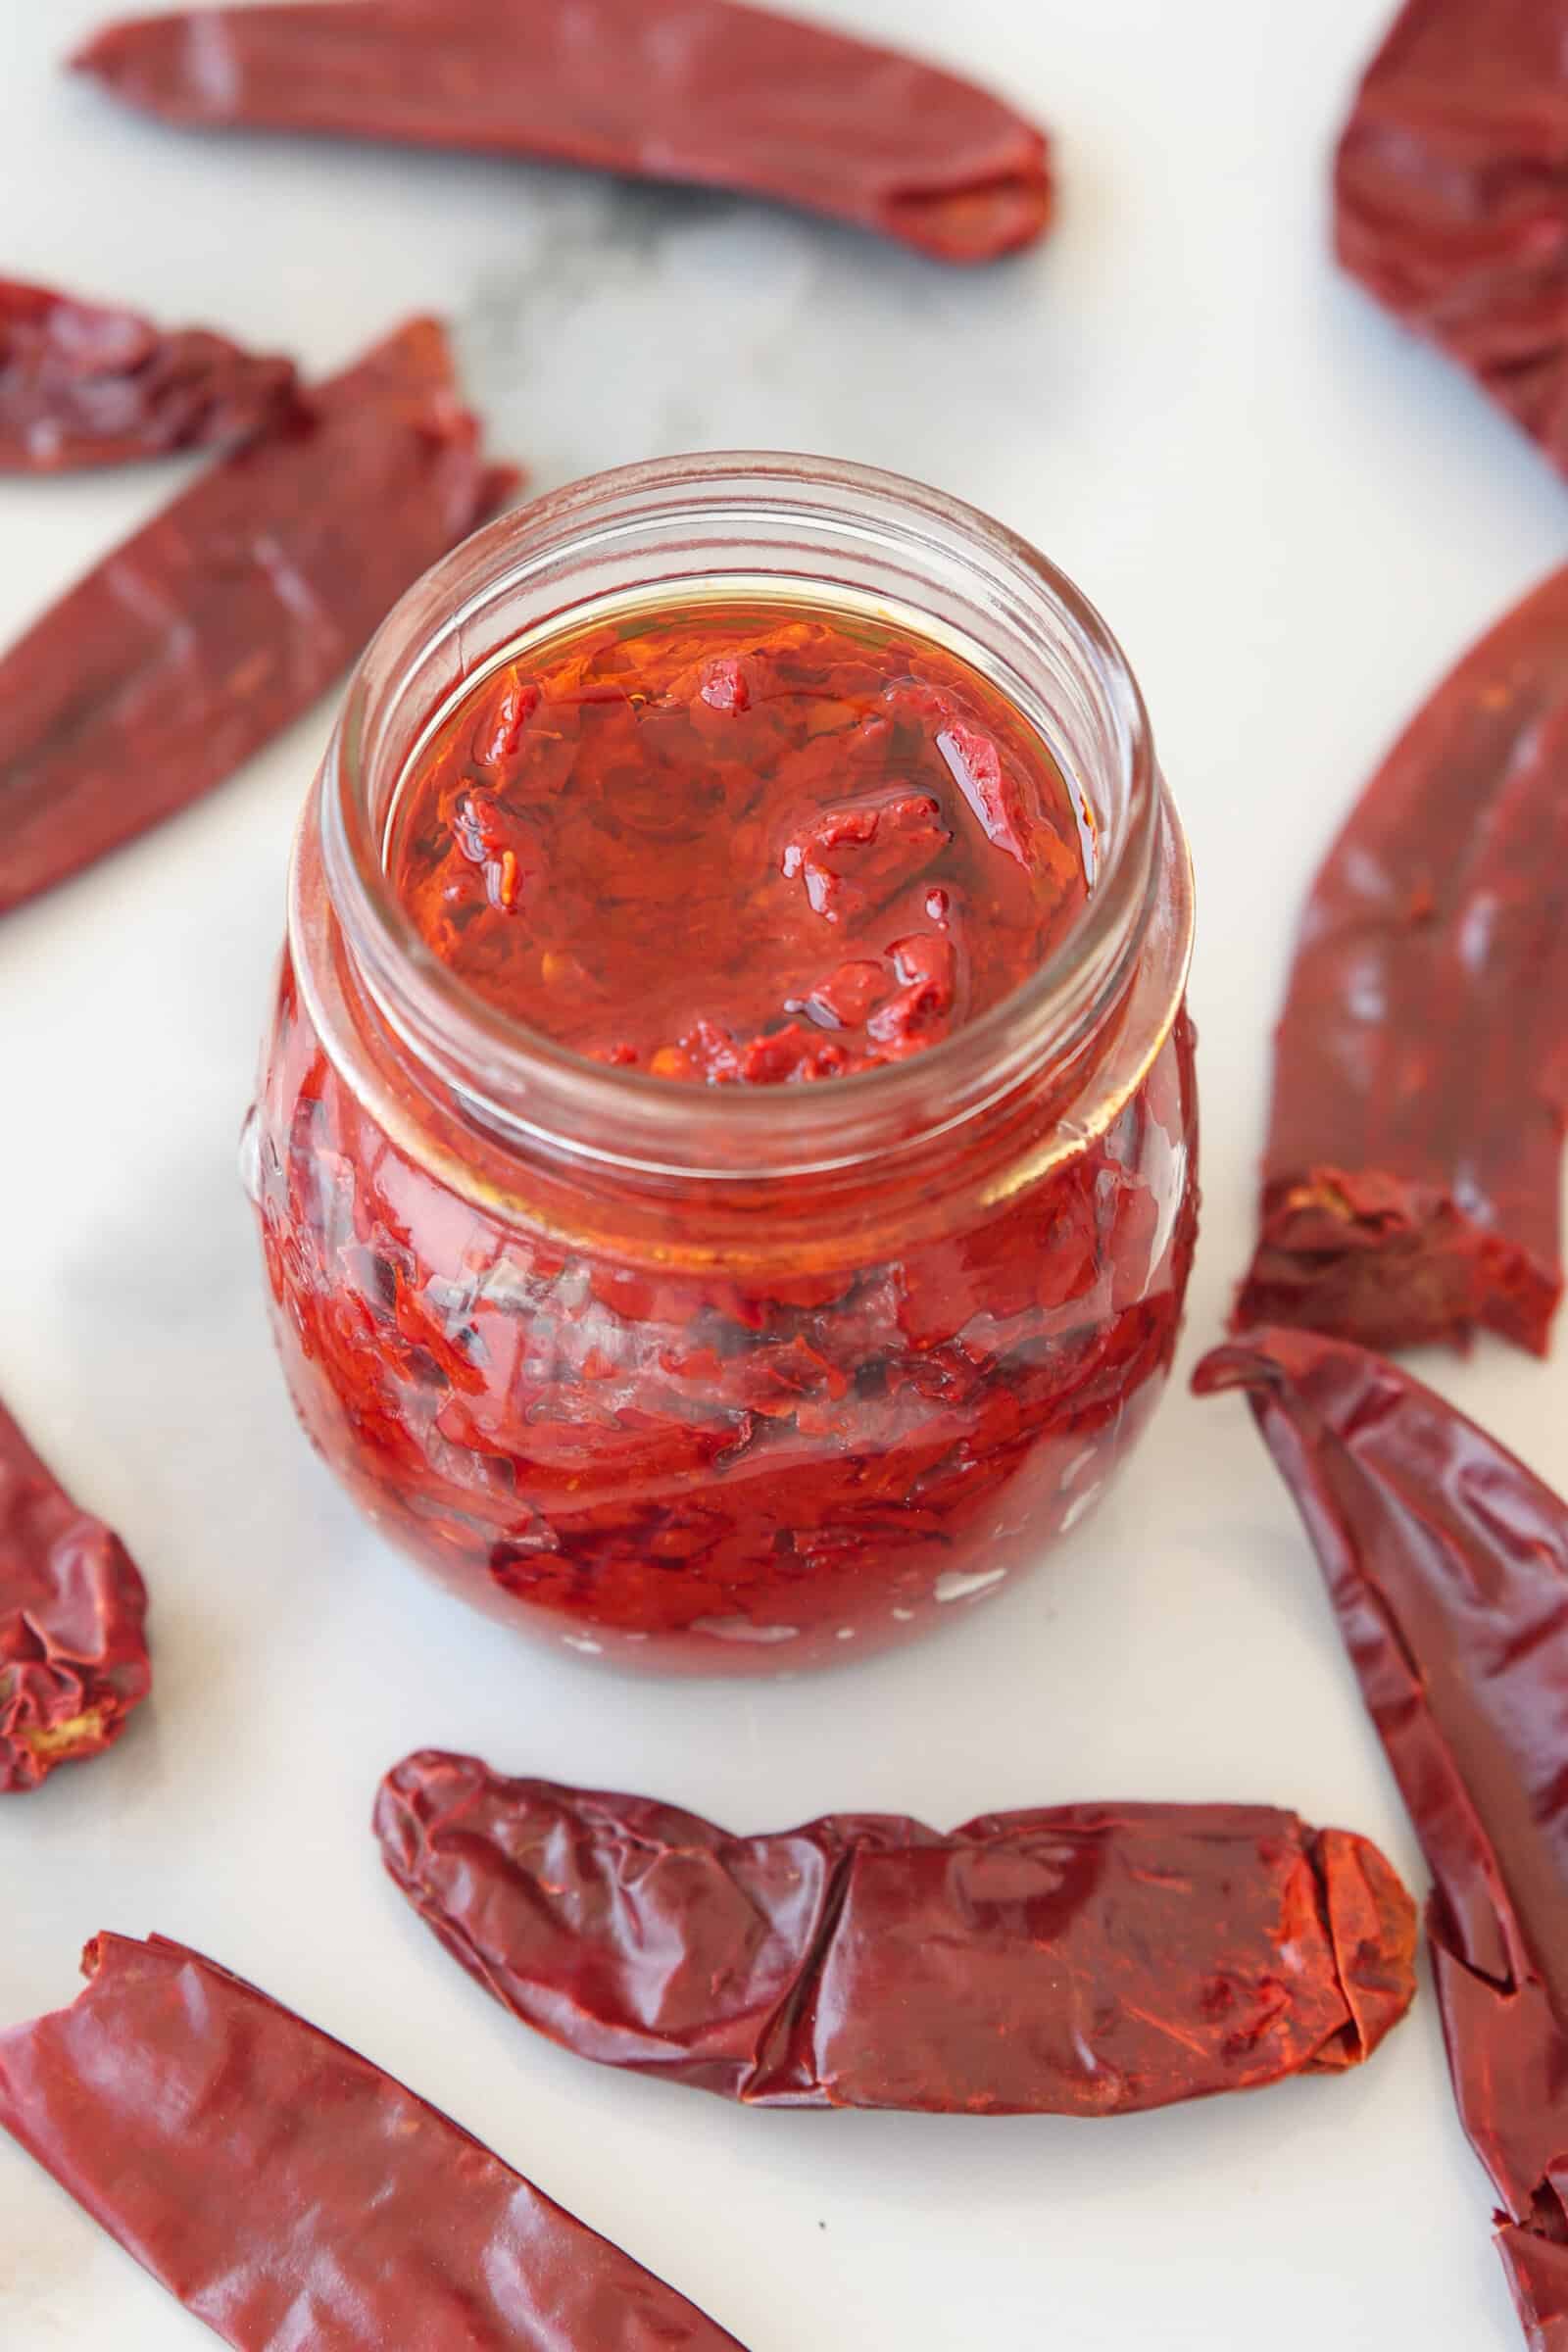
- Soak the Chilies: Remove the stems from the dried chilies and soak them in boiling water for 20–30 minutes, or until they’re soft and pliable. Drain well, then remove most of the seeds if you prefer a milder, smoother harissa.
- Toast the Spices: While the chilies are soaking, lightly toast the cumin, coriander, and caraway seeds in a dry pan until fragrant. Let them cool slightly, then grind them into a fine powder.
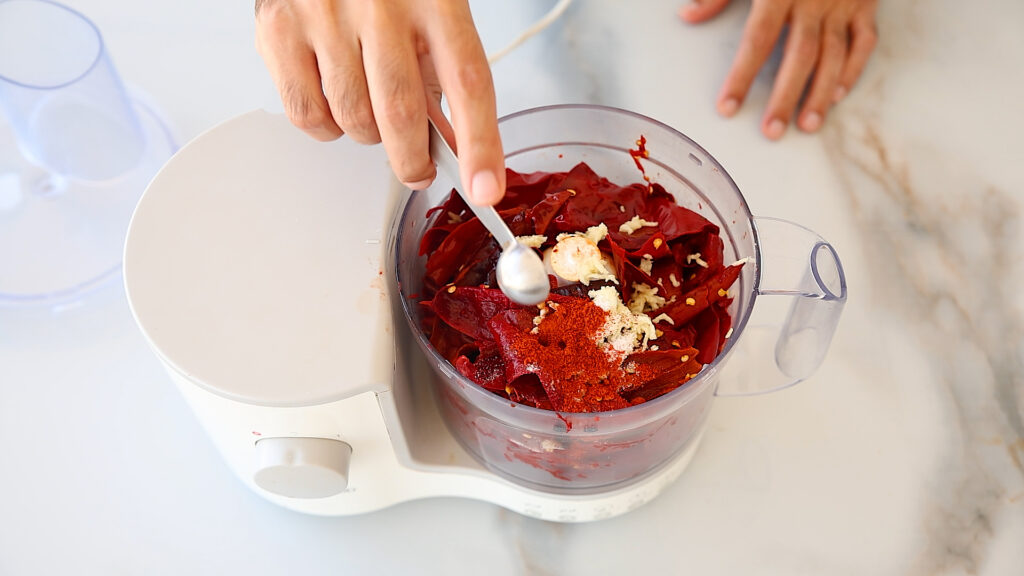
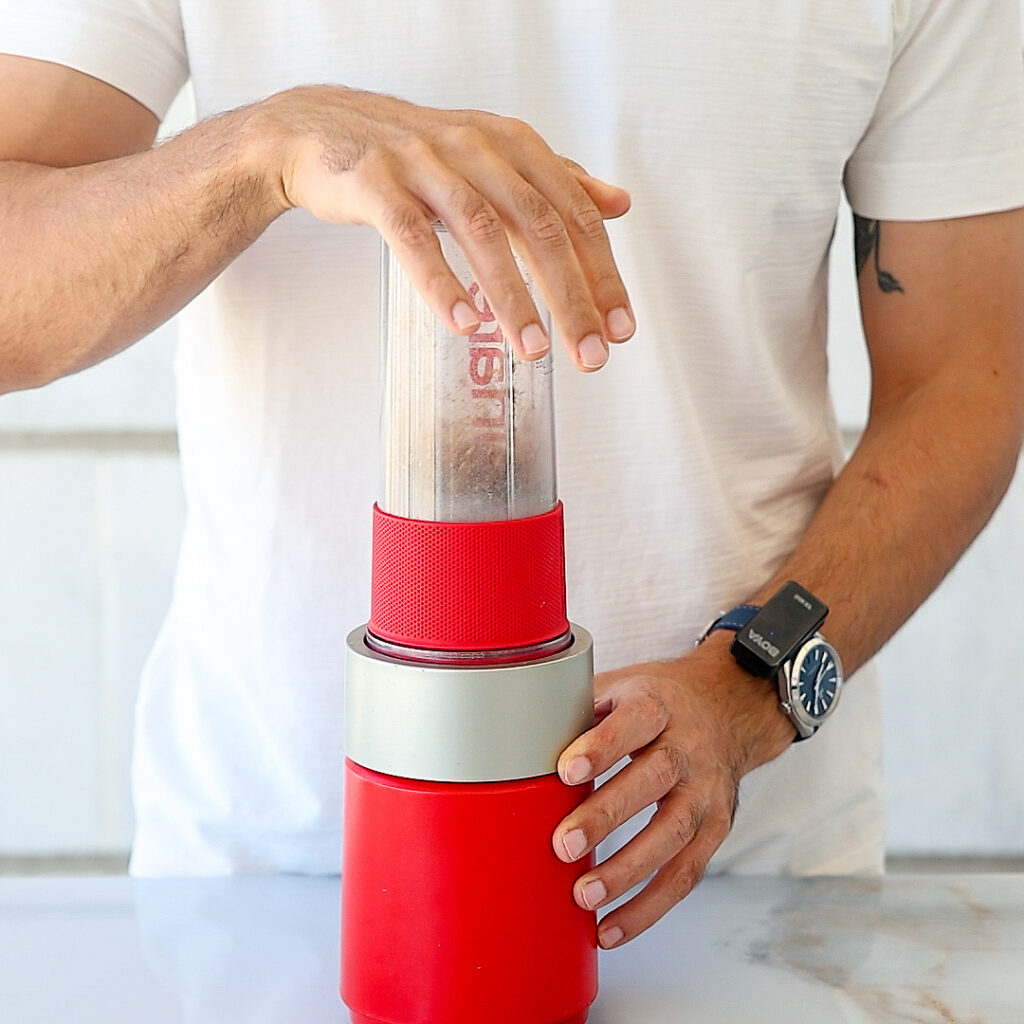
- Blend Everything Together: Add the softened chilies, garlic, toasted spices, smoked paprika, lemon juice, salt, and a little olive oil to a food processor. Blend until mostly smooth, adding more olive oil as needed until you reach a thick, spreadable consistency.
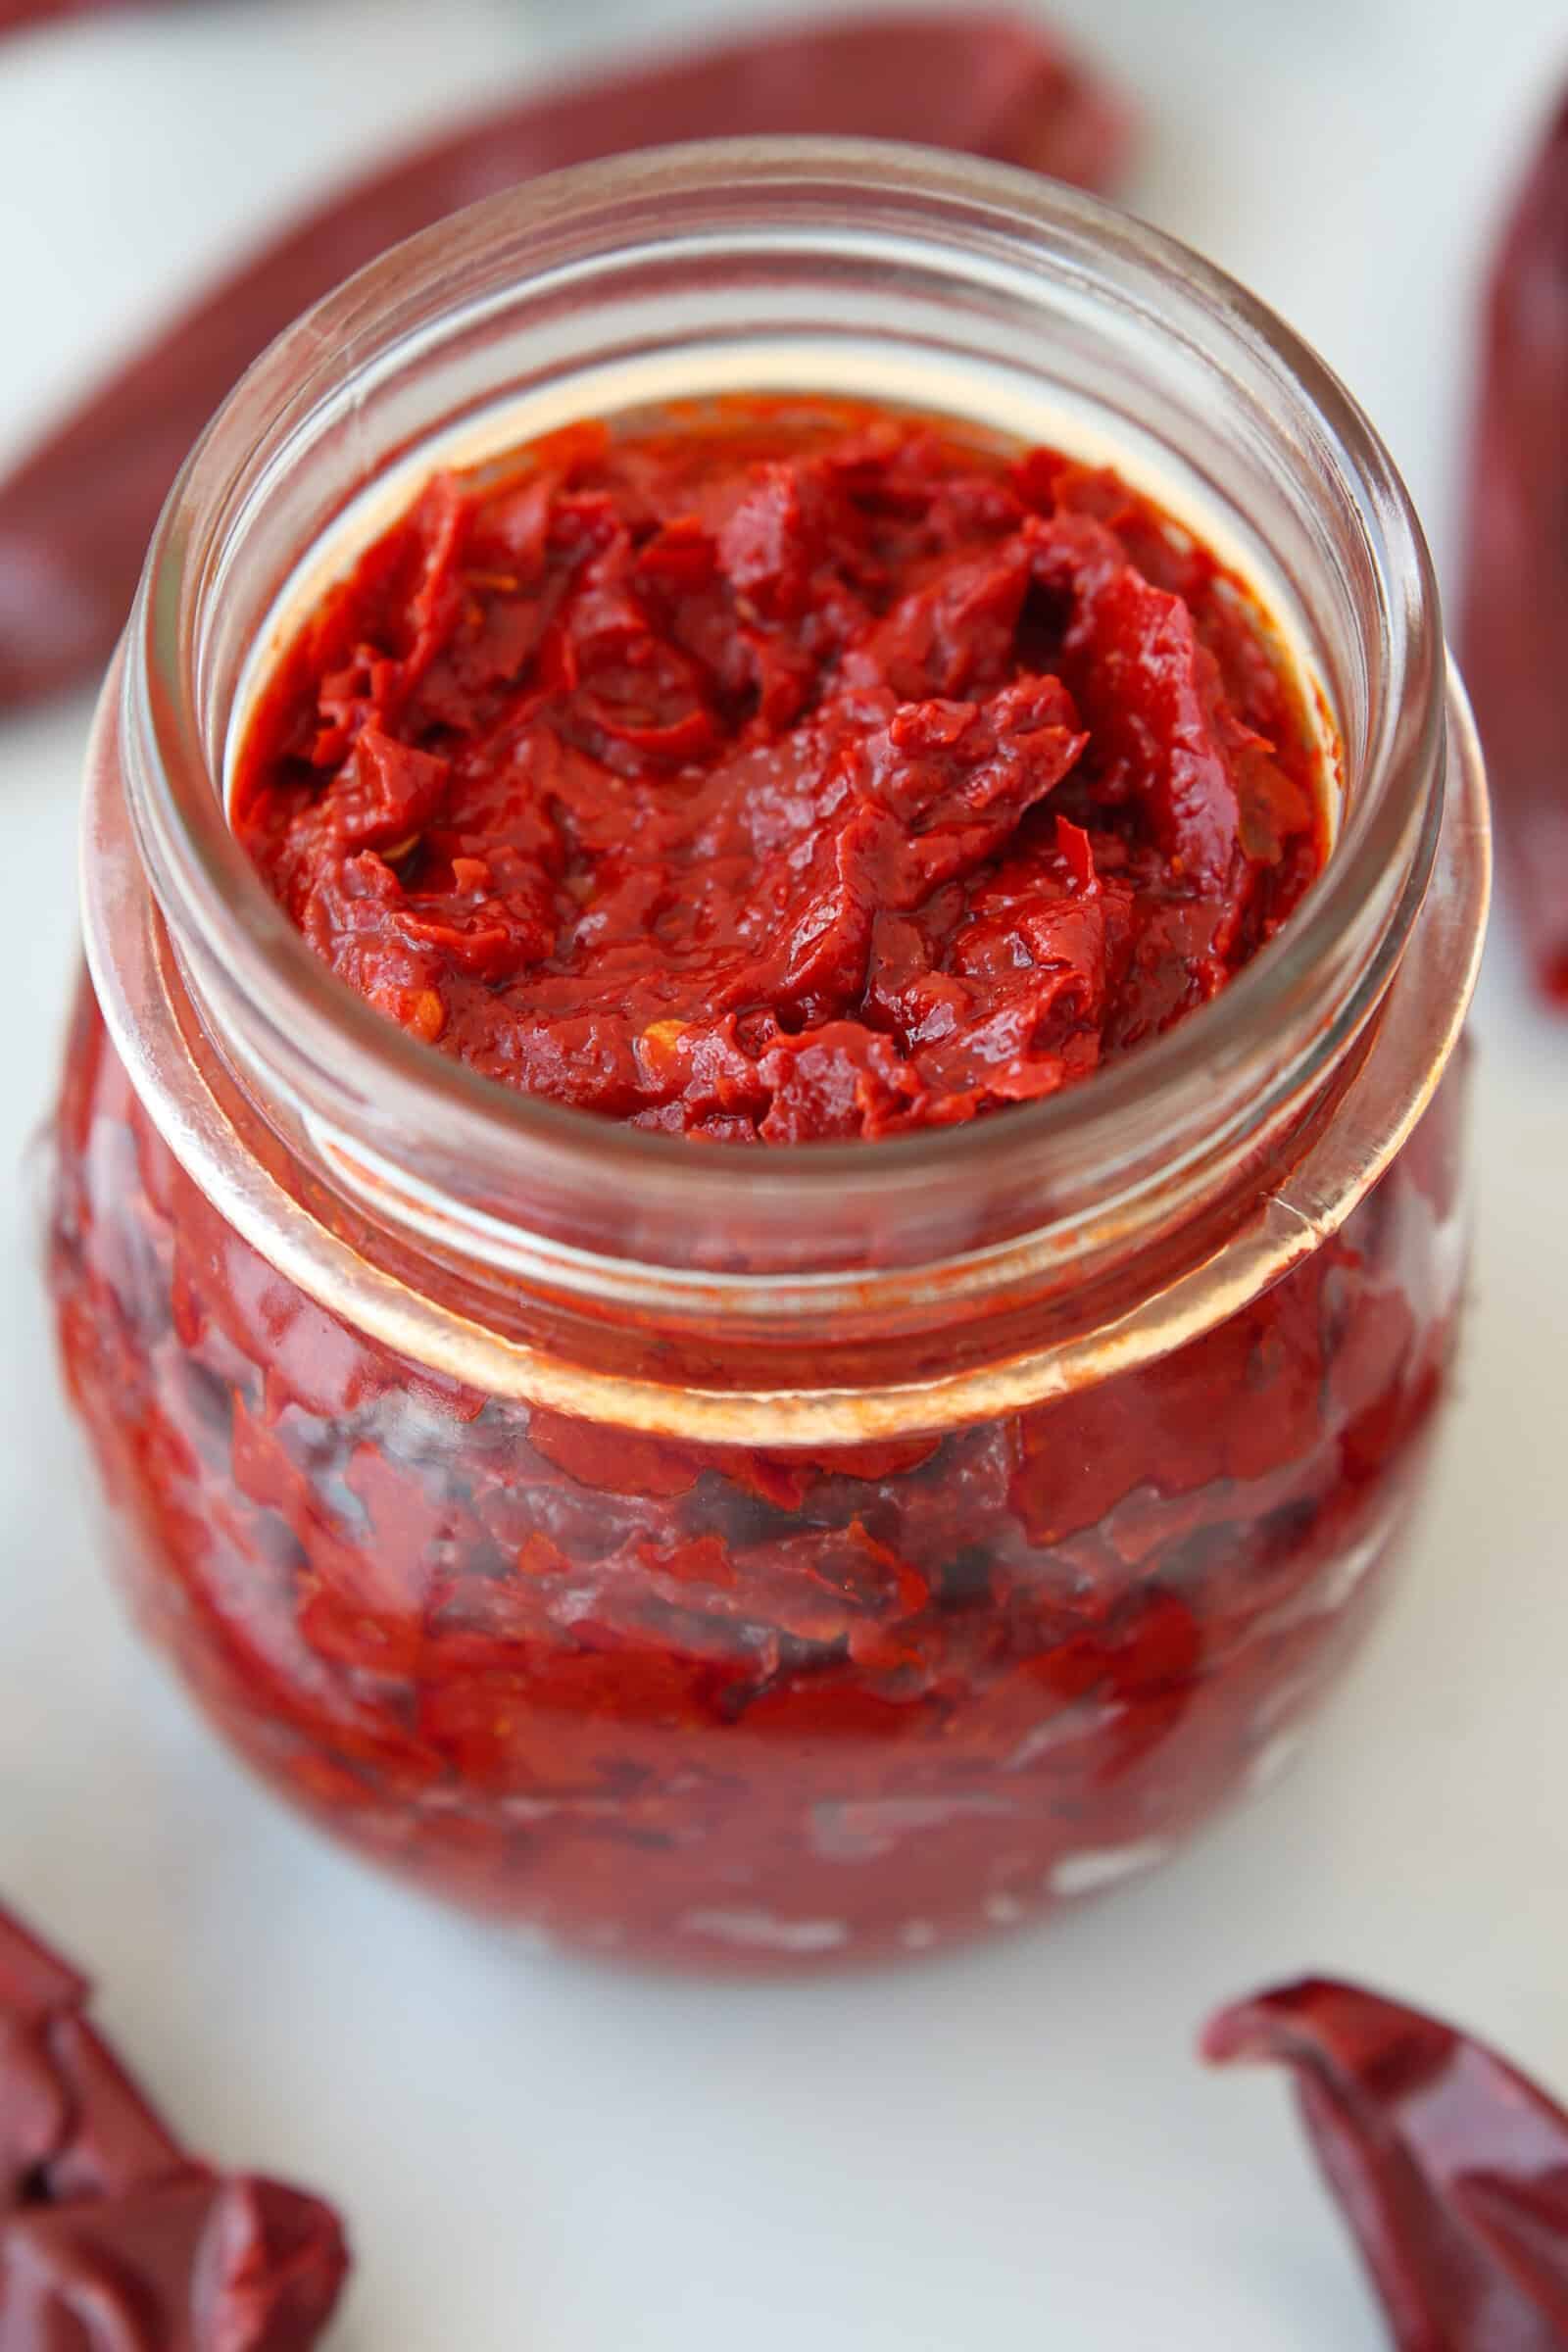
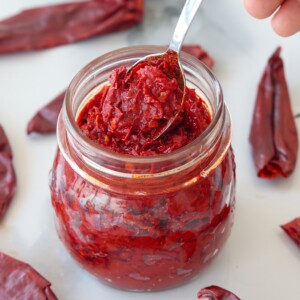
- Store & Enjoy: Transfer the harissa to a clean jar and smooth the surface. Cover with a thin layer of olive oil, seal, and refrigerate. The flavors become even better after a few hours, or overnight.
Control The Heat
One of the best things about making homemade harissa is that you have complete control over the spice level.
The mild (or sweet) dried chilies make up the base of the recipe. They provide most of the flavor, color, and texture, while the hot dried chilies are what mainly add heat.
- Mild Harissa: Use only mild dried chilies and remove most of the seeds.
- Medium Harissa: Add 10–15g of dried hot chilies.
- Hot Harissa: Add 20g or more of dried hot chilies and leave some of the seeds in.
- Extra Hot: Increase the amount of hot chilies and keep more of the seeds for maximum heat.
Remember that different chili varieties vary in heat and flavor, so don’t be afraid to experiment until you find your perfect balance.
The Best Spices for Homemade Harissa
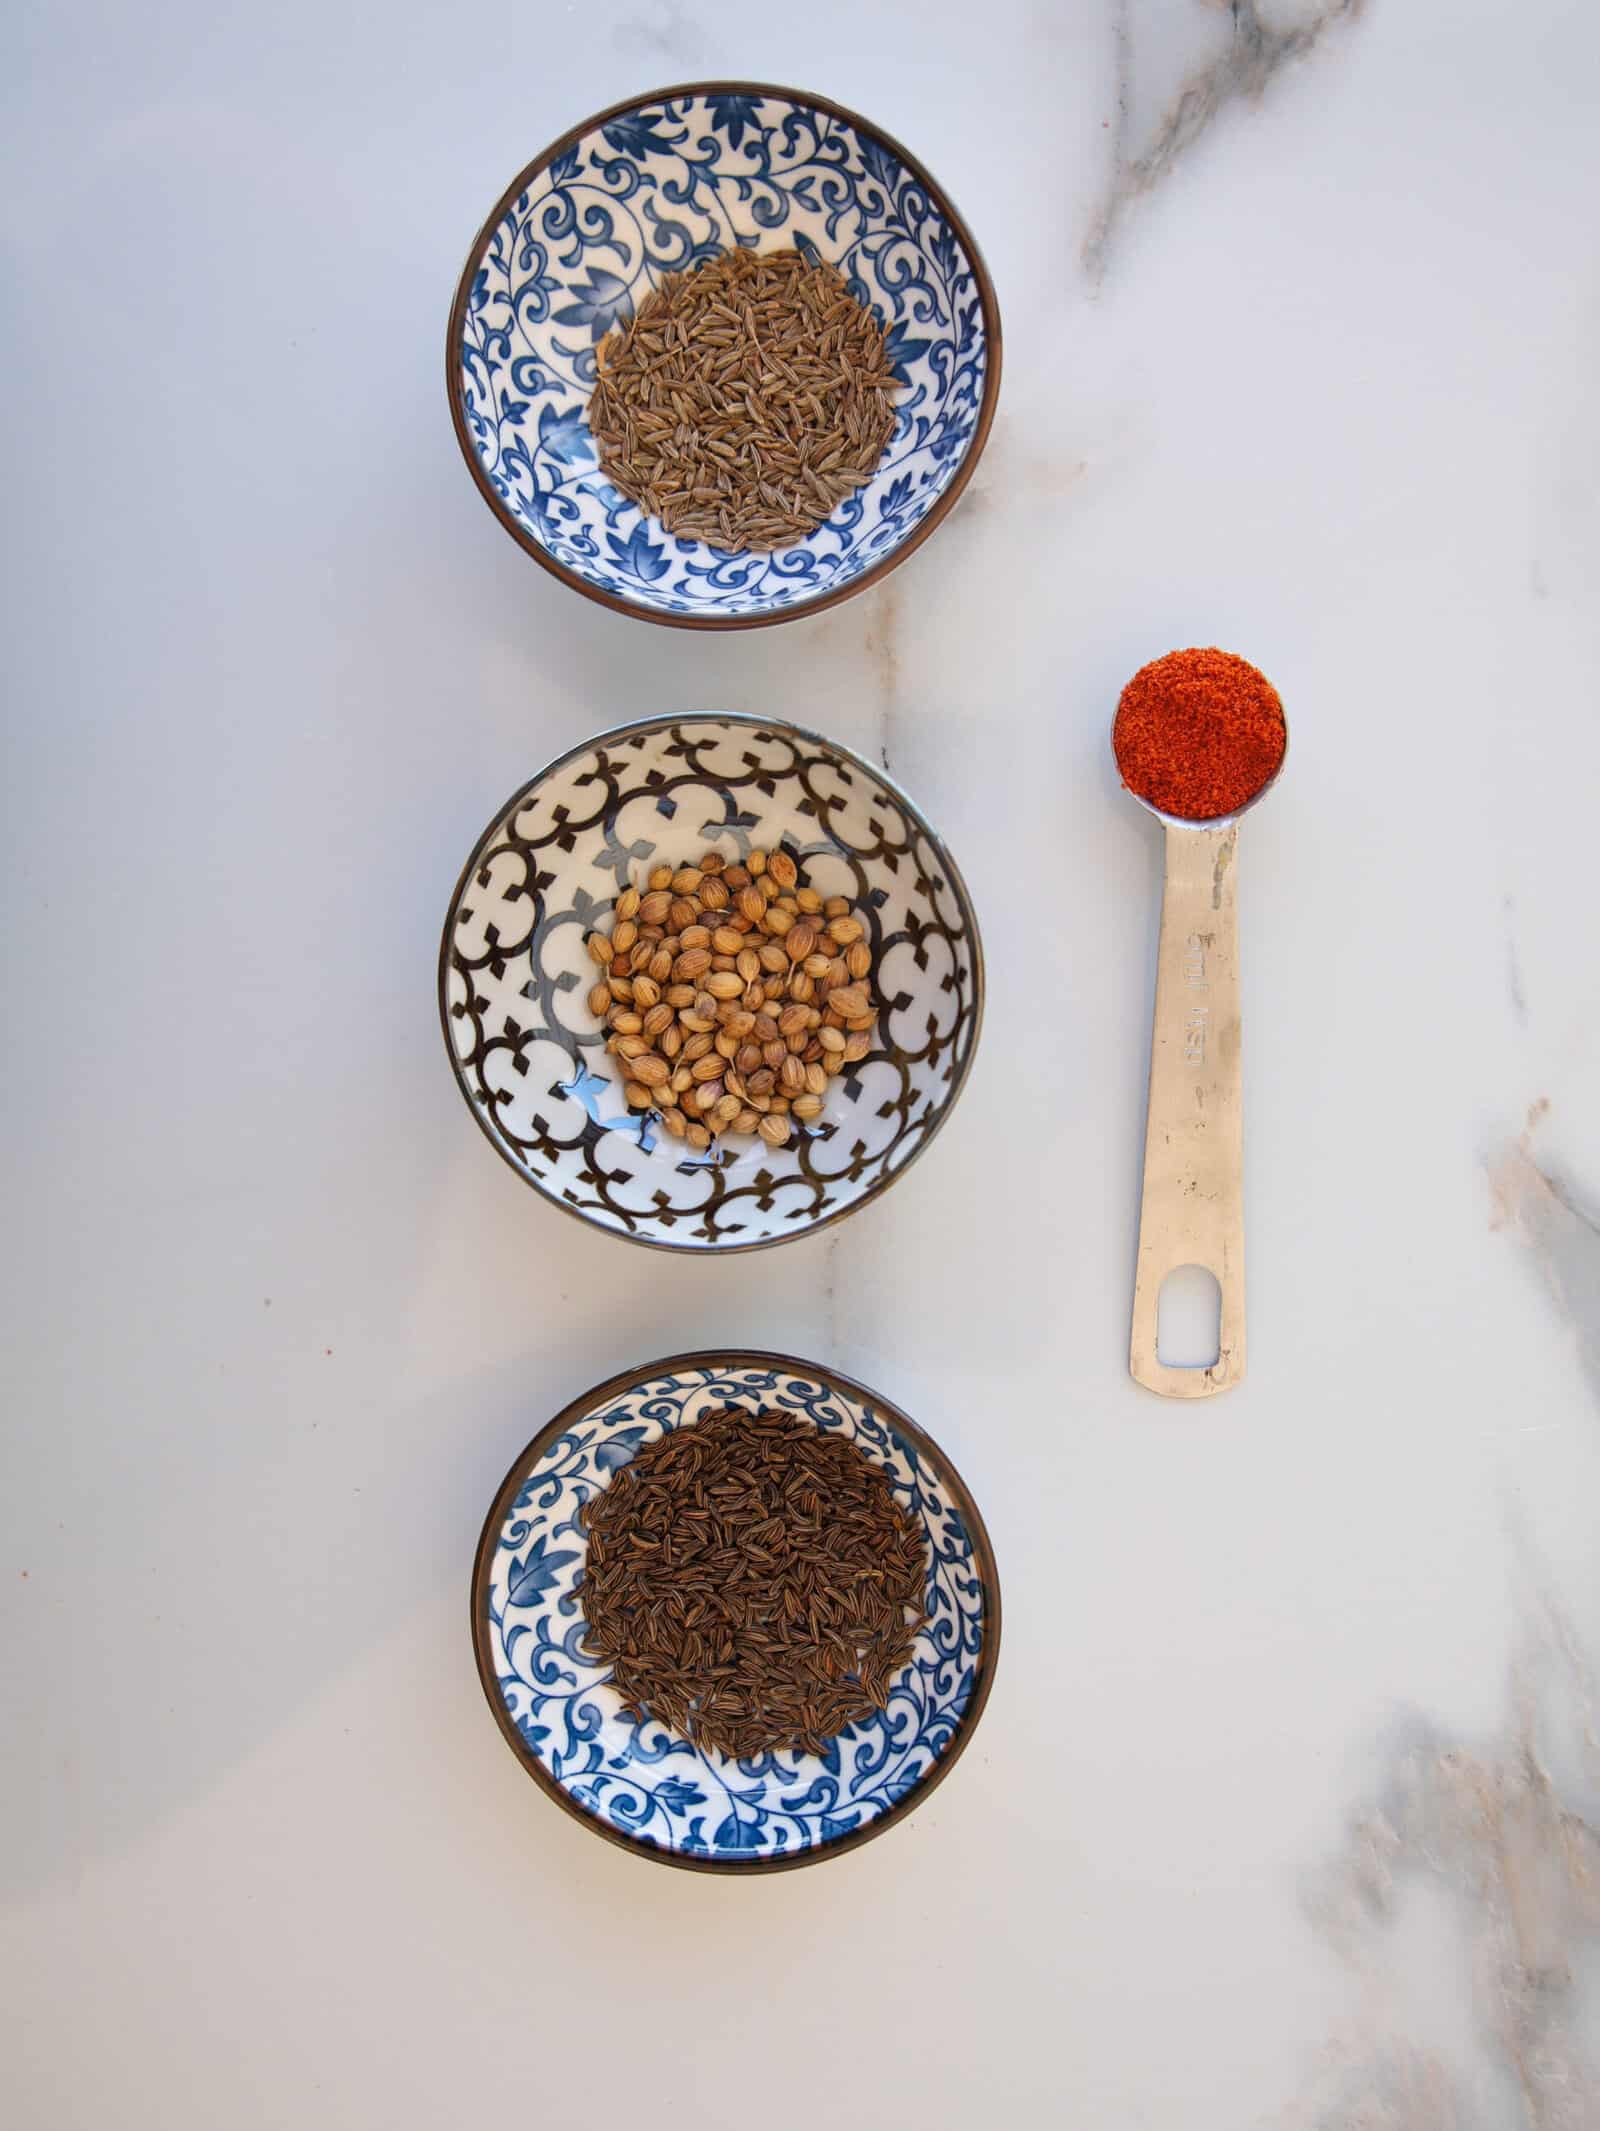
The signature flavor of harissa comes from a simple blend of cumin, coriander, and caraway, along with smoked paprika, garlic, and dried chilies. Together, they create the warm, earthy, and slightly smoky flavor that makes harissa so distinctive.
Toast & Grind Your Own Spices for Better Flavor
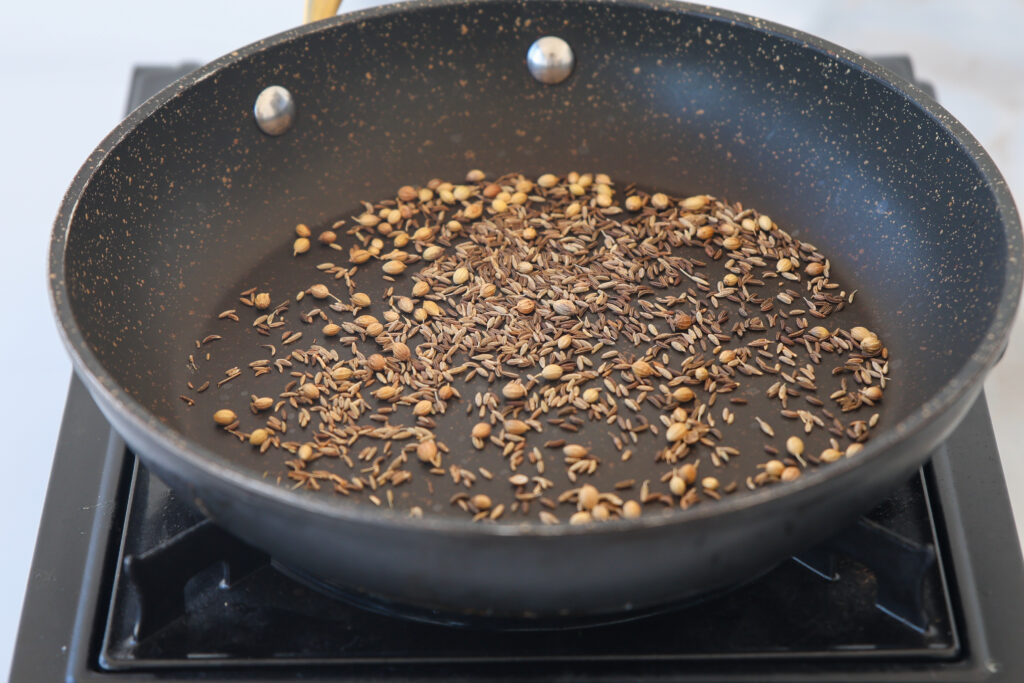
For the best results, I highly recommend using whole cumin, coriander, and caraway seeds. Toast them in a dry pan for 1–2 minutes until fragrant, then grind them yourself using a spice grinder. This simple step releases their natural oils and creates a much fresher, more aromatic harissa.
That said, store-bought ground spices work perfectly well, especially if that’s what you already have in your pantry. Your harissa will still be delicious, but freshly toasted and ground spices add an extra layer of flavor that’s well worth the few extra minutes.
Trust Me, Wear Gloves
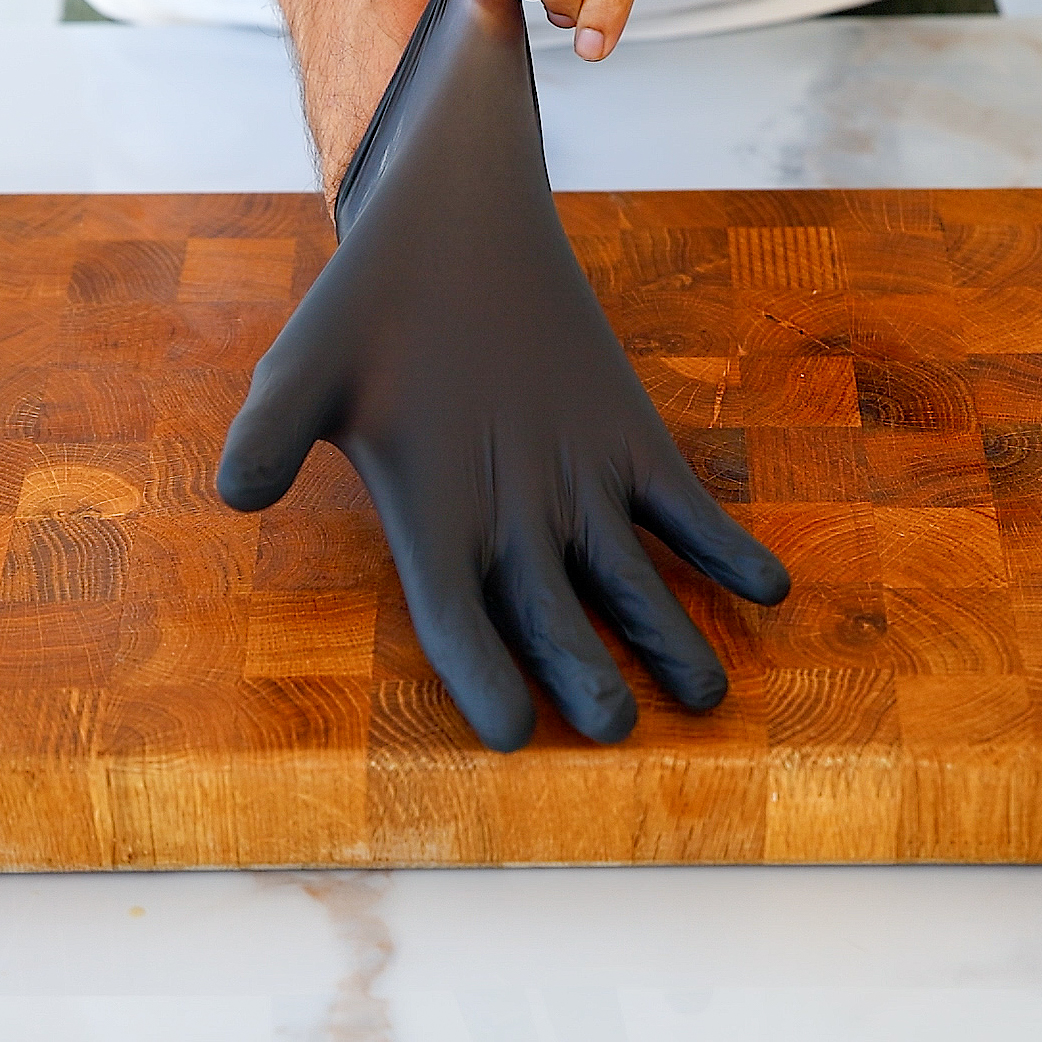
If you’re working with hot chilies, wear disposable gloves, even if you don’t think they’re that spicy.
The oils from the chilies can linger on your hands long after you’re done cooking and can cause a painful burning sensation if you accidentally touch your eyes, face, or even handle contact lenses. Even after washing your hands, the oils can linger, so gloves are well worth it.
Don’t Make It Too Smooth

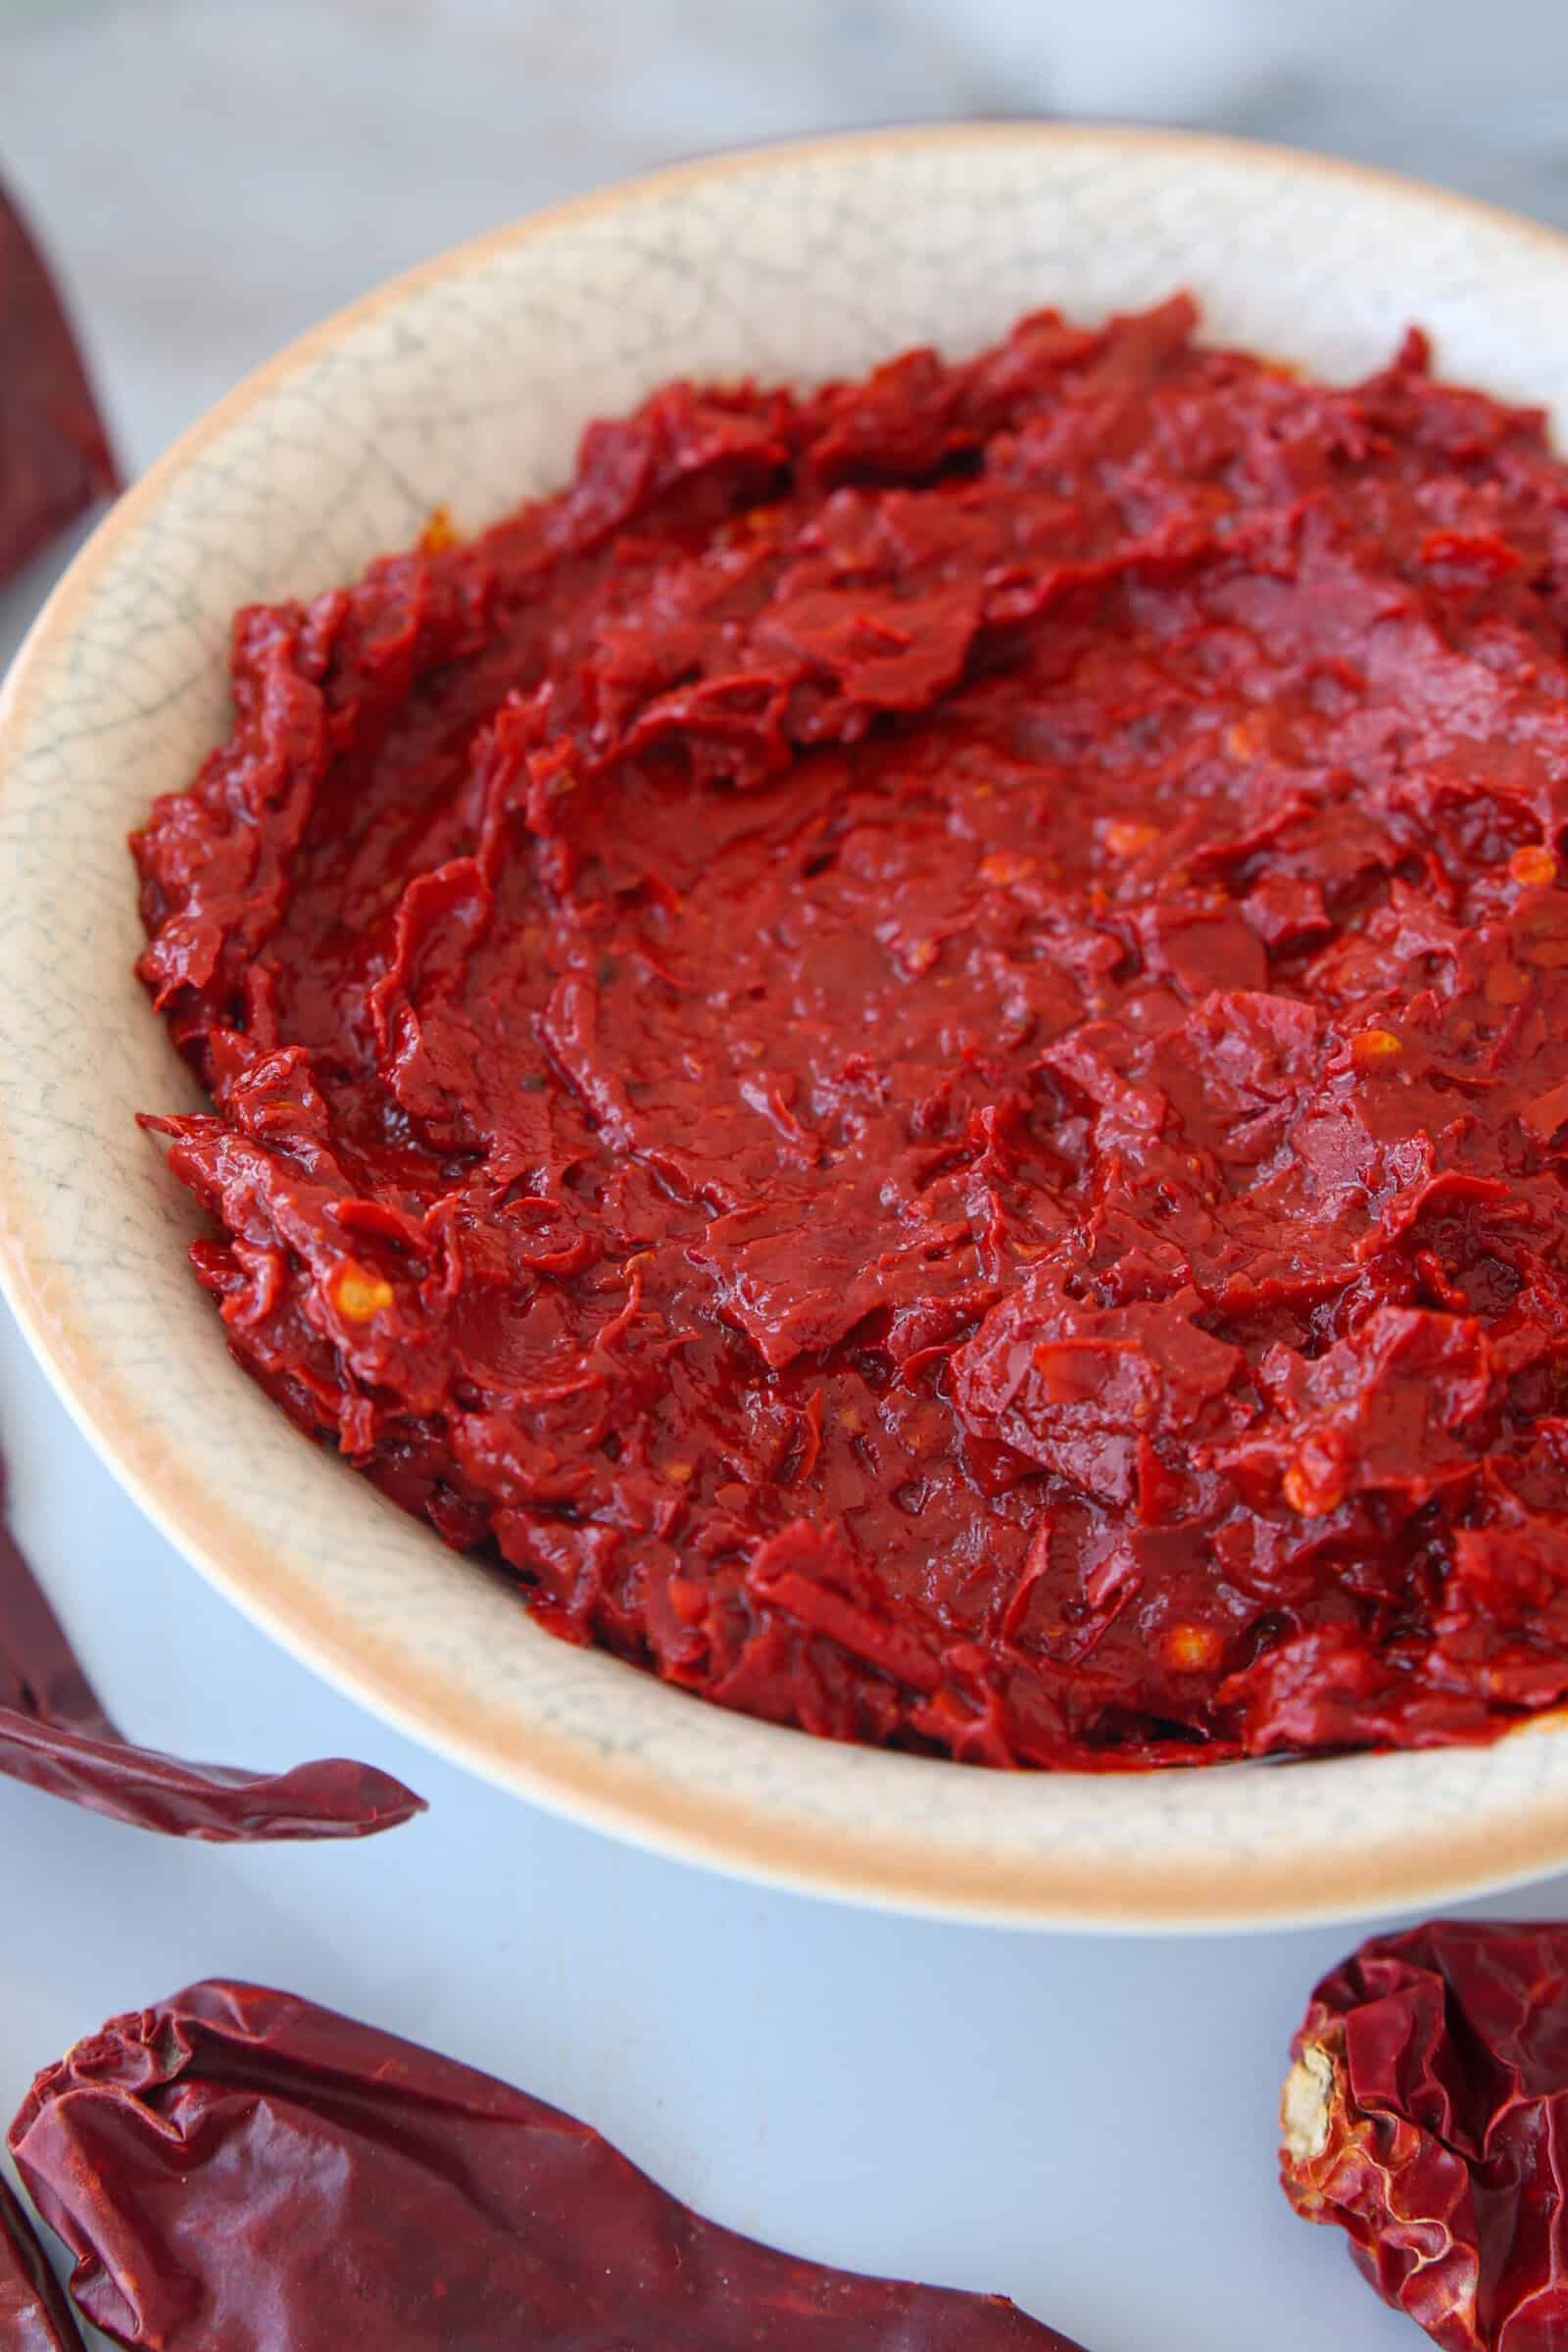
Don’t blend the harissa until it’s completely smooth. Traditional homemade harissa usually has a little texture, with tiny bits of chilies and spices that give it a more rustic look and better texture.
If you prefer a smoother spread, simply blend a little longer and add more olive oil if needed. I like a thick, spreadable paste that’s mostly smooth but still has a little texture.
Always Cover It With Olive Oil

Before storing, pour a thin layer of olive oil over the surface. This helps preserve freshness and prevents the top from drying out. After each use, simply add another thin layer if needed.
Expert Tips & Tricks
- Taste before adding more heat. After blending, taste the harissa before adding extra hot chilies. The flavors develop as it rests, and it’s much easier to add heat than to take it away.
- Don’t remove every seed. Removing most of the seeds creates a smoother, less bitter harissa, but leaving a few behind adds extra heat and a bit more texture.
- Let it rest overnight. Harissa tastes good immediately, but it tastes even better the next day. Giving it a night in the refrigerator allows the chilies, garlic, and spices to meld together.
- Use quality olive oil. Since olive oil is one of the main ingredients, choose one you enjoy the flavor of. A good extra virgin olive oil adds richness and helps tie all the flavors together.
Optional Variations & Dietary Adaptations
- Turn Up the Heat – Add more dried hot chilies, leave in some of the seeds, or use hotter varieties such as árbol or bird’s eye chilies for a fiery harissa.
- Roasted Pepper Harissa – Blend in a roasted red pepper for a sweeter, milder, and creamier spread. While this isn’t traditional, it’s a delicious variation that’s especially good as a dip or sandwich spread.
- Use Garlic Confit – Replace the raw garlic with garlic confit for a sweeter, richer, and more mellow harissa with a silky texture.
- Lemon Juice or Vinegar – I usually use fresh lemon juice because I love the bright, fresh flavor, but red wine vinegar is another traditional option that gives the harissa a slightly sharper tang.
- Add Fresh Herbs – Blend in a small handful of fresh cilantro or parsley for a brighter, herb-forward version. It won’t be as traditional, but it’s fantastic for grilled meats and vegetables.
- Naturally Vegan & Gluten-Free – This homemade harissa is naturally vegan, vegetarian, dairy-free, gluten-free, and low-carb, making it an easy way to add big flavor to almost any meal.
Ways to Use Homemade Harissa
One of my favorite things about homemade harissa is just how versatile it is. Once you have a jar in the fridge, you’ll find yourself adding it to all kinds of meals. Here are some of my favorite ways to use it:
Marinades & Grilling
Harissa is fantastic as a marinade for Baked Chicken Skewers, Shrimp Skewers, grilled fish, lamb, beef, or vegetables. You can also mix it with olive oil and brush it over chicken, seafood, or kebabs before grilling or roasting.
Sandwiches & Wraps
Spread it inside Homemade Pita Bread with Falafel, use it in wraps, burgers, sandwiches, doner kebab, or shawarma, or add a spoonful to grain bowls, rice bowls, and couscous bowls for an instant flavor boost.
Dips & Sauces
Swirl harissa into Homemade Hummus, Greek yogurt, mayonnaise, labneh, or sour cream for an easy spicy dip or sandwich spread. It also makes a delicious salad dressing when whisked with olive oil and lemon juice.
Eggs & Breakfast
Harissa and eggs are one of my favorite combinations. Add it to Shakshuka, spoon it over fried or scrambled eggs, spread it on avocado toast, mix it into omelets, or serve it alongside breakfast potatoes.
Soups, Stews & Vegetables
Stir a spoonful into lentil soup, tomato soup, chickpea stew, chili, or pasta sauce for extra depth and warmth. It’s also delicious tossed with roasted cauliflower, carrots, potatoes, zucchini, eggplant, or Brussels sprouts before roasting.
How to Store Harissa Paste
One of the great things about homemade harissa is that it keeps well, so you can make a batch and enjoy it for weeks.
- Refrigerator: Transfer the harissa to a clean, airtight glass jar and smooth the surface. Pour a thin layer of olive oil over the top before sealing. This helps preserve freshness and prevents the surface from drying out. Stored this way, homemade harissa will keep in the refrigerator for up to 3 weeks.
- After Each Use: Always use a clean spoon to avoid introducing bacteria. If needed, add another thin layer of olive oil to cover the surface before returning the jar to the refrigerator.
- Freezer: Harissa freezes beautifully. Portion it into an ice cube tray or small airtight containers, then freeze for up to 3 months. Once frozen, transfer the cubes to a freezer bag for easy storage. Thaw overnight in the refrigerator or add a cube directly to soups, stews, or sauces while cooking.
More Homemade Sauce & Dip Recipes
Homemade Harissa Recipe
Ingredients
- 120 g (120 g) Dried chilis see notes
- 10-20 g (15 g) Dried hot chilies optional (see notes)
- Boiling Water for soaking the chilies
- 3 Garlic cloves
- ½ teaspoon Salt
- 1 teaspoon Smoked paprika
- 1 teaspoon Cumin seeds
- 1 teaspoon Caraway seeds
- 1 teaspoon Coriander seeds
- 2 tablespoons (30 ml) Lemon juice
- 3-4 tablespoons (60 ml) Olive oil plus more for covering
Instructions
- Soak the chilies: Remove the stems and most of the seeds from the dried chilies. Place them in a large bowl and cover with boiling water. Let soak for 20–30 minutes, or until softened and pliable.
- Toast the spices: Meanwhile, toast the cumin seeds, caraway seeds, and coriander seeds in a dry pan over medium heat for 1–2 minutes, until fragrant. Let cool slightly, then grind using a mortar and pestle or spice grinder. See notes.
- Prepare the chilies: Drain the soaked chilies well. Cut them open and remove most of the seeds. This step is optional, but recommended for better control over the spice level and for a smoother, less bitter harissa. Leaving some seeds will create a spicier paste.
- Blend: Transfer the chilies to a food processor or blender. Add the garlic, salt, smoked paprika, toasted spices, lemon juice or vinegar, and 1 tablespoon of olive oil.
- Blend until mostly smooth, scraping down the sides as needed. Gradually add more olive oil, 1 tablespoon at a time, until the harissa reaches your desired consistency. The paste should be thick, rich, and spreadable, not thin or runny.
- Store: Transfer the harissa to a clean jar and smooth the top. Cover with a thin layer of olive oil to help preserve freshness.
Video
Notes
- Control the heat: This recipe lets you fully customize the spice level. The mild (or sweet) dried chilies create the base flavor, color, and texture, while the hot chilies mainly add heat.
- Oil: Add the olive oil gradually while blending. Harissa should have a thick consistency, not a thin sauce-like texture. The oil also helps preserve the paste and improves the flavor over time.
- Use gloves: Hot chilies can irritate your skin and eyes. It’s highly recommended to wear gloves while handling and deseeding the chilies.
- Dried chilis vs. fresh chilies: Traditional harissa is commonly made with dried chilies, which create a deeper, smokier, and more concentrated flavor. Some versions also include fresh chilies for a brighter, fresher heat, but dried chilies are the more traditional and common choice.
- Garlic: For a deeper, sweeter, and more mellow flavor, you can replace the raw garlic with garlic confit. It creates a smoother, richer harissa with less sharpness.
- Roasted pepper? Some modern or Western-style harissa recipes include roasted red peppers or even tomato paste. While delicious, they are not traditionally used in authentic harissa. That said, you can add roasted peppers for a sweeter, milder, and creamier version.
- Best chilies for harissa: A combination of chilies usually gives the best flavor. Good options include guajillo, ancho, New Mexico, árbol, or Kashmiri chilies. Mixing mild and hot varieties creates a balanced harissa.
- Spices: For the best flavor, I highly recommend using whole spices, toasting them lightly, and grinding them yourself. It creates a much fresher and more aromatic harissa. However, store-bought ground spices work perfectly fine if that’s what you have on hand.
- Seeds: If you prefer a spicier harissa, don’t remove all the seeds. Leaving some seeds inside will increase the heat significantly.
- Storage: Store in an airtight jar in the refrigerator for up to 3 weeks. Always keep the surface covered with a thin layer of olive oil to help prevent spoilage. Even after scooping some out, add a little more oil to cover the top again.
Nutrition
FAQs
Not necessarily. One of the biggest advantages of making harissa at home is that you control the heat. Use mostly mild dried chilies for the base, then adjust the spice level by adding more or fewer hot chilies and leaving in some of the seeds if you like extra heat.
Harissa paste is thick, concentrated, and packed with flavor. Harissa sauce is usually thinner and often contains additional oil, vinegar, or water. Homemade harissa is typically made as a paste, which you can easily thin with olive oil or lemon juice if you want a sauce.
You can, but the flavor will be different. Traditional harissa is made with dried chilies, which create a deeper, richer, and slightly smoky flavor. Fresh chilies produce a brighter, fresher-tasting paste with a thinner consistency.
Absolutely. Harissa freezes very well for up to 3 months. I like freezing it in ice cube trays so I can thaw just the amount I need for marinades, soups, or sauces.
 for Tiramisu & More")


")

Please identify the seeds that are listed in ingredient #7, “Ground Seeds.” Based on instructions, and by process of elimination, I think it should read, “Ground Cumin Seeds,” but I’d like to be certain before I try this. Thanks much!
You’re absolutely right, it should say cumin seeds. Thanks so much for catching that! I’ve just fixed the typo in the recipe. 😊
As someone who loves making homemade kitchen staples like tomato sauce, basil pesto, and even tahini paste, I absolutely love recipes like this. They’re so useful, and I’m really happy you finally shared a harissa recipe, I’ve been waiting for this one! I’m a big fan of harissa and love spicy food.
Thanks for the easy-to-follow instructions and all the great tips!