Best Homemade Hummus | Creamy and Authentic
This post may contain affiliate links.
As a Middle Easterner who grew up on hummus, my homemade hummus recipe with dried chickpeas is near and dear to my heart. It’s something I’ve made at least once every few weeks for over a decade. This creamy, dreamy dip comes together with just 6 basic ingredients and very little active work, perfect for scooping with flatbread, dipping veggies, and more!

One of my favorite weeknight hacks is building a mezze platter for a Middle Eastern-style “snack dinner.” Between this easy homemade hummus, authentic baba ganoush, vibrant tabbouleh, hearty dolma, and fresh pita bread, all the bases are covered! Better yet, they can all be made ahead of time, so when your tummy starts grumbling all you have to do is dish it all out.
Fun fact: the word hummus literally means “chickpeas” in both Arabic and Hebrew. So when we say “hummus,” we’re really just saying “chickpea spread.”
Ingredients & Substitutions
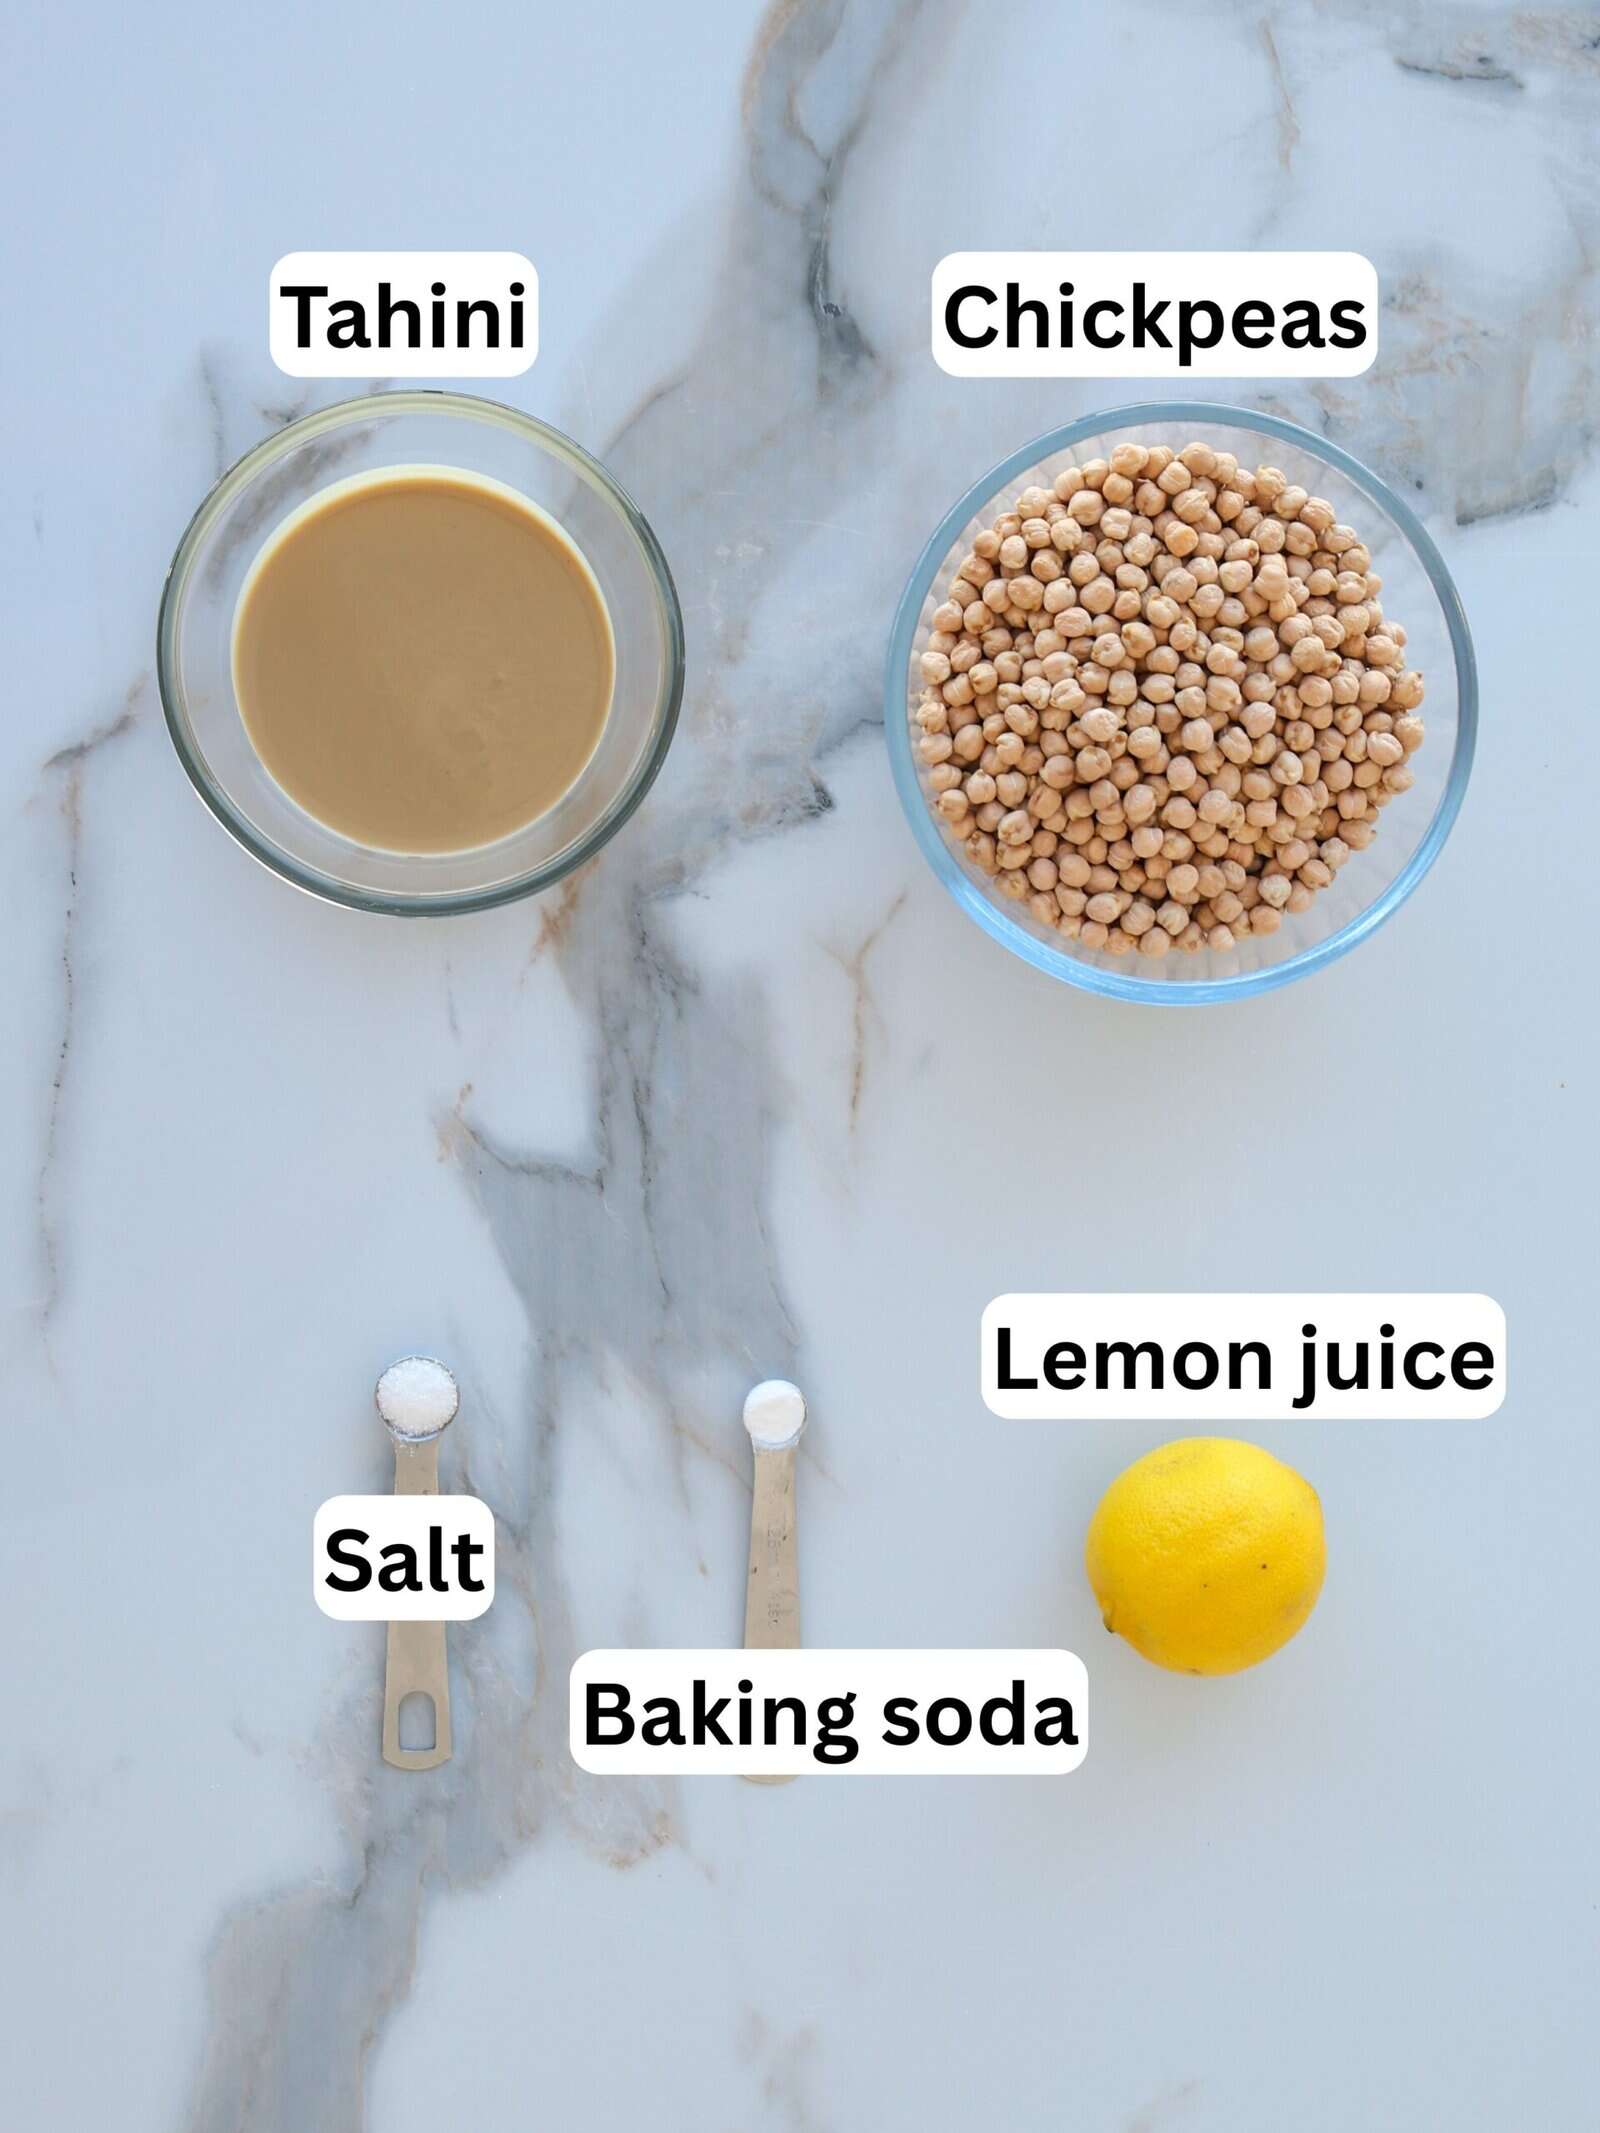
- Dried Chickpeas – I personally prefer cooking my own chickpeas for making hummus, particularly because I can get the smaller, creamier Mediterranean variety which aren’t usually sold in cans. That said, canned garbanzos work, too. Read on below for more information.
- Baking Soda – While commonly used as a leavener in baking, baking soda is actually a secret weapon for making hummus. It helps to soften the chickpeas considerably, resulting in a creamier, smoother hummus. Simply rinse the beans when they are done cooking to remove any residual flavor.
- Lemon Juice – Fresh lemon makes the flavor bright and clean; bottled juice can taste bitter.
- Tahini Paste – Making homemade tahini is simple to do, but you’re welcome to use store-bought for convenience.
- Salt – Because every dish needs a little seasoning! Use kosher or sea salt and adjust to taste.
- Cooking Liquid & Ice cubes – A splash of cold water (or chickpea cooking liquid) helps everything blend super smooth. Toss in 1–2 ice cubes for that extra creamy, fluffy finish.
- Garlic – Optional, but delicious for an added layer of flavor. Make sure you’re using fresh garlic instead of the jarred minced kind for the best results.
This is just a short review of the ingredients; for the complete recipe, including quantities, scroll down to the recipe card 👇
How to Make Homemade Hummus
Watch the full video recipe to learn how to make the BEST Homemade Hummus recipe.
Prefer the written recipe? Scroll down to the recipe box 👇
Choosing & Preparing Chickpeas for the Best Hummus

Hummus may be simple, just chickpeas, tahini, lemon, salt, and sometimes garlic, but the way you prepare the chickpeas makes all the difference. Ultra-smooth hummus starts with very soft beans, while undercooked chickpeas often lead to a grainy texture.
For the creamiest result, look for smaller chickpeas, often labeled Middle Eastern or Mediterranean varieties. They usually have thinner skins and a creamier interior, so you can often skip peeling and still get silky hummus.
Dried vs. Canned Chickpeas
Cooking chickpeas from scratch gives you the most control over texture. Soak overnight and simmer until very tender, soft enough to mash easily between your fingers, for ultra-smooth hummus.
Canned chickpeas are convenient and perfectly acceptable. Simply drain, rinse, and simmer them in fresh water for 10–15 minutes before blending to soften the beans and improve texture.
Whichever you use, adding a small pinch of baking soda while cooking helps soften the skins and improves smoothness. For best balance, use about 250–265 g (roughly 1½ cups) cooked chickpeas. Too few makes hummus overly tahini-forward; too many can make it thick and pasty.
Do You Need to Peel Chickpeas?
If you’re using smaller, thin-skinned chickpeas, peeling isn’t necessary. But for ultra-luxurious, restaurant-style hummus, removing skins, especially from canned beans, can make it even smoother.
To peel, gently pinch each chickpea so the skin slips off, or rub them between your hands in a bowl of water so the skins float up and can be skimmed away.
Homemade Hummus: Step-By-Step
Making homemade hummus is easier than you think. The photos below show how to make hummus completely from scratch using dried chickpeas. Short on time? You can absolutely use canned chickpeas and skip the soaking and cooking, both methods work beautifully. See the full instructions in the recipe card below.


Optional Variations & Dietary Adaptations
- Tahini-Free – If you’re avoiding sesame (or have a sesame allergy), substitute tahini with unsweetened sunflower seed butter or even plain Greek yogurt for a different but still creamy result.
- Roasted Garlic – Swap raw garlic for a whole head of roasted garlic or garlic confit. The flavor becomes mellow, sweet, and slightly caramelized, perfect if you prefer less sharpness and more depth.
- Lemon Lovers’ – Add extra lemon zest and an additional tablespoon of fresh lemon juice for a brighter, more citrus-forward version. This pairs well with grilled vegetables, fish, or warm pita.
- Spicy – Blend in a pinch of cayenne, smoked paprika, or a spoonful of harissa for heat. You can also swirl chili oil on top before serving for color and kick. Not a fan of heat but still like spice? Add cumin or paprika while blending or sprinkle spices on top for extra flavor.
- Herby – Add a handful of fresh parsley, cilantro, or dill to the blender for a vibrant green, herbaceous twist. This works especially well in spring and summer spreads.
- Roasted Red Pepper – Blend in ½ cup roasted red peppers (well drained) for sweetness and smoky flavor. You may need to slightly reduce added liquid to maintain thickness.
Expert Tips & Tricks
- Cook Extra & Freeze – Since cooking dried chickpeas takes time, make a large batch and freeze portions for later. Once fully cooked and cooled, divide into measured portions and freeze in airtight bags or containers. When you’re ready to make hummus, simply thaw and blend. They’re also perfect for tossing into salads, soups, stews, and grain bowls, future you will be grateful.
- Notes on Tahini – Great hummus depends on great tahini. Look for smooth, pourable tahini that tastes balanced, not bitter. Stir the jar thoroughly before measuring, as the oil naturally separates. The amount is flexible and comes down to preference: More tahini (½–¾ cup / 120–180 g) = richer, creamier, slightly nuttier hummus. Less tahini = lighter texture with more pronounced chickpea flavor.
- On Liquid & Ice – Reserved chickpea cooking liquid adds subtle flavor and extra creaminess, but cold water works beautifully too. For ultra-fluffy hummus, blend in 1-2 ice cubes while processing. The cold temperature helps emulsify the mixture and creates a lighter, smoother texture.
- Keep on Blending – Most people stop too soon. Let your food processor run for several minutes, scraping down the sides as needed. Hummus transforms from slightly grainy to silky as it fully emulsifies.
- Taste & Adjust – Once fully blended, taste and adjust salt, lemon, and garlic. Hummus flavors mellow as it rests, so don’t be afraid to brighten it slightly before chilling.
- Serving Tip – For the best texture, let hummus sit at room temperature for 20–30 minutes before serving. Finish with good olive oil, a sprinkle of paprika or sumac, and a few whole chickpeas for a classic restaurant-style presentation.
How to Serve Hummus
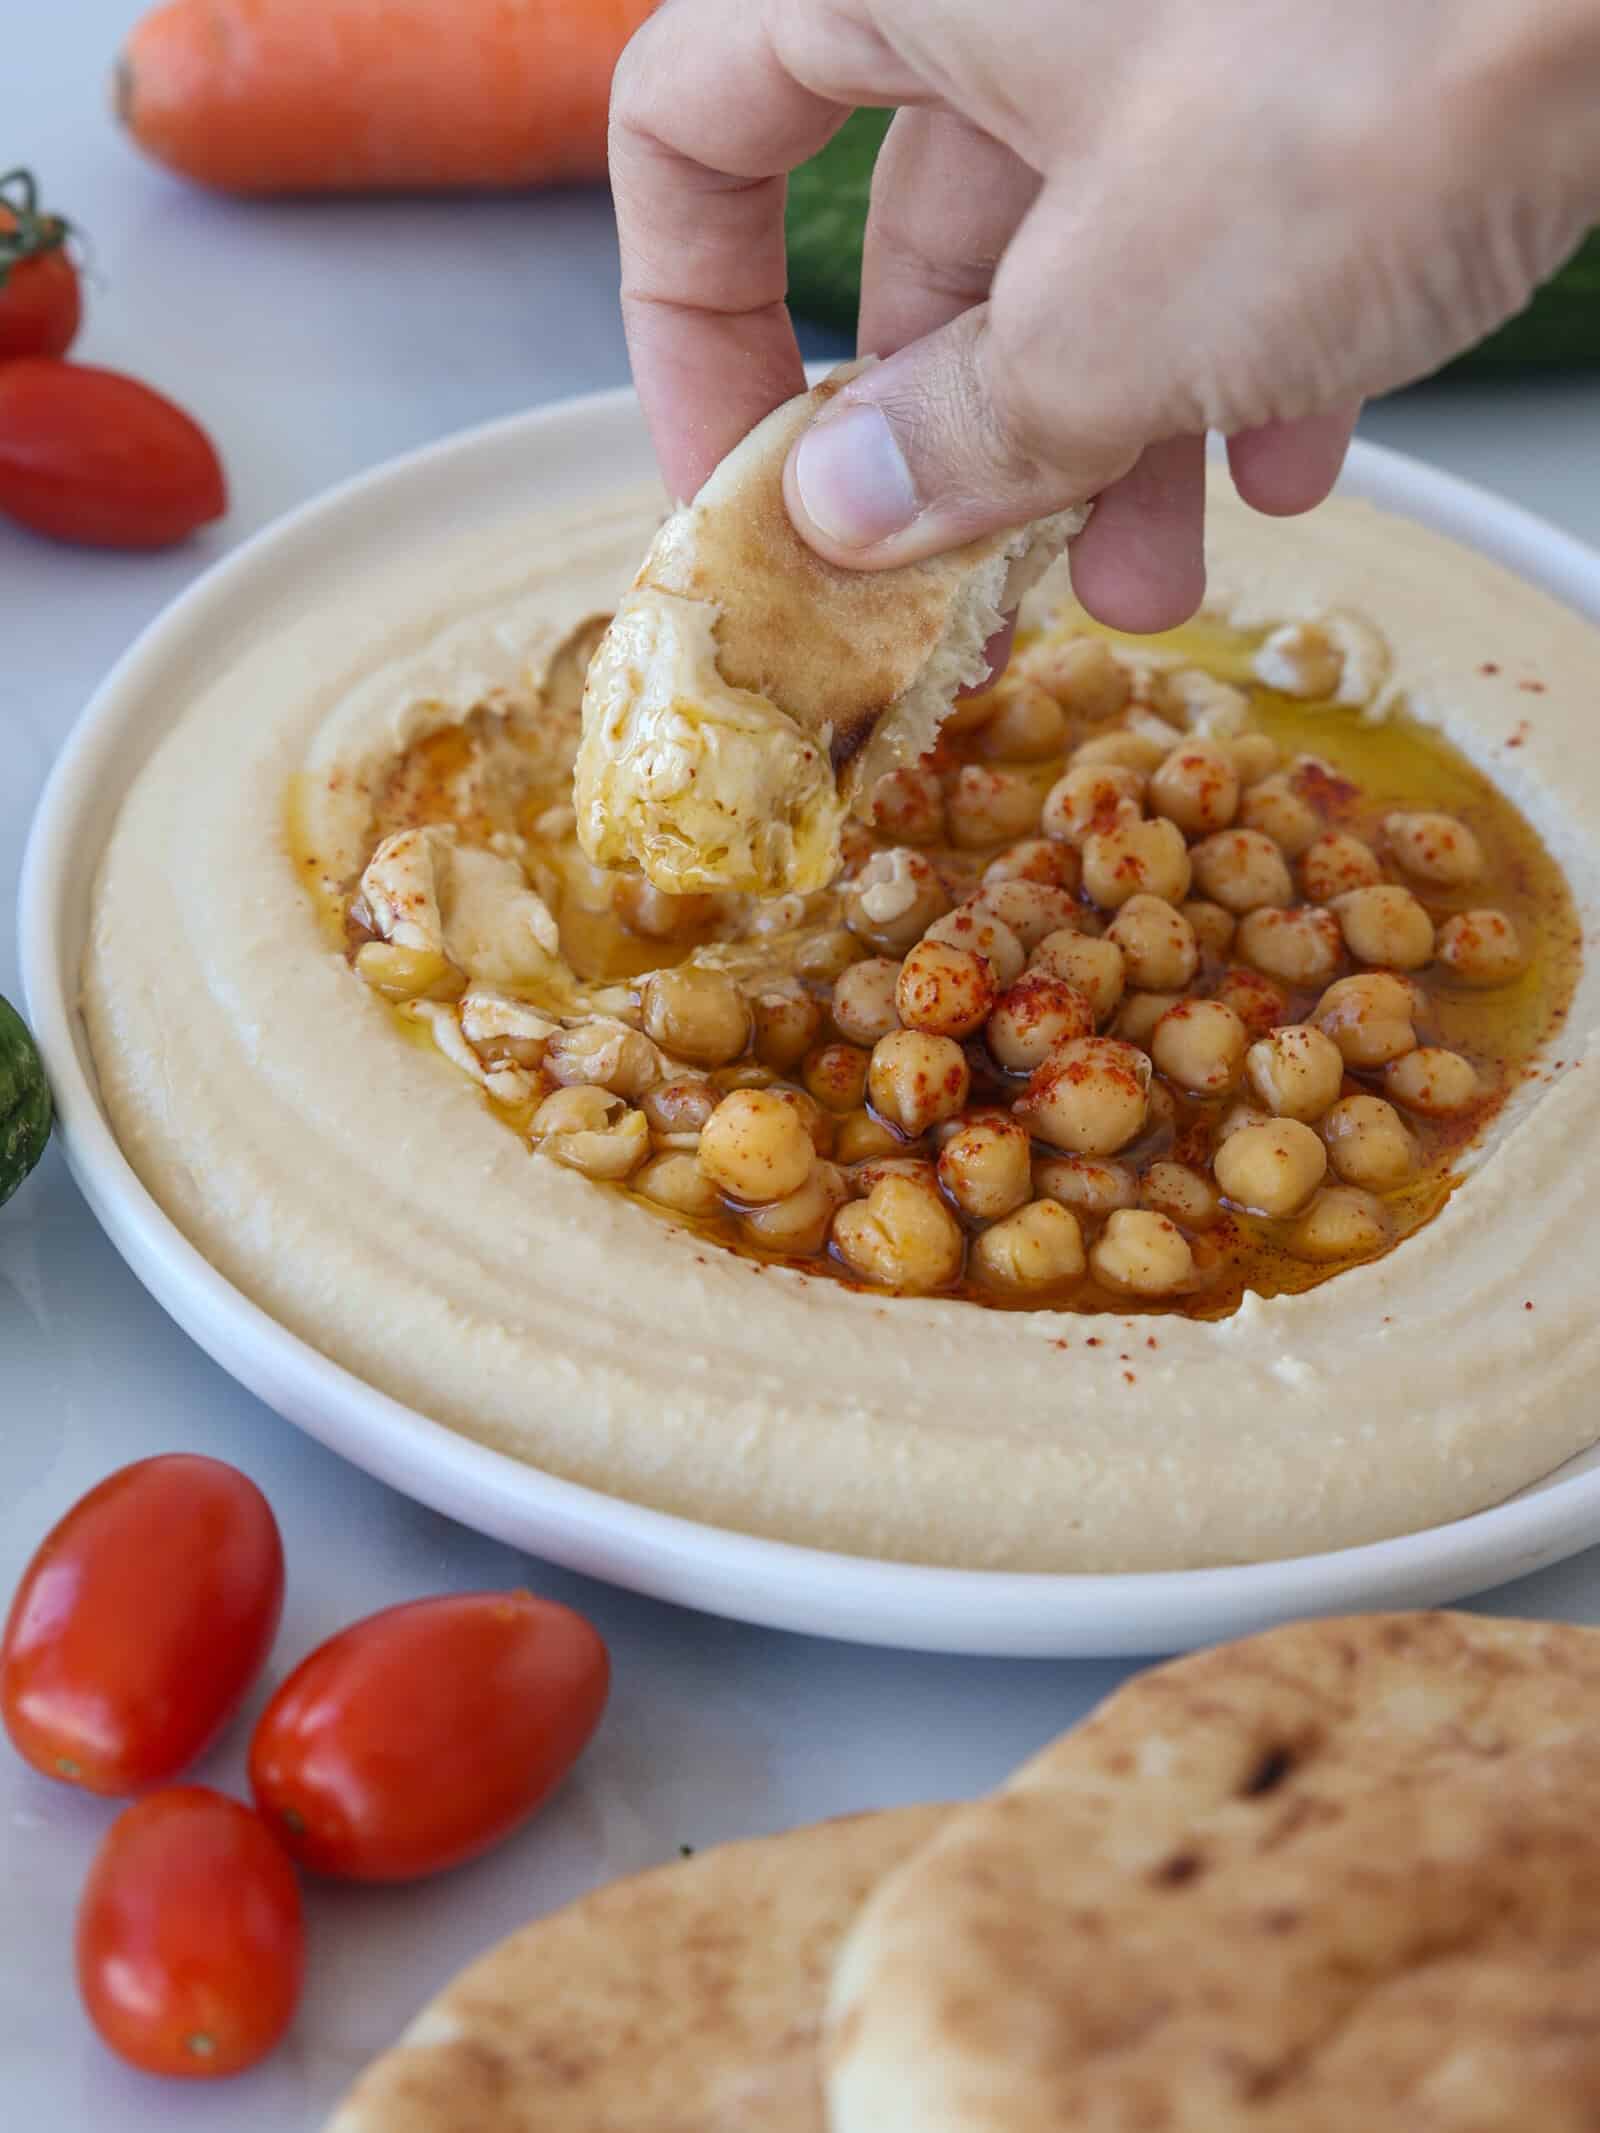
For a classic presentation, spread the hummus onto a wide, shallow plate and use the back of a spoon to create swirls. Drizzle generously with olive oil or tahini sauce, then add your favorite toppings. A sprinkle of paprika, chopped fresh parsley, and a handful of whole chickpeas instantly make it Instagrammable. For something more substantial, try topping it with:
- Boiled eggs (halved or sliced)
- Toasted pine nuts for crunch
- Sautéed mushrooms or roasted veggies for earthy depth
- Caramelized onions for sweetness
- Olives or feta for briny tang
- Crispy falafel
- Warm, spiced ground meat or baked chicken Kabobs
Pair chickpea hummus with warm pita, flatbread, or fresh baguette. It also works beautifully with crunchy vegetables like cucumbers, carrots, radishes, and bell peppers for a lighter option.


How to Store Hummus
- Refrigerator: Transfer the hummus to an airtight container and smooth the surface. Drizzle a thin layer of olive oil over the top before sealing to help prevent it from drying out. Store in the refrigerator for up to 4-5 days. If it thickens, stir in a little water or lemon juice before serving to bring back the creamy texture. If liquid separates slightly during storage, simply stir before serving.
- Freezing: Hummus can be frozen for up to 3 months. Place it in a freezer-safe container, leaving a little space at the top for expansion. For best texture, freeze without fresh toppings. Thaw overnight in the refrigerator, then stir well and adjust seasoning or lemon juice if needed.
- Let it rest: Hummus tastes best slightly softened, not ice-cold. Let it sit at room temperature for about 20-30 minutes before serving, then refresh with a drizzle of olive oil and your favorite toppings.
More Dip & Spread Recipes
More Classic Middle Eastern Recipes

Best Homemade Hummus | Creamy and Authentic
Equipment
Ingredients
For cooking the chickpeas:
- ¾ cup (120 g) Dried chickpeas or 250–265 g cooked chickpeas (such as canned), drained
- 1 teaspoon Baking soda *read notes
- Water for soaking and cooking
For the hummus:
- 1½ cup (250 g) Cooked chickpeas homemade cooked or canned (250-265g)
- 3-4 tablespoons (45 ml) Lemon juice
- ½ cup (120 g) Tahini paste adjust to taste (read notes)
- 1 teaspoon Salt adjust to taste
- ⅓ cup (80 ml) Cooking liquid or cold water adjust as needed
Optional:
- 1 clove Garlic
- 2-3 Ice cubes
Instructions
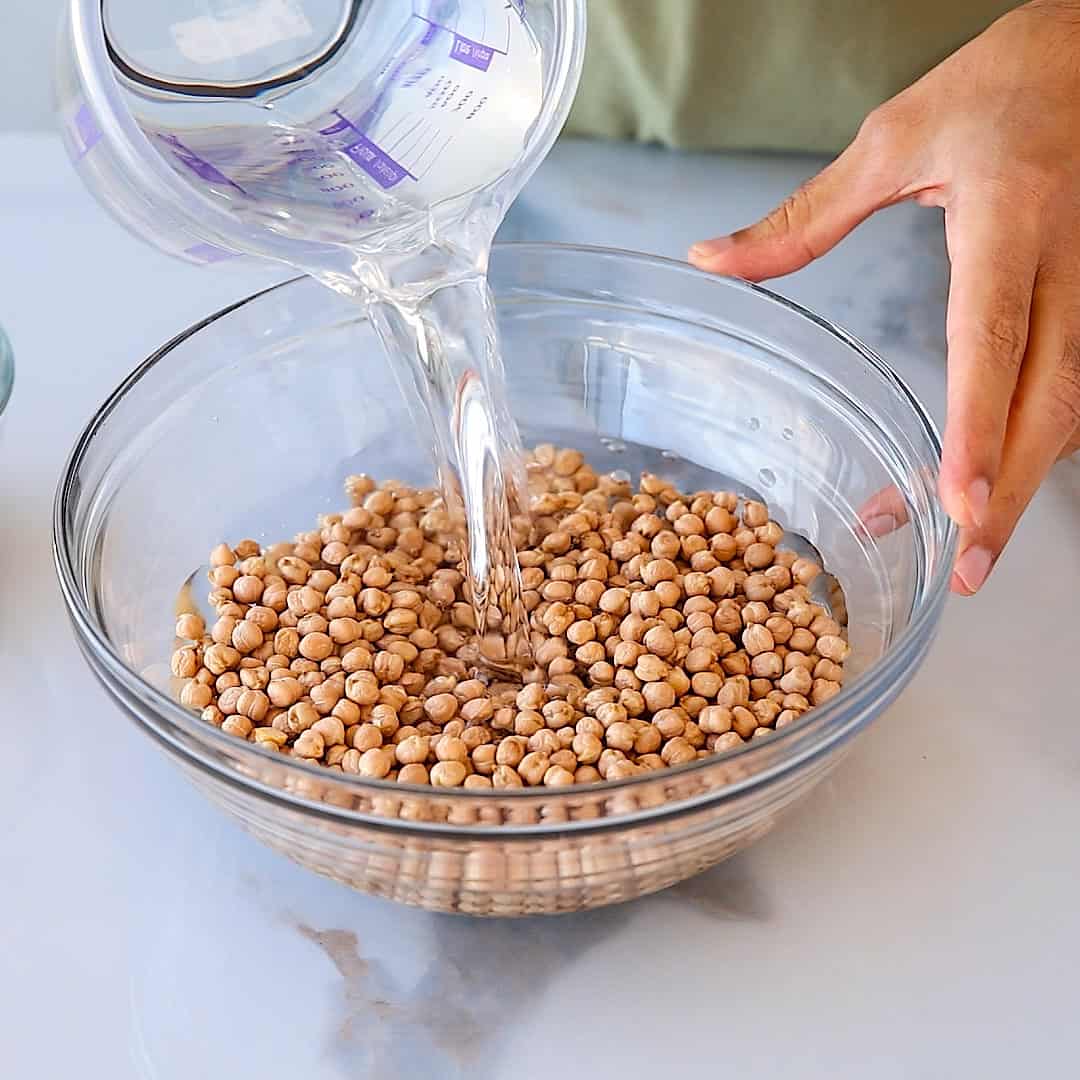
- Soak the Chickpeas (skip if using canned): Place chickpeas in a large bowl and cover with plenty of water. Soak overnight (8–12 hours). They will double in size.
- Cook the Chickpeas: Drain, transfer to a pot, cover with fresh water, and add baking soda. Bring to a boil, skim foam, then simmer 90–120 minutes, until chickpeas are extremely soft and mash easily between fingers. Reserve some cooking liquid, then drain.
- Measure 1½ cups (250–265g) cooked chickpeas for the hummus.
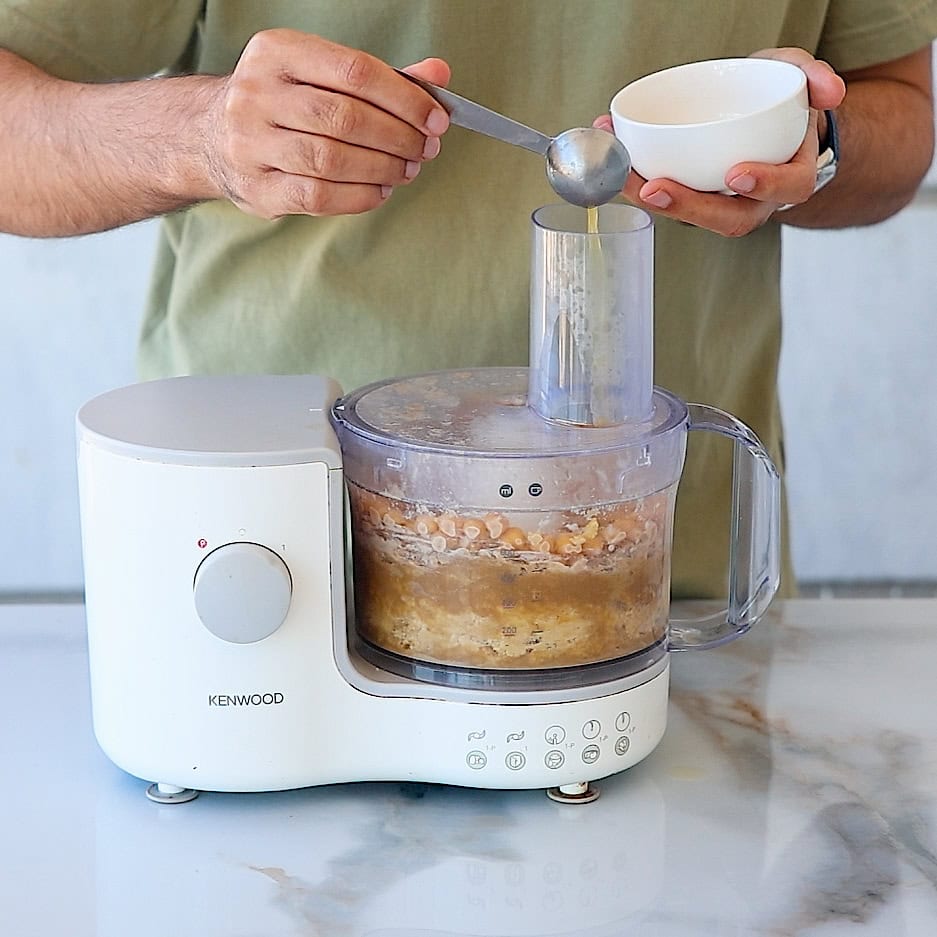
- Blend: In a food processor, blend tahini and lemon juice for about 30 seconds until lighter and creamy. Add cooked chickpeas, salt, and optional garlic. Blend 1–2 minutes, scraping sides as needed, until smooth.
- Adjust Texture: With the processor running, slowly add cooking liquid or cold water until silky and creamy. At this stage you also can add a few ice cubes for a fluffier hummus (read notes). Hummus should be slightly loose; it thickens in the fridge.
- Serve: Spread hummus on a plate, drizzle with olive oil, and garnish as desired (see serving suggestions section). Serve with warm pita or vegetables.
Video
Notes
- Chickpea types: choose smaller chickpeas (often labeled as Middle Eastern or Mediterranean chickpeas). Smaller beans have thinner skins and a creamier interior, which results in smoother, silkier hummus without needing to peel them individually.
- Dried vs canned chickpeas (and the amount that matters): This recipe works both ways: you can cook chickpeas from scratch or use canned, pre-cooked chickpeas. In both cases, what really matters is using about 250–265 g cooked chickpeas for the correct hummus texture. If using canned chickpeas, simply drain, rinse, and optionally simmer them for 10–15 minutes to soften before blending.
- Cook extra and freeze: Since cooking chickpeas takes time, it’s a good idea to cook a large batch and freeze portions for later. Once cooked, divide chickpeas into portions and freeze. Whenever you want to make hummus, simply thaw and blend, or use them for salads, stews, and other chickpea dishes.
- Tahini quality & quantity: Great hummus depends on good tahini. Use smooth, pourable tahini you enjoy the taste of. The amount can vary based on personal preference: more tahini makes hummus richer, creamier, and slightly more nutty, while less tahini gives a lighter chickpea flavor. Most people prefer ½–¾ cup (120–180 g), so feel free to experiment and find your favorite balance.
- Cooking liquid, water & ice cubes: Reserved chickpea cooking liquid adds flavor and creaminess, but cold water works perfectly too. For extra fluffy hummus, many cooks blend in 1–2 ice cubes, which helps create a lighter, smoother texture.
- Baking soda: Baking soda helps break down chickpea skins and softens the beans faster, creating creamier hummus. Don’t add too much, just a small amount is enough. Rinse chickpeas well after cooking to remove any residual flavor.
- Garlic: Traditional hummus sometimes includes garlic. 1 clove to the blender for a mild flavor, or more if you like it stronger. For a gentler taste, roast the garlic first.
- Pressure cooker: To speed things up, cook soaked chickpeas in a pressure cooker for about 30-40 minutes with baking soda, then allow natural pressure release. The chickpeas should still be very soft for the best texture.
- Spices: Classic hummus is simple, but you can add cumin or paprika while blending or sprinkle spices on top for extra flavor.
- Topping: Finish hummus with a generous drizzle of tahini sauce, olive oil, plus toppings like paprika, chopped parsley, whole chickpeas, boiled eggs, toasted pine nuts, sautéed mushrooms, caramelized onions, falafel or even spiced ground meat.
- Storage: Store hummus in an airtight container in the refrigerator for up to 3-4 days. If it thickens, stir in a little water or lemon juice before serving to bring back the creamy texture.
FAQs
The secret to good hummus is very soft chickpeas and proper blending. Cook the chickpeas until they’re extremely tender, then blend long enough for a silky, whipped texture. Use high-quality tahini, fresh lemon juice, and enough liquid (water or cooking liquid) to create a smooth, creamy consistency.
After about 5-7 days, hummus can start to spoil because it’s a moist, protein-rich food that is an ideal environment for bacteria to grow, even in the refrigerator. Over time, you may notice sour smells, visible mold, separation, or an off taste. While it might look fine, harmful bacteria aren’t always visible. For safety and best quality, homemade hummus is generally recommended to be eaten within 4-5 days and stored in an airtight container in the fridge.
Heck yeah, it is! Homemade hummus is fresher, creamier, and fully customizable. You control the tahini quality, lemon brightness, garlic level, salt, and texture, so it tastes vibrant rather than overly thick or acidic like some store-bought versions. It’s also often more economical, especially if you cook chickpeas in bulk. The only “cost” is a little time, but once you taste ultra-smooth, freshly blended hummus, it’s hard to go back.
Traditionally, classic hummus includes tahini. It adds richness, creaminess, and a slightly nutty depth that balances the chickpeas and lemon. That said, you can make hummus without tahini. If you’re avoiding sesame, you can substitute sunflower seed butter, Greek yogurt, or even a bit of extra olive oil for creaminess, just know the flavor profile will shift slightly.
Chickpeas that aren’t cooked long enough or blending too briefly are the most common reasons. Softer beans and longer blending produce smoother hummus.
Ice cubes help emulsify the hummus while blending, creating a lighter, fluffier, and smoother texture.
")
")

")
")


Priceless video, thank you so much! I love all your recipes!!!!
perfect recipe.
Great recipe. Honestly, I don’t have time to soak and cook the chickpeas, so I just use canned chickpeas and boil them for 15 minutes to soften them up, exactly as you suggested, and it turns out perfect.