Healthy Chocolate Peanut Butter Bars with Oats
This post may contain affiliate links.
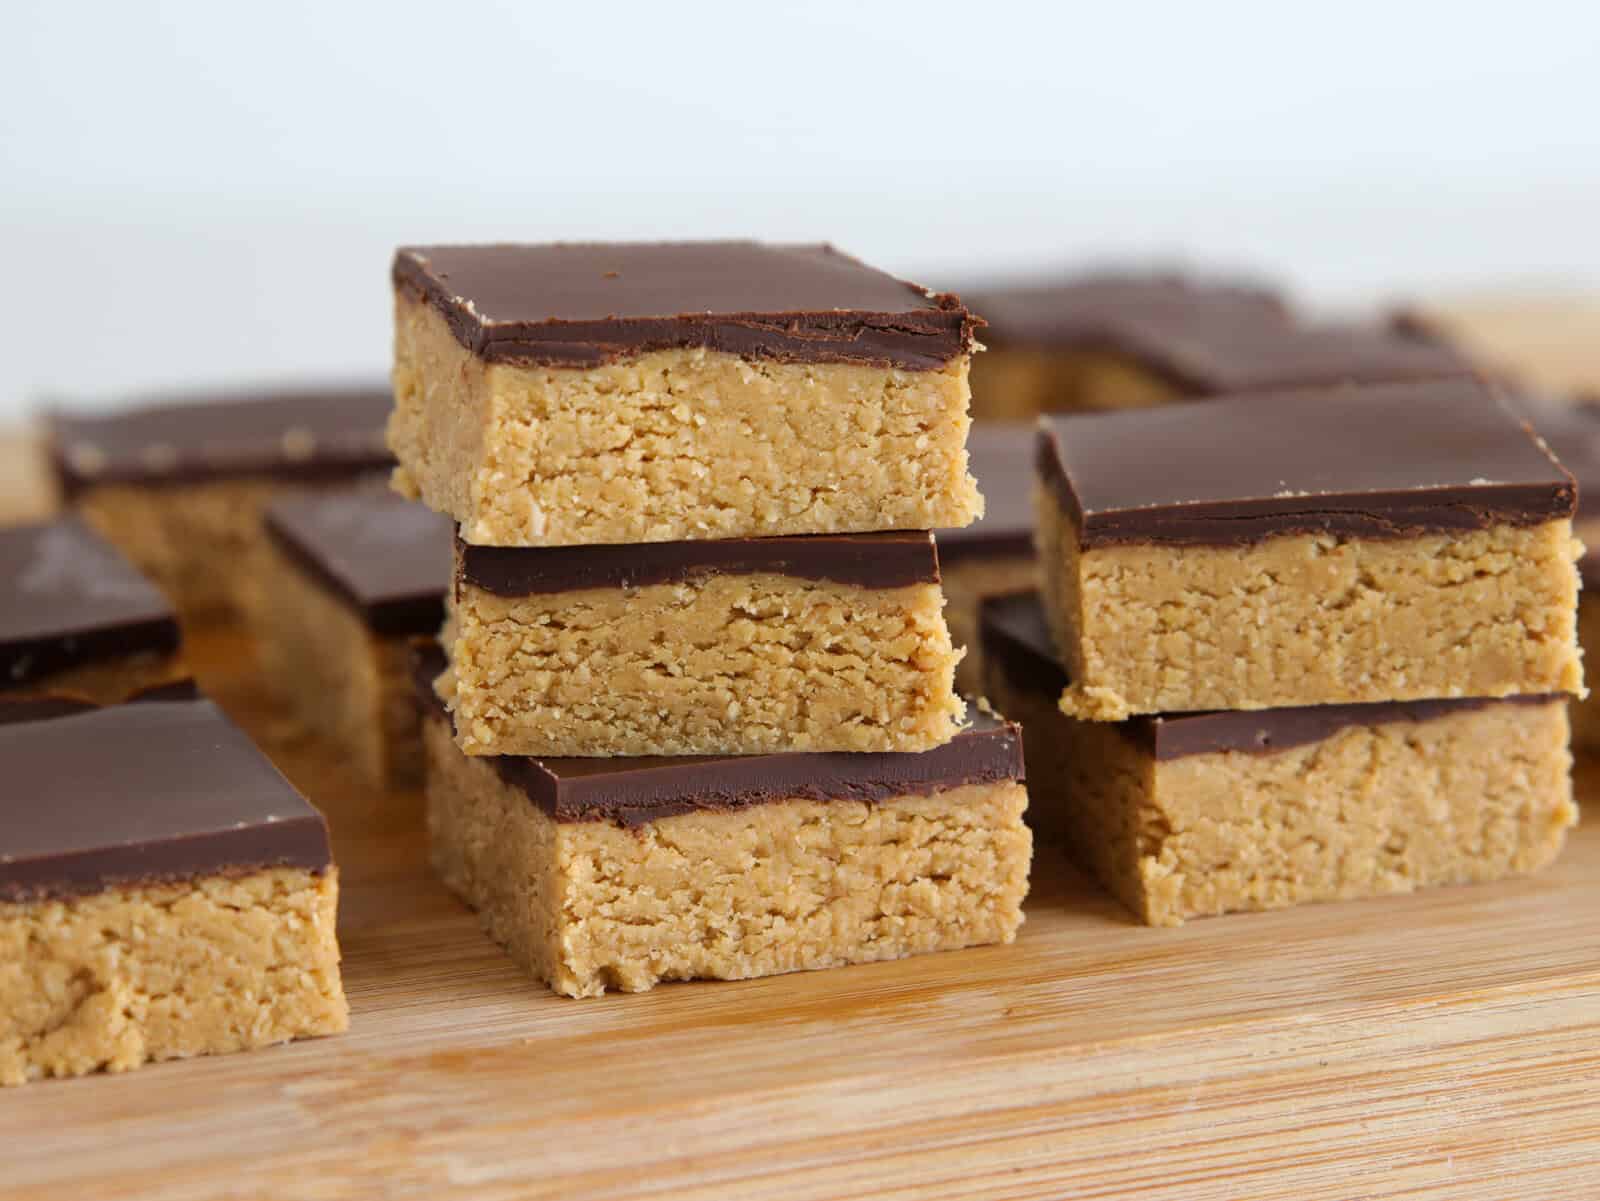
These easy No-Bake Chocolate Peanut Butter Bars are salty-sweet, naturally vegan and gluten-free. Better yet, they’re made in just 15 minutes with only 7 ingredients! Plus, with 10 grams of protein and 4 grams of fiber per serving, they’re pretty nutritious. What’s not to love?
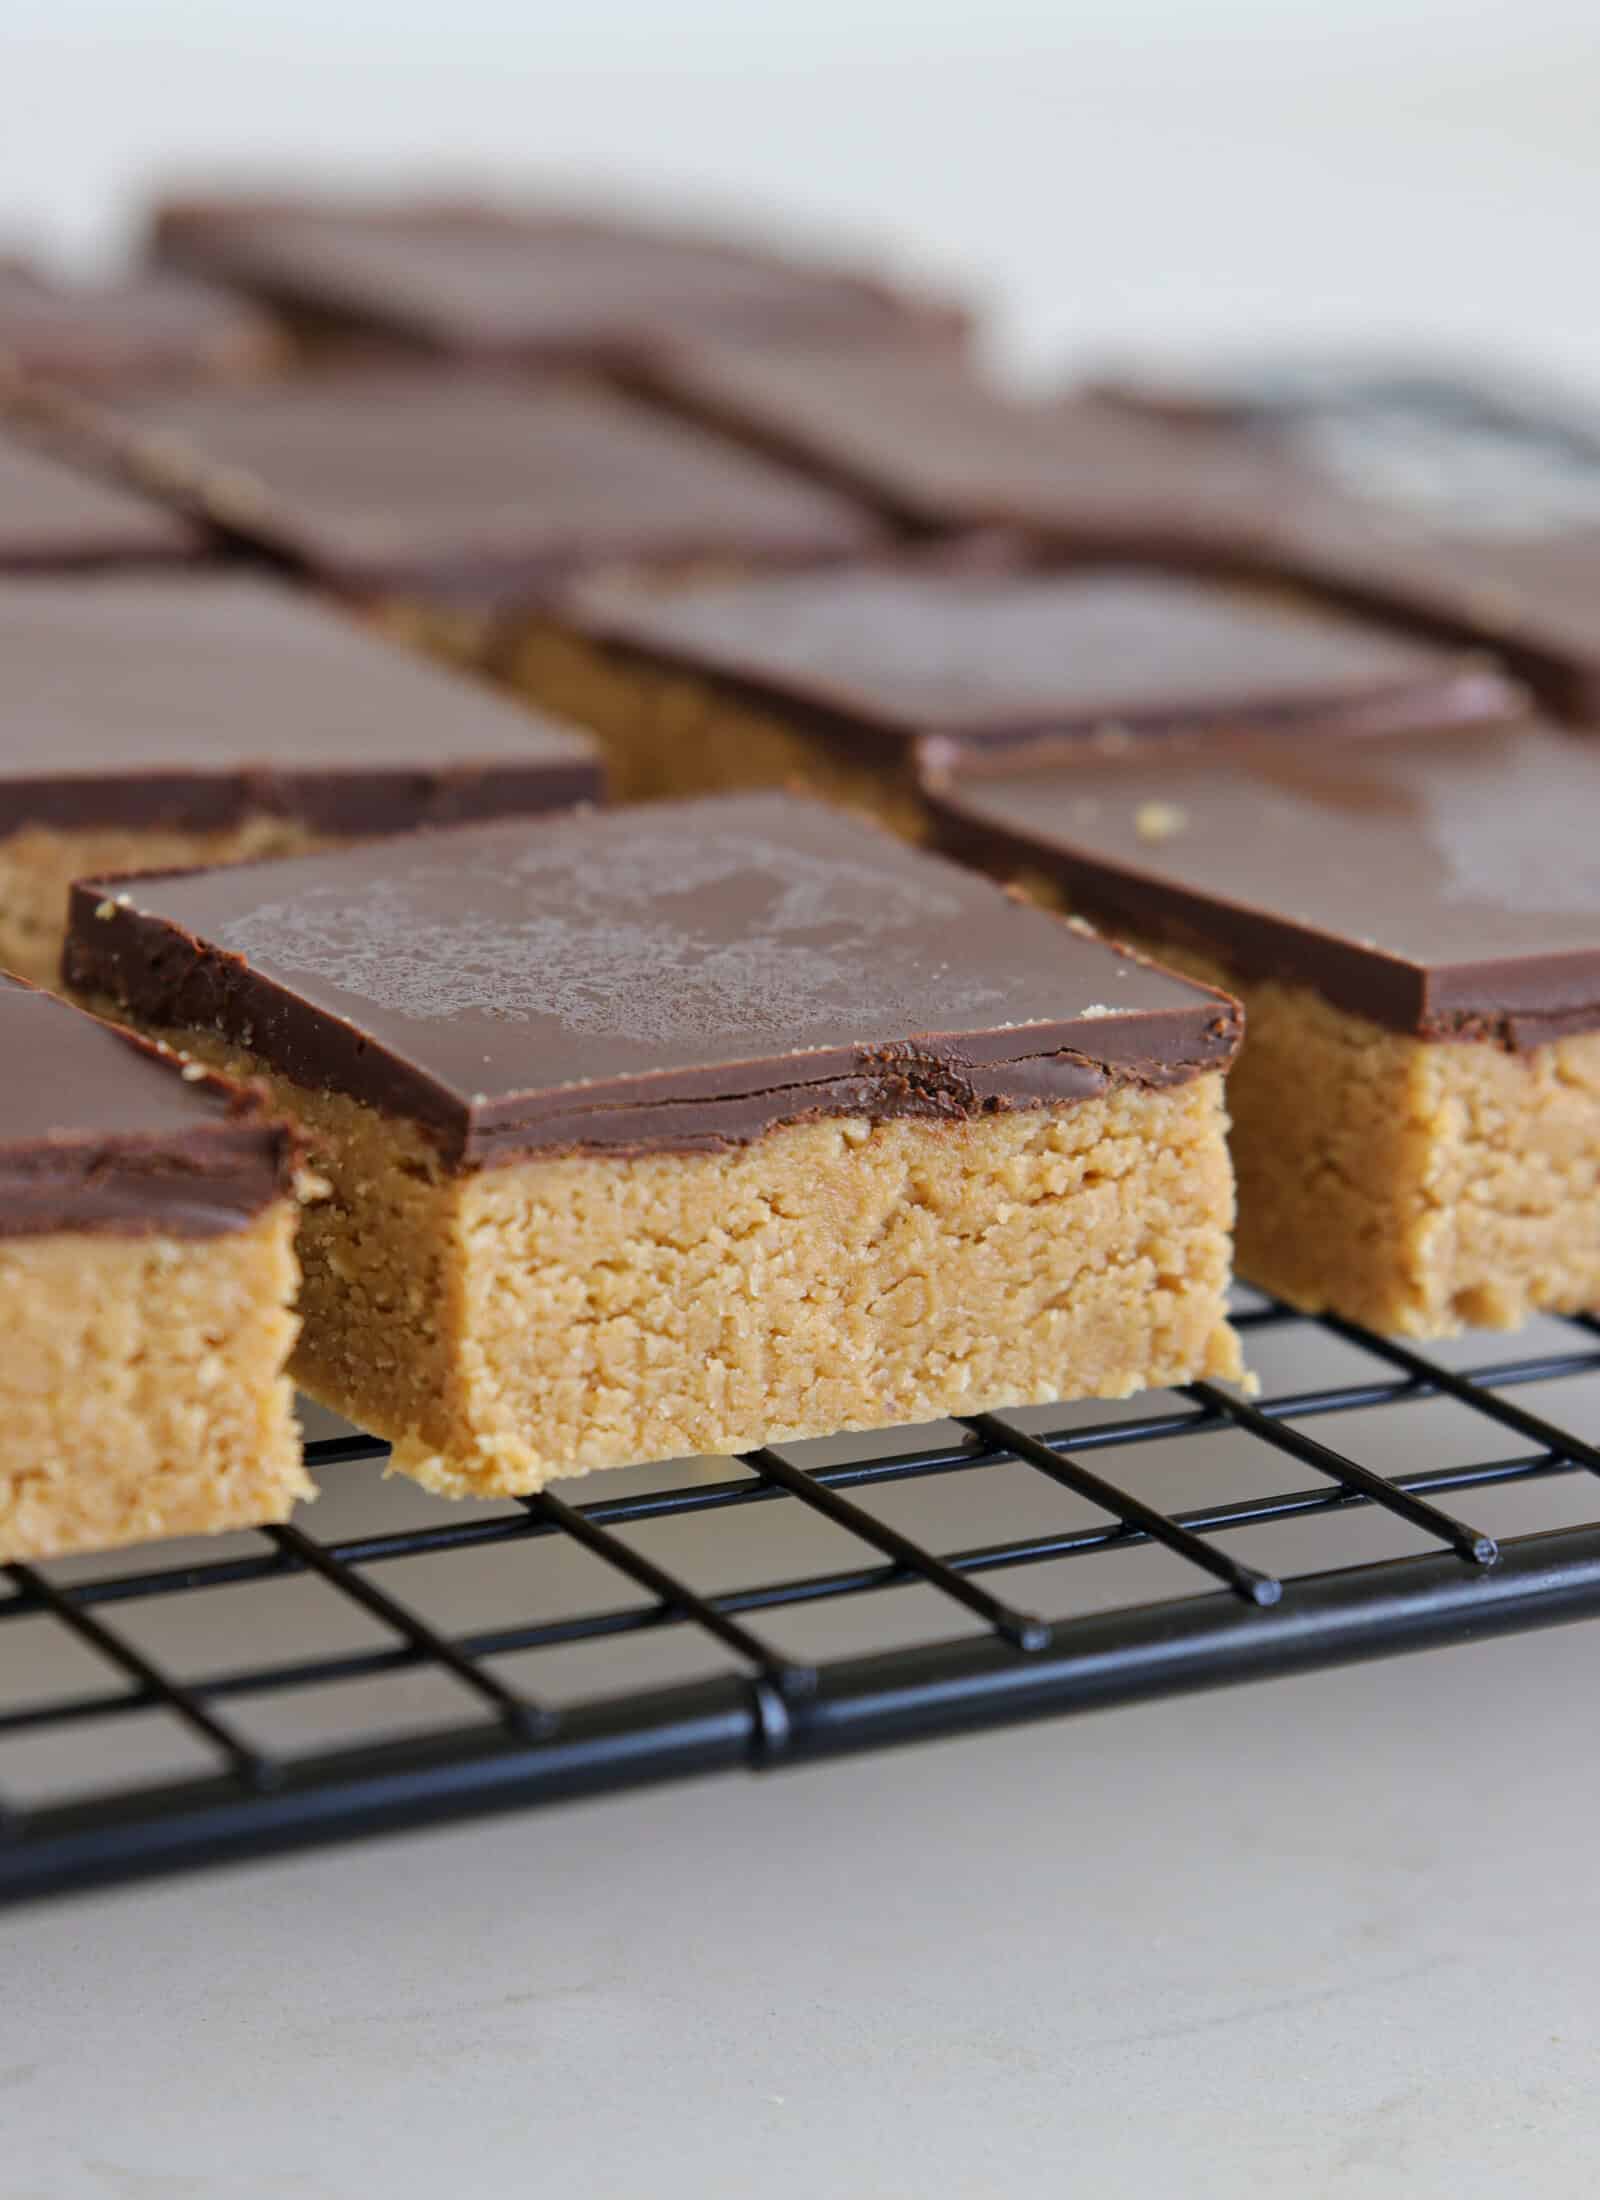
I’m a real sucker for healthy dessert recipes. What can I say? I want my cake, and to eat it, too! These yummy chocolate oat peanut butter bars are the perfect example—they’re loaded with whole grains, protein-packed nuts, and are made without any refined sugar. Oh, and my favorite part? You don’t even have to turn on the oven to make a batch!
Why You’ll Love No Bake Chocolate Peanut Butter Bars
- With over 94,000 views and 3,100 likes in just the last year, my YouTube video showing how to make chocolate peanut butter bars with oatmeal is a real hit. My subscribers can’t get enough of these no-bake treats!
- If you’re a meal-prepping sort, this easy recipe is for you. These chocolate and peanut butter no bake bars keep well in the fridge for a week, or can be frozen for up to 2 months. Consider your snacktime sorted!
- All you need are 7 simple, whole-food ingredients and 15 minutes to make a batch, making them the perfect last-minute treat.
Ingredients & Substitutions
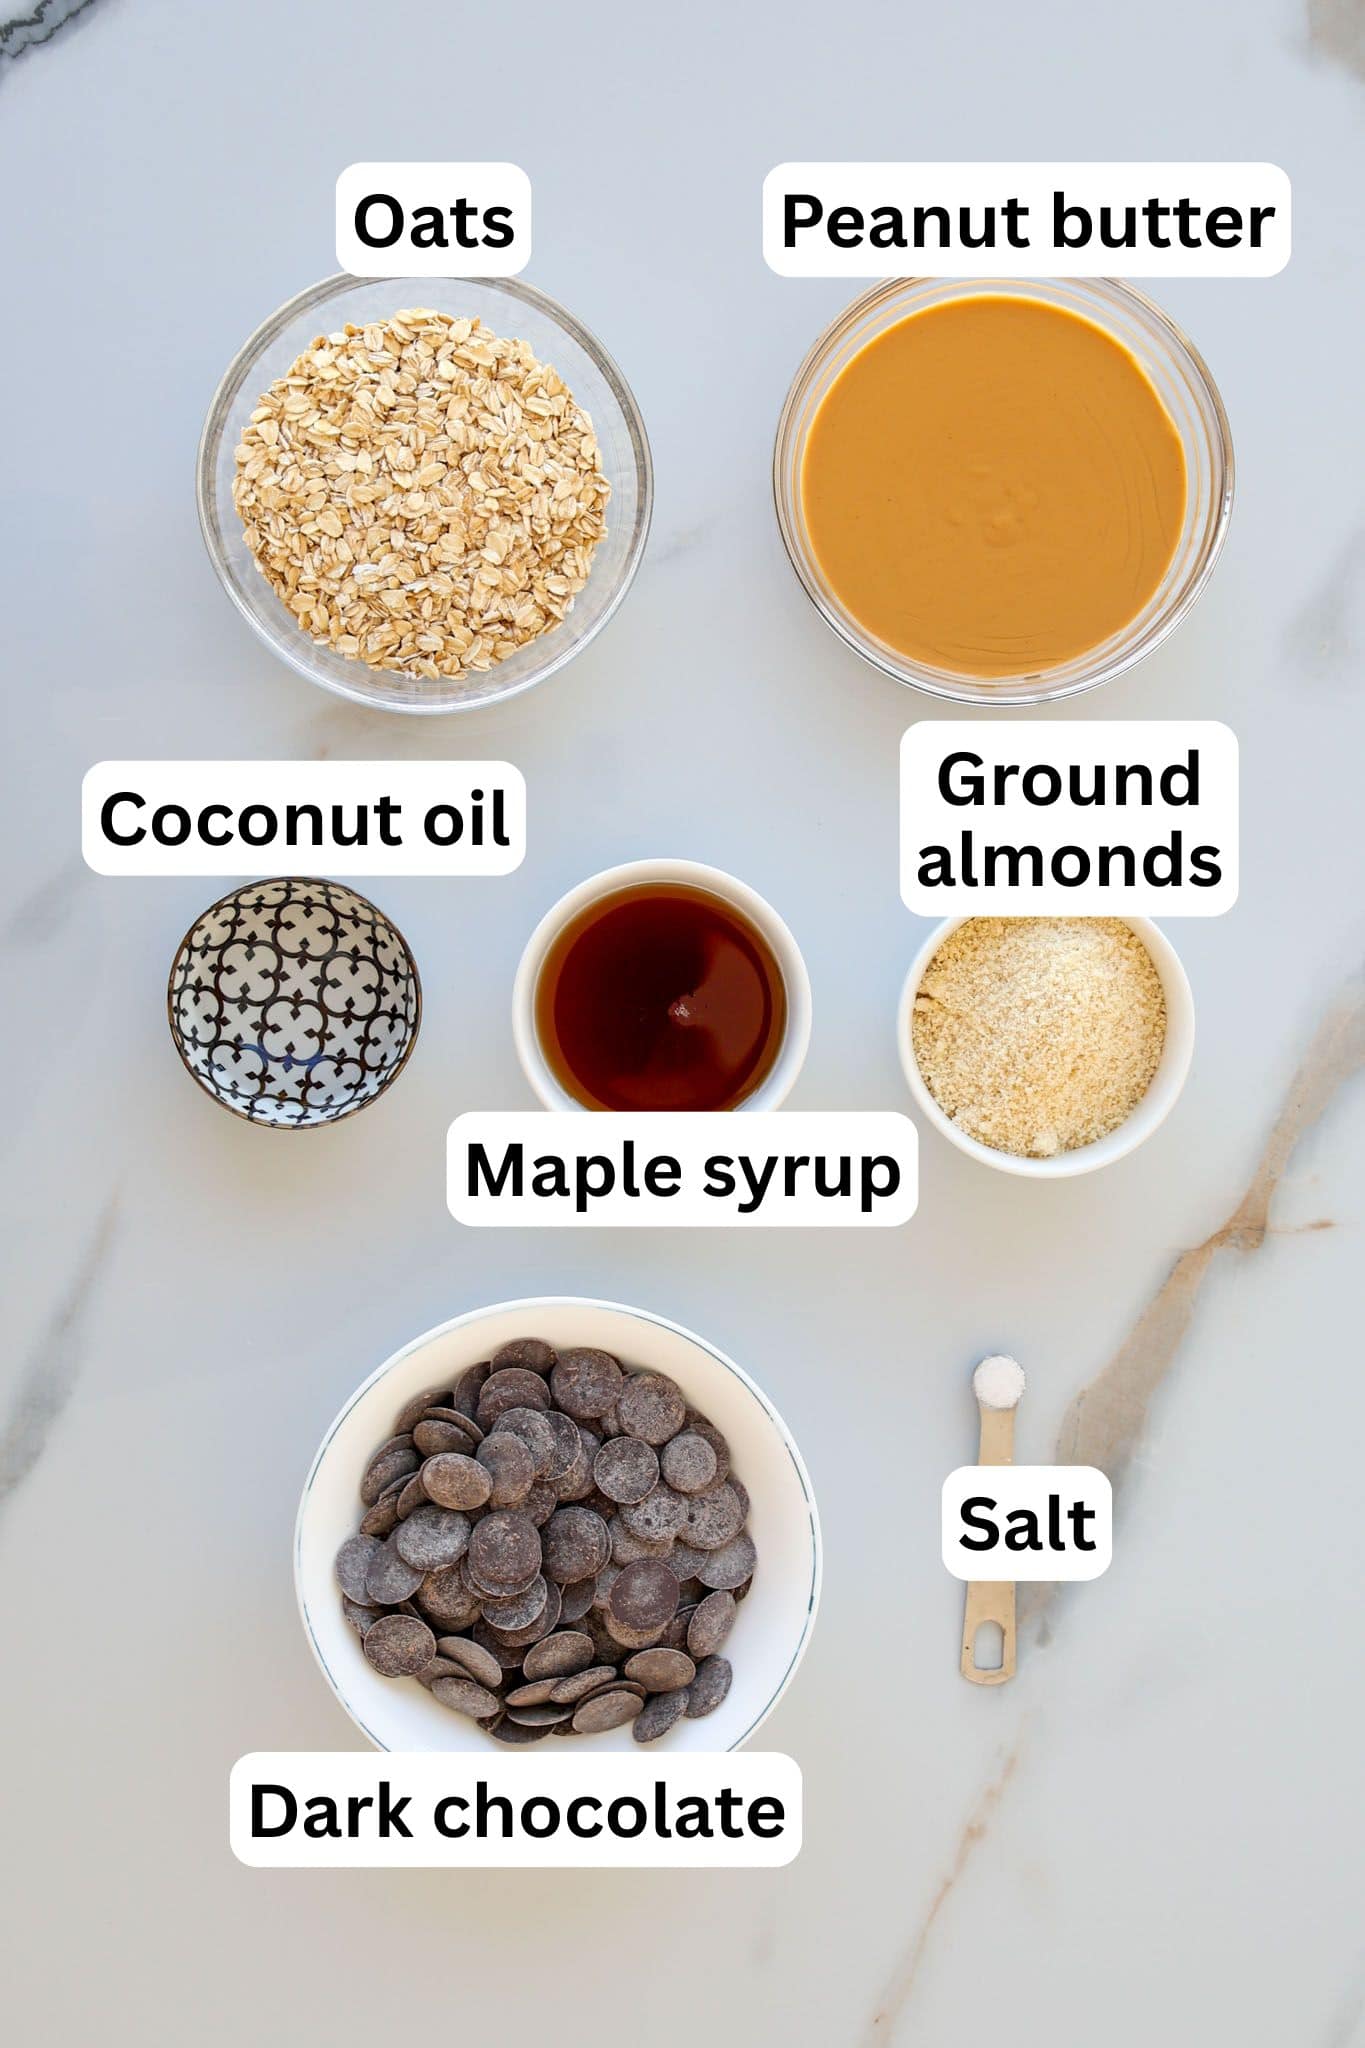
- Natural Peanut Butter & Salt – When you choose your peanut butter, look for a jar that lists peanuts as the only ingredient—starting unsalted and unsweetened gives us the opportunity to season it exactly to taste!
- Rolled Oats – Unlike some recipes that use sugary graham crackers, my recipe calls for deliciously nutty, fabulously fiber-packed, and fantastically frugal homemade oat flour. Feel free to use either rolled oats or quick oats.
- Ground Almonds – Also known as almond flour, this adds a satisfyingly gritty texture to emulate the treats made with graham crackers. It also boosts the protein and heart-healthy fat! I prefer using fine-ground almond flour made with blanched almonds, but you’re welcome to use coarser almond meal if you prefer.
- Maple Syrup – This all-natural sweetener adds a dessert-like flavor and acts to bind the peanut butter filling with some moisture. Feel free to swap in another liquid sweetener like honey, agave nectar, or date syrup.
- Dark Chocolate – Reach for high-quality bar chocolate for the best results; chocolate chips are designed to hold their shape, which can affect the texture of the glossy chocolate topping. I prefer 70-75% chocolate, but you’re welcome to swap in milk chocolate, semisweet chocolate, or bittersweet chocolate if you prefer!
- Coconut Oil – Adding a touch of fat to the melted chocolate topping makes it look shiny and softens the consistency, making it easier to eat. If you don’t have any on hand, butter works too!
This is just a short review of the ingredients; for the complete recipe, including quantities, scroll down to the recipe card 👇
Why Use Creamy Natural Peanut Butter?
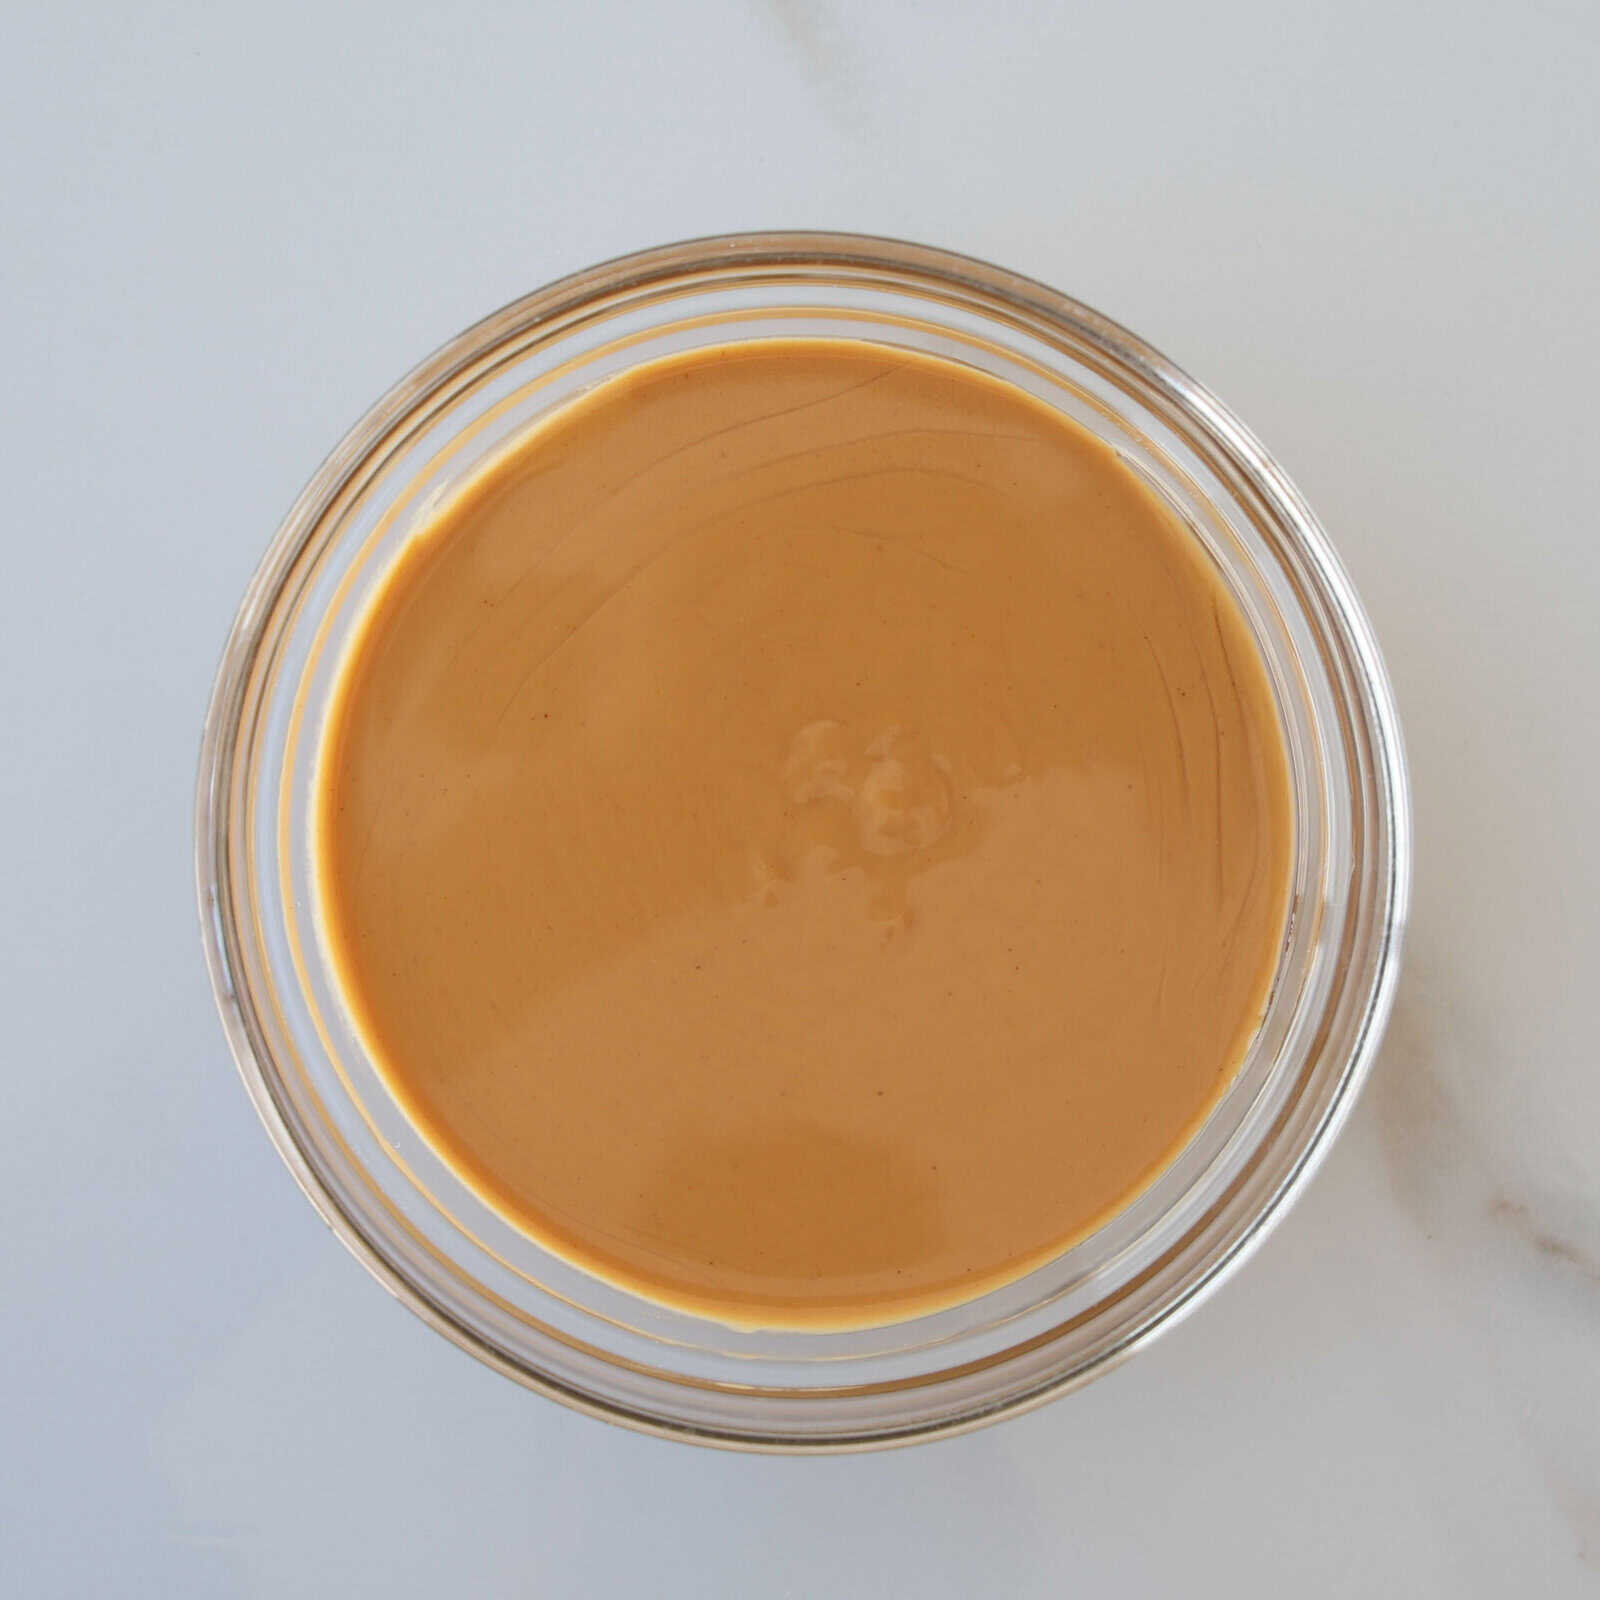
For these no-bake bars, creamy natural peanut butter is key to achieving the perfect texture and flavor. Unlike processed varieties that contain hydrogenated oils, sugar and stabilizers, natural peanut butter is made with just peanuts. That means it’s softer, more pourable, and blends seamlessly with the almond flour and oats—no clumping or stiffness.
Aside from tasting more peanutty than the fake stuff, real peanut butter is also much healthier—always a good thing in my book! If your jar has separated, just give it a good stir before using for best results. And, while I’m not usually a fan of single-task kitchen tools, a peanut butter stirrer is well worth it!
What to Do With Leftover Peanut Butter?
If you’ve got an open jar of peanut butter and need some inspiration, here are a few of my favorite ways to use it up. Each recipe is easy, delicious, and peanut butter-packed:
How to Make Chocolate Peanut Butter Bars
Watch the full video recipe to learn how to make Healthy Chocolate Peanut Butter Bars with Oats. This step-by-step tutorial simplifies the process, offering tips and tricks to guarantee perfect results every time.
Prefer the written recipe? Scroll down to the recipe box 👇
Optional Variations & Dietary Adaptations
- Nut-Free – Can’t do peanuts or almonds? Not to worry. Swap in sunflower seed butter and sunflower seed flour instead! And, if coconuts are also on the naughty list, butter makes a great substitute for the oil.
- Gluten-Free – Just make sure your oats or oat flour are certified GF.
- Extra Crunchy – Stir in ¼ cup of chopped roasted peanuts, puffed rice, or crushed pretzels into the peanut butter base for added crunch.
- Layered Fruit Jam – Spread a thin layer of raspberry or strawberry chia jam over the peanut butter base before adding the chocolate topping for a PB&J-inspired treat.
- Toppers – Sprinkle the chocolate layer with some flaky sea salt, chopped nuts, toasted coconut, or sprinkles for extra pizzazz.
Expert Tips & Tricks
- Use well-stirred natural peanut butter. Make sure your peanut butter is fully mixed and smooth before adding it to the mixture—you don’t want to use the dry bits at the end of a jar.
- Pack the base firmly. Press the peanut butter mixture into the pan using a spatula, the back of a spoon, or your hands to ensure neat slices.
- Chill thoroughly before slicing. For neat, even bars, let the mixture chill for at least 30–45 minutes, or until completely firm. You can speed this up by placing the pan in the freezer for 15–20 minutes.
- Use parchment for easy removal. Let the parchment overhang the sides of the pan so you can lift the bars out easily without digging around the edges.
- Slice with a hot knife. Run a sharp knife under hot water, wipe it dry, and slice. This helps cut cleanly through the firm chocolate layer without cracking.
Storage & Reheating
- Refrigerator: Store the bars in an airtight container in the fridge for up to 1 week. They’ll stay firm and fudgy straight from the fridge.
- Freezer: For longer storage, freeze the bars in a single layer or between sheets of parchment paper in a sealed container. They’ll keep well for up to 2 months. Let them sit at room temperature for 5–10 minutes before eating for the best texture.
- Room Temperature: These bars can sit out for a few hours at room temp (great for serving!), but they soften over time and may become sticky—especially in warm weather. For best results, keep them chilled.

More Healthy Snack Recipes

Healthy Chocolate Peanut Butter Bars with Oats
Equipment
Ingredients
For the peanut butter layer:
- 2 cups (480 g) Natural peanut butter (unsweetened, unsalted)
- 1 cup (90 g) Rolled oats or oat flour
- 1 cup (100 g) Ground almonds (almond flour)
- ⅓ cup + 1 tablespoon (90 ml) Maple syrup read notes
- Pinch Salt
For the chocolate topping:
- 5.6 oz (160 g) Dark chocolate
- 1 tablespoon (15 ml) coconut oil
Instructions
- Prepare the pan: Line an 8-inch (20cm) square baking pan with parchment paper, making sure some hangs over the sides for easy removal.
- Make oat flour: Place the oats in a blender or food processor and blend until a fine flour forms. (You can use pre-made oat flour if preferred.)
- Mix peanut butter base: In a large bowl, combine the oat flour, ground almonds, peanut butter, maple syrup, and a pinch of salt. Mix until a thick, uniform dough forms.
- Shape the base: Press the peanut butter mixture firmly into the prepared pan in an even layer. Place in the fridge to chill.
- Make chocolate topping: Finely chop the dark chocolate and place in a heatproof bowl with the coconut oil. Microwave in 15–20 second intervals, stirring between each, until fully melted and smooth.
- Assemble: Pour the melted chocolate over the peanut butter base and spread evenly.
- Chill and serve: Refrigerate for at least 30 minutes, or until set. Slice into bars and enjoy!
Video
Notes
- Peanut butter: Use natural peanut butter with just peanuts. Stir well before using to incorporate the oil. Avoid overly dry or overly runny varieties.
- Oat flour: Homemade oat flour works great and adds texture. For a smoother base, sift it before mixing.
- Almond flour: Ground almonds or almond meal both work here. For a nut-free version, swap with sunflower seed flour.
- Sweetener: Maple syrup adds moisture and sweetness, adjust slightly based on the sweetness of your peanut butter.
- Chocolate: Use good-quality dark chocolate (70% or higher for a richer taste), or substitute with semi-sweet or milk chocolate if preferred.
- Coconut oil: Helps create a smooth, shiny chocolate layer and makes slicing easier when chilled.
- Storage: Keep the bars stored in the fridge for up to 7 days or freeze for up to 2 months. They’re best served cold, straight from the fridge.
- Texture: The bars firm up beautifully in the fridge but stay soft and chewy thanks to the almond flour and syrup combo.
- Toppings (optional): Sprinkle flaky salt, chopped nuts, or shredded coconut on top before the chocolate sets for extra texture and flair.
Nutrition
FAQs
Yes! My recipe swaps in oat flour and almond flour for a healthier take
Chocolate peanut butter bars taste like a mashup of a peanut butter cup and a no-bake cookie. The base is thick, chewy, and nutty from the oats and natural peanut butter, with a subtle sweetness from the maple syrup. On top, you’ve got a smooth, glossy layer of dark chocolate that adds a bittersweet contrast and a satisfying snap when you bite into it. They’re comforting, nostalgic, and just the right amount of decadent!
While I can’t promise that this is THE easiest, these no-bake chocolate peanut butter bars and my no-bake chocolate peanut butter oatmeal bars are definitely in the running!

")


Can I reduce the amount of maple syrup in the recipe? I do not use artificial sweetners so would like to know by what amount I can reduce the maple syrup. Thank you.
Yes, you can reduce the maple syrup if you prefer a less sweet bar. I wouldn’t reduce it by more than about 2–3 tablespoons, though, since it also helps bind the mixture together. If the mixture feels a bit dry after reducing the syrup, add an extra tablespoon or two of peanut butter until it holds together when pressed. I hope that helps!
Can I make with regular peanut butter?
I’m not sure what you mean by “regular” peanut butter, if you mean the sweetened or salted kind (like classic store brands), then yes, you can still use it. Just keep in mind it will make the bars a bit sweeter and saltier, so you may want to reduce or skip the added maple syrup and salt. You also might need to reduce the amount of oats/almond flour as the store brands are not as liquid as natural peanut butter.
If I wanted to incorporate chia seeds, how would I go about it?
You can mix chia seeds right into the peanut butter layer. Add 2–3 tablespoons along with the oat flour and ground almonds. They’ll blend in easily, add texture, and boost nutrition without changing the recipe much.
Thank you, David!
So, there is no need to grind them up with the oatmeal? Will they be digested properly when adding to recipe whole?
No need to grind them, whole chia seeds will still be digested and give you all their benefits. They’ll soften as the bars set, so you’ll get both the nutrition and a nice little crunch. If you prefer a smoother texture, you can grind them, but it’s totally optional.
Is the calorie content per serve (one square) of for the full piece?
The calorie content is per one square (individual serving), not for the full pan.
If you’re looking to reduce the calorie count, here are a few ideas:
Use less peanut butter: Try reducing the peanut butter slightly (e.g., from 2 cups to 1¾ cups) and compensate with a bit more oats or almond flour.
Swap the sweetener: Replace maple syrup with a lower-calorie option like monk fruit syrup or another sugar-free syrup.
Thin the chocolate layer: Use less chocolate or choose a darker chocolate (85% or more) to reduce sugar and fat content.
Smaller portions: Slice the bars into smaller squares to enjoy a lighter treat while still satisfying the craving!
One of the best peanut butter bars I’ve ever tried. Thank you!
Love this recipe. While the calorie count is high, the ingredients make it quite healthy for a dessert. My daughter is gluten-sensitive and this is one of her favorite desserts. I have made them several times and will continue to. It takes me about 10-15 minutes to make.
Can I send in mail or do they have to stay refrigerated?
I wouldn’t recommend sending these by mail.
absolutely delicious 😋
I need to try this and keep improving