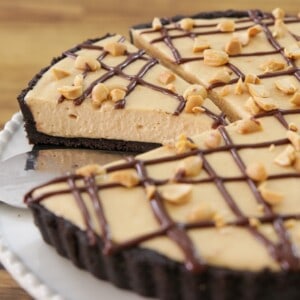
Easy No-Bake Peanut Butter Pie Recipe
This post may contain affiliate links.
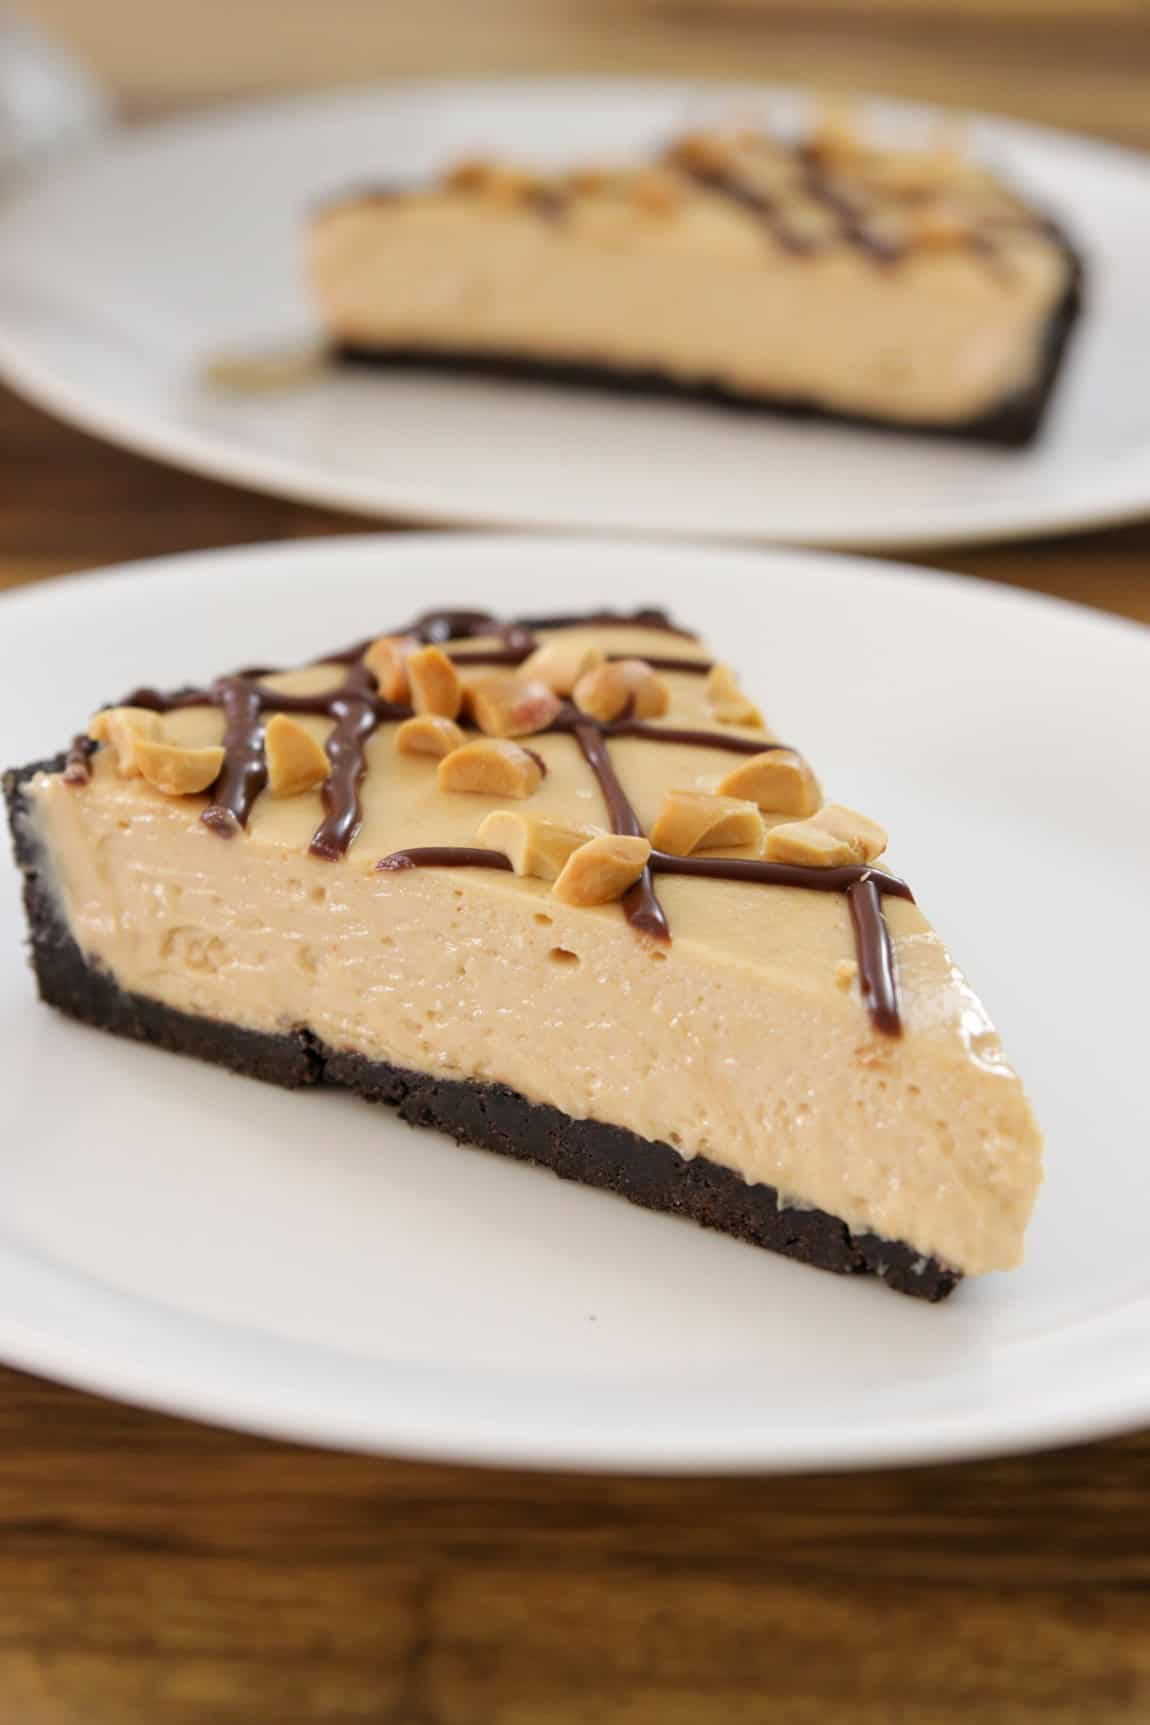
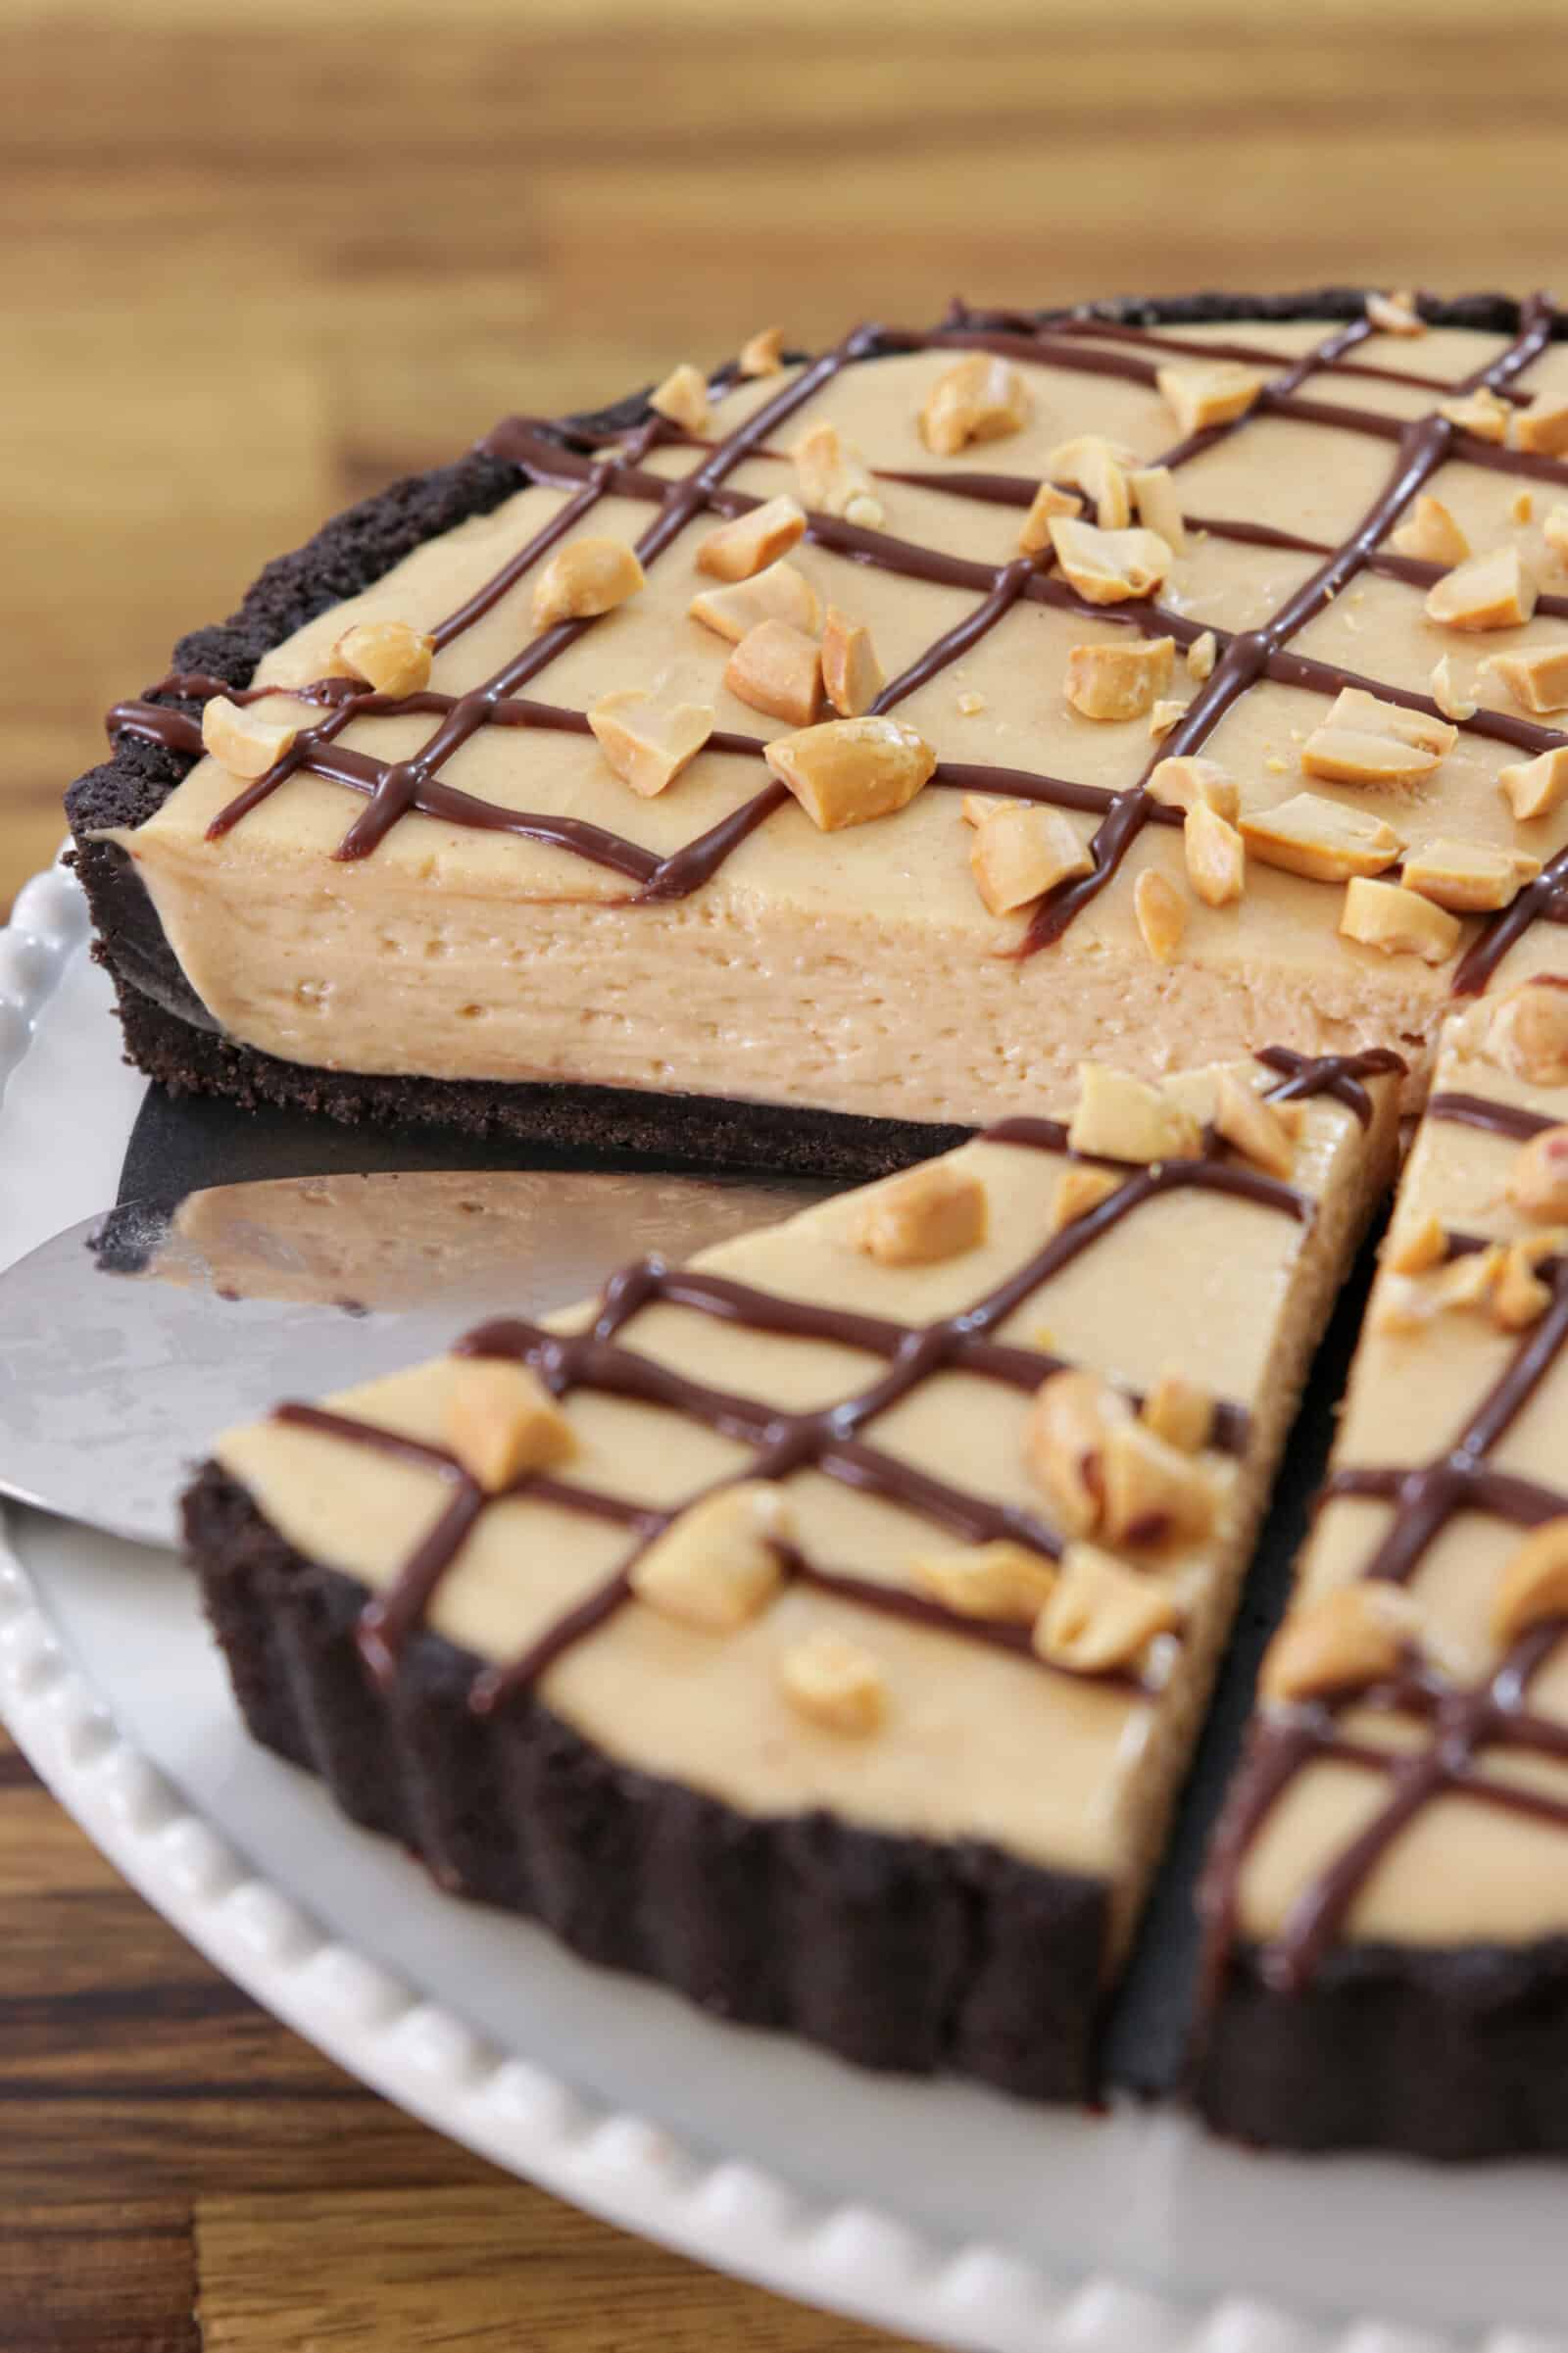
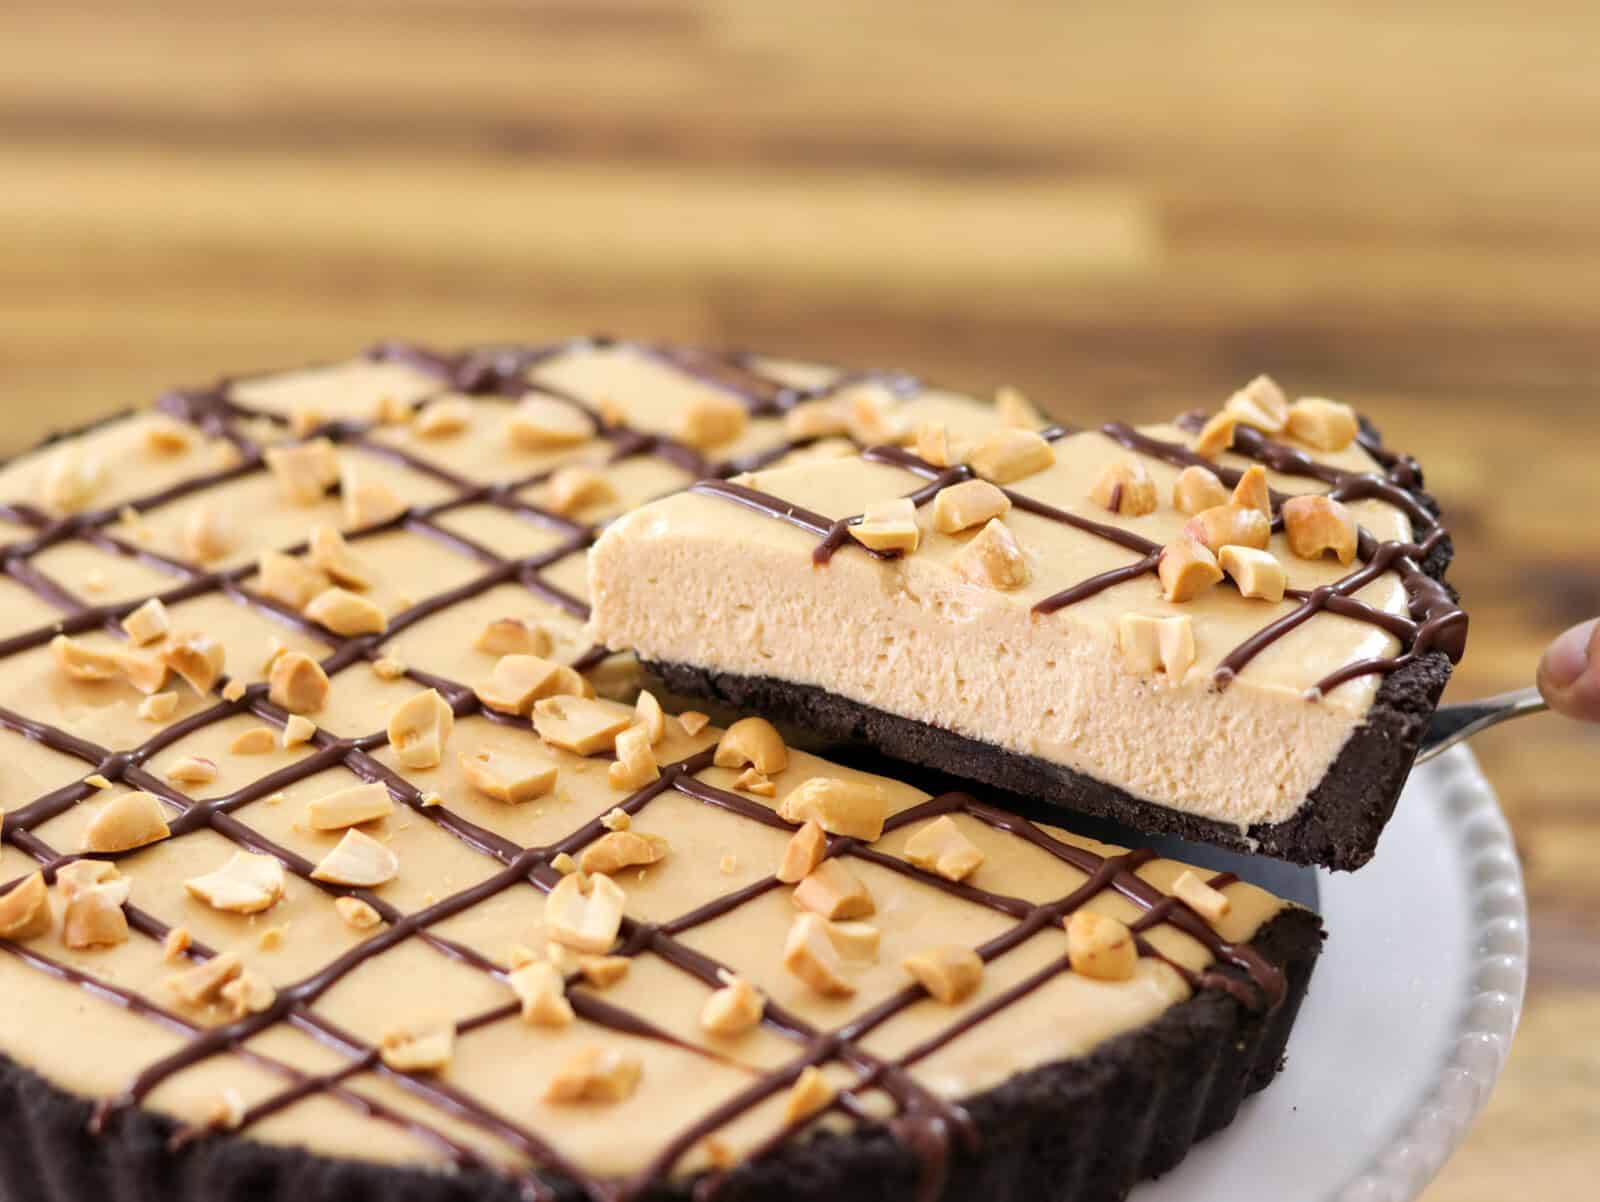
Celebrations deserve special desserts, and this easy No Bake Peanut Butter Pie recipe is perfect for when you don’t want to turn on the oven. Despite looking like it came from a bakery, this easy-breezy showstopper comes together with no fuss. Just press-in a simple cookie crust, whip up the dreamy peanut butter filling, add a few simple garnishes, and refrigerate!
I originally published this recipe in 2020 and have since updated it with new photos, improved instructions, and extra success tips.
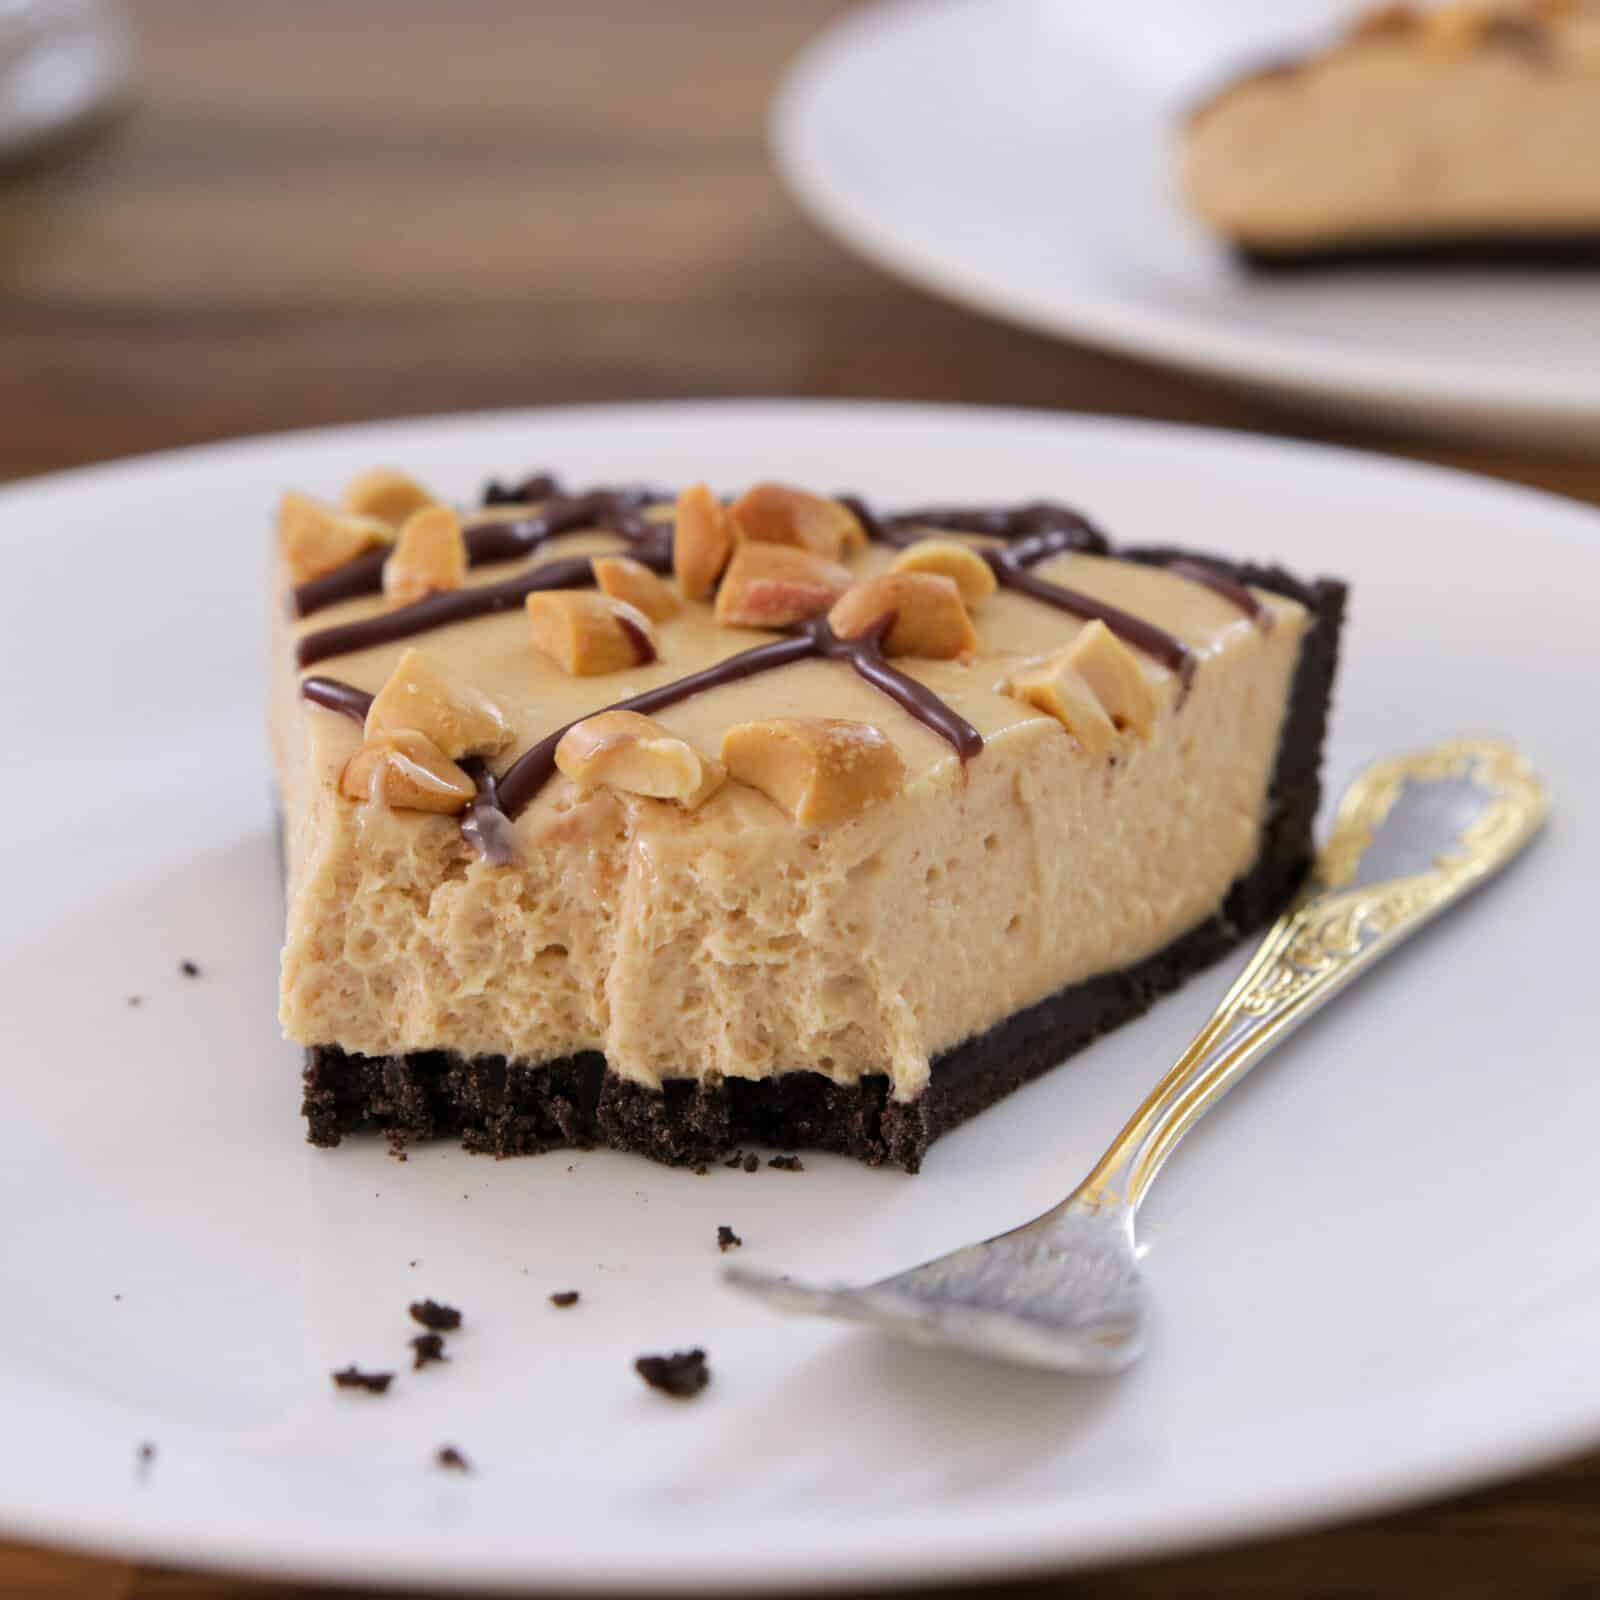
With Father’s Day around the corner, having a few solid chocolate peanut butter desserts on deck is always a good idea. After all, what dad doesn’t love a salty-sweet treat?!? This no bake peanut butter pie is like a lighter no-bake peanut butter cheesecake, replete with a chocolate cookie crust and a filling similar to my fluffy peanut butter mousse. Delightful!
If you love easy treats like this, check out my collection of no-bake desserts for more simple, oven-free recipes.
Why This Peanut Butter Pie Works
- No gelatin needed – The combination of cream cheese and peanut butter creates a naturally stable filling that firms up perfectly in the fridge.
- Light yet sliceable texture – Whipped cream adds airiness, while the fats from the cream cheese and peanut butter give structure, so you get clean slices without a dense feel.
- Perfectly balanced flavor – The salty richness of peanut butter pairs with a slightly bitter chocolate crust to keep the dessert from tasting overly sweet.
- Simple, no-bake method – With just a few basic steps and no oven required, this recipe is easy, reliable, and great for make-ahead desserts.
Ingredients & Substitutions
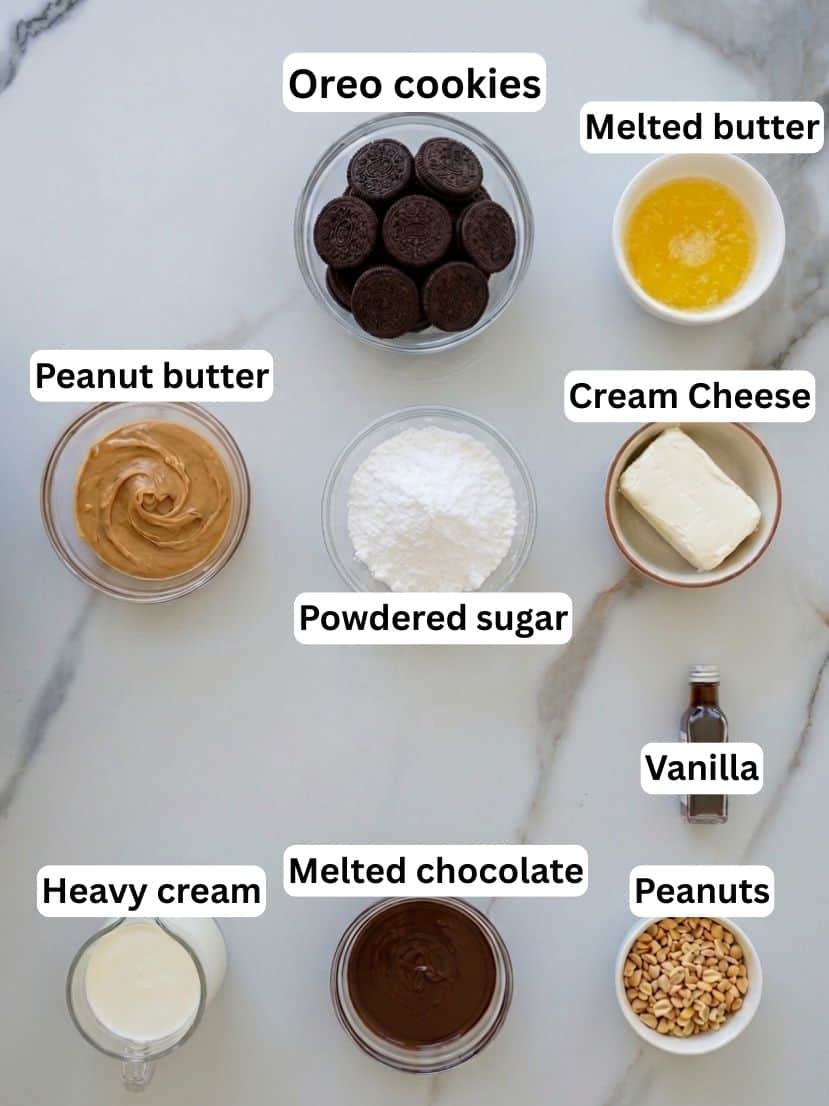
- Oreo Cookies – My go-to choice for a chocolate cookie crust.
- Butter – If you use unsalted butter, add a pinch or two of salt to balance out the sweetness of the crust.
- Creamy Peanut Butter – I like to use my homemade peanut butter, but you’re welcome to swap in store-bought natural peanut butter instead. Just make sure it’s well-stirred.
- Cream Cheese – Stick to full-fat block-style cream cheese for the best results. If you’d like to lighten up a bit, Neufchatel cheese is a better choice than reduced-fat cream cheese.
- Powdered Sugar – This starchy sweetener ensures a silky-smooth peanut butter filling that slices beautifully.
- Vanilla Extract – For aromatic warmth and sweet depth. You can use an equal amount of vanilla paste if needed.
- Heavy Cream – The most decadent dairy of them all! If needed, swap in slightly lighter whipping cream. While you want the cream cheese to be room temperature, make sure the cream is cold for the best whip-ability.
- Melted Chocolate – Optional, for garnish. I recommend sticking to dark chocolate (55% or higher) to prevent the peanut butter pie from tasting too sweet.
- Chopped Peanuts – Optional, for a bit of crunch. Make sure they’re roasted and salted for the best flavor. Honey roasted peanuts would also be delicious!
This is just a short review of the ingredients; for the complete recipe, including quantities, scroll down to the recipe card 👇
How to Make No-Bake Peanut Butter Pie With Cream Cheese
Watch the full video recipe to learn how to make the BEST No-Bake Chocolate Peanut Butter Pie. This step-by-step tutorial simplifies the process, offering tips and tricks to guarantee perfect results every time.
Prefer the written recipe? Scroll down to the recipe box 👇
How Do No-Bake Pies Work Without Gelatin?
You might wonder how a pie can firm up in the fridge without gelatin or cornstarch. The secret is in the combination of ingredients working together. Cream cheese is the backbone here. It’s naturally thick and stable, and when chilled, it solidifies just enough to give the filling structure without turning it into a brick.
Peanut butter does the same; its fat content and density add body that holds its shape once cold. Whipped cream brings airiness, but it also contributes. The powdered sugar helps stabilize the whipped cream (it contains a bit of cornstarch), and the fat from all three components binds together as it chills. The result is a pie that slices cleanly but still melts on your tongue.
The key: Let it chill for at least 4 hours, ideally overnight. That gives the fats time to firm up and the flavors to meld. Rush it, and you’ll have a soft, scoopable mess instead of clean slices.
Optional Variations & Dietary Adaptations
- Gluten-Free – Use gluten-free Oreos to keep the crust celiac-friendly.
- Nut-Free – While peanut butter is the main ingredient here, you can swap it for tahini paste to make a nut-free pie.
- Dairy-Free – Swap in your favorite plant-based cream cheese and whipping cream alternative.
- Different Nut Butters – While peanut butter is classic, don’t feel limited. This creamy no-bake pie should work well with hazelnut butter, almond butter, or homemade Nutella if you prefer!
- Different Crust – If you prefer to double down on the peanut butter flavor profile, reach for Nutter Butter cookies instead. You can also swap in graham crackers or homemade gluten-free graham crackers, digestive biscuits, or vanilla or chocolate wafer cookies.
- Add-Ons – You’re welcome to use any pie toppers you prefer. Aside from melted chocolate and peanuts, you can try rosettes of whipped cream, a drizzle of chocolate ganache, and/or chopped peanut butter truffles or mini peanut butter cups
Expert Tips & Tricks
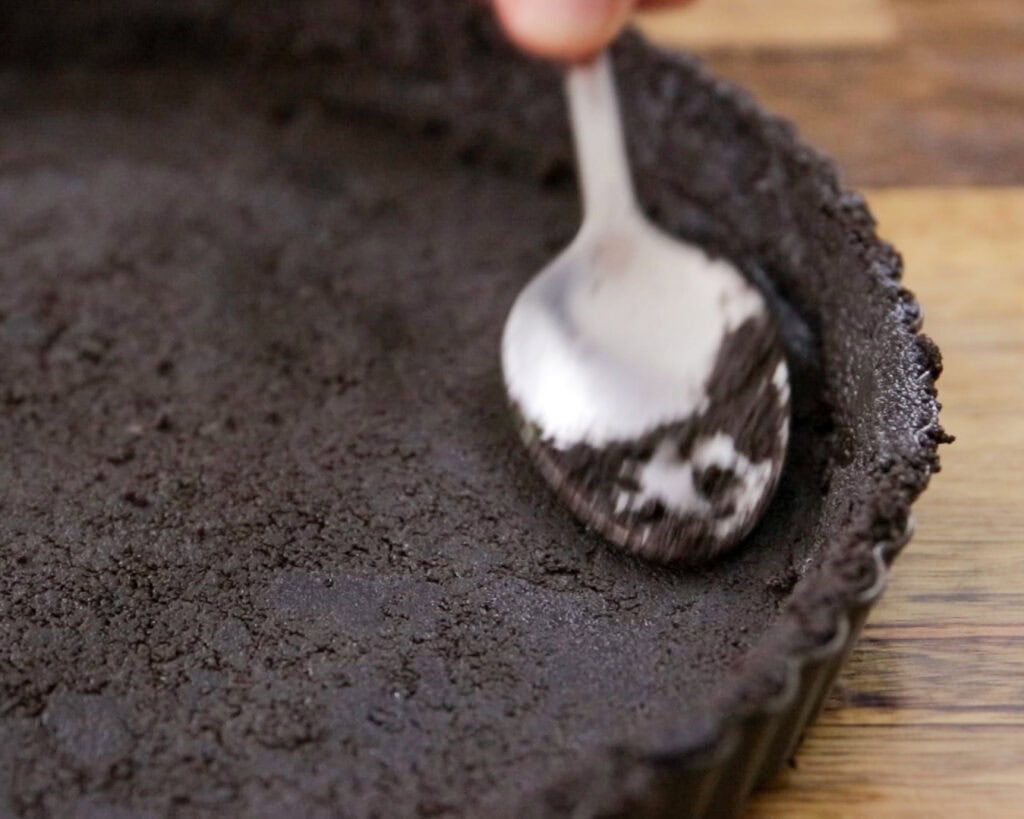
- Press the crust into the pie dish firmly and evenly. I like to use the bottom of a dry cup measure to help smooth out the top and press the crust into the corners of the pan.
- Give plenty of time for the filling to set up. While normal pies rely on the heat of the oven to set the filling up, this no-bake peanut butter pie requires plenty of time to chill out in the fridge. Make sure you set aside a minimum of 4 hours for chilling before serving.
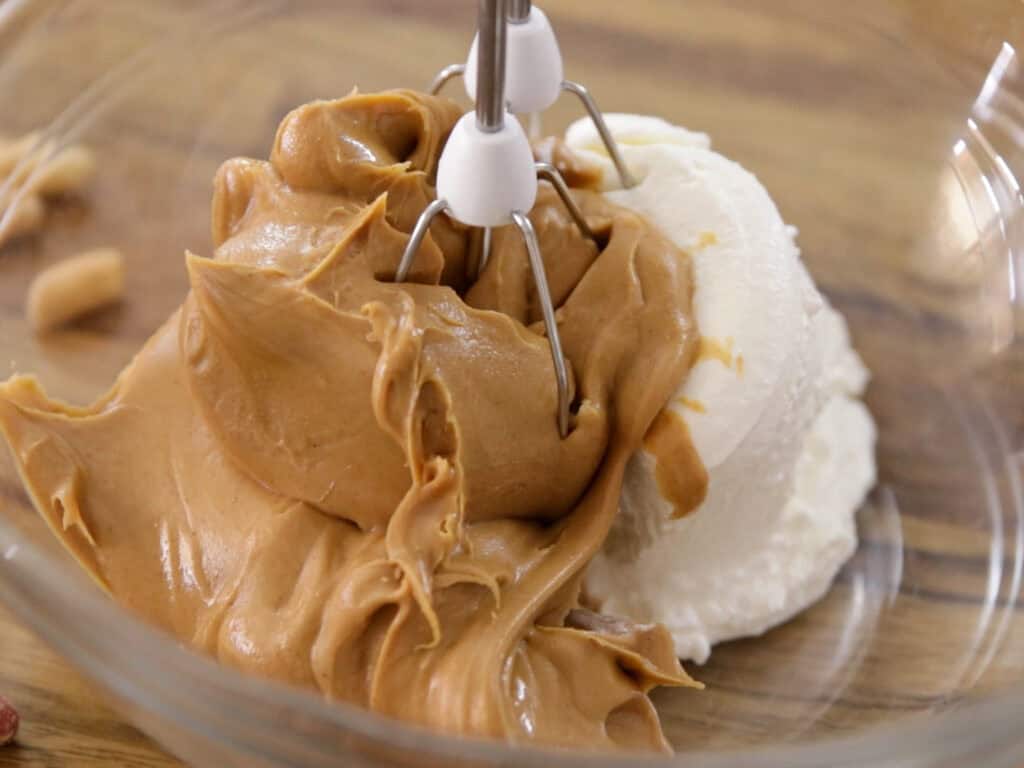
- Beat the cream cheese and peanut butter together until completely smooth before adding the other ingredients. This ensures a silky, lump-free filling.
How to Store Peanut Butter Pie
- Refrigeration: Store no-bake peanut butter pie covered tightly with plastic wrap or foil in the refrigerator for up to 5 days. The filling stays creamy and sliceable when kept cold, don’t leave it at room temperature for more than 30 minutes or it will soften.
- Freezing: Freeze the whole pie (or individual slices) wrapped in plastic wrap and then aluminum foil for up to 2 months. Thaw in the refrigerator for 3-4 hours before serving for the best texture, or let slices sit at room temperature for 15-20 minutes for a softer, almost ice-cream-like consistency.
More No-Bake Dessert Recipes
More Peanut Butter Dessert Recipes
No-Bake Peanut Butter Pie
Ingredients
For the crust:
- 25 (300 g) Oreo cookies
- ⅓ cup (85 g) Butter melted
For the filling:
- 1 cup (250 g) Creamy peanut butter see notes
- 1 cup (225 g) Cream cheese softened
- ¾ cup (95 g) Powdered sugar
- 1 teaspoon Vanilla extract
- 1 cup (240 ml) Heavy cream cold
For the topping (optional):
- 4 tablespoons Melted chocolate
- Chopped peanuts
Instructions
- Make the crust: Crush the Oreo cookies into fine crumbs using a food processor or by placing them in a sealed bag and crushing with a rolling pin. Add the melted butter and mix until evenly combined.
- Press the mixture firmly into the bottom and sides of a 9-inch (23cm) tart pan. Refrigerate while you prepare the filling.
- Prepare the filling: In a large bowl, beat the cream cheese until completely smooth. Add the peanut butter and continue beating until fully combined and creamy.
- Add powdered sugar and vanilla extract, and mix until smooth and well incorporated.
- Whip the cream: In a separate bowl, whip the cold heavy cream to stiff peaks.
- Combine: Gently fold the whipped cream into the peanut butter mixture until fully combined and light in texture.
- Assemble: Spread the filling evenly over the chilled crust and smooth the top.
- Chill: Refrigerate for at least 4 hours, preferably overnight, until fully set.
- Serve: Before serving, drizzle with melted chocolate and sprinkle with chopped peanuts.
Video
Notes
- Peanut butter: Use creamy, well-stirred peanut butter. Natural peanut butter works, but avoid very runny or oily types, they can make the filling too soft.
- Cream cheese: Make sure it’s fully softened before mixing. Cold cream cheese will create lumps that are hard to fix later.
- Heavy cream: Use cold heavy cream (at least 32–36% fat) and whip to stiff peaks. Under-whipped cream will result in a softer, less stable filling.
- Mixing order matters: Beat the cream cheese first, then add peanut butter. This helps achieve a smooth, lump-free texture.
- Crust: Press the crust firmly and evenly, especially into the corners. A flat-bottom glass or measuring cup works well for this.
- Chilling time: Don’t rush this step. The pie needs time to fully set—overnight chilling gives the best texture and clean slices.
- Storage: Store covered in the refrigerator for up to 5 days.
Freeze for up to 2 months—thaw in the fridge before serving.
Nutrition
FAQs
There are a ton to choose from! Aside from this no-bake cream cheese peanut butter pie, you could try making my easy chocotorta, no bake chocolate tart, no bake biscuit cake, no bake brownies, no bake nutella peanut butter cheesecake, no churn peanut butter ice cream, lazy cake, microwave chocolate mug cake, or about a bajillion other no bake desserts!
If your pie didn’t set, it’s usually due to insufficient chilling time or incorrect ingredient ratios. Make sure to chill the pie for at least 4 hours (preferably overnight), use full-fat cream cheese, and whip the cream properly to stiff peaks before folding it in.
Yes, but it must be well-stirred and not too runny. Very oily or thin peanut butter can make the filling too soft and prevent the pie from setting properly.

")

")


Is it possible to cut down on the amount of powdered sugar?
Yes, you can reduce the powdered sugar slightly, start with about ½ cup instead of ¾. Just keep in mind that it helps stabilize the filling, so reducing too much may make it softer. Taste and adjust, and make sure to chill it well so it sets properly
HI from Mary The no bake peanut butter pie was a hit with my book club.we were all to bring a dessert . I tried this one for first time was so easy to make and was as said such a hit . Thank you for such great recipes 🙂
Made this for a lunch with friends – turned out beautifully and got rave reviews. I didn’t have a tart pan with a loose base, so used a regular pie plate. Easy to cut and serve.
Can the peanut butter pie be made ahead of time and frozen. Will flavor and texture change if frozen. Thanks
Hi,
Yes you can make the pie and keep it in the fridge or freezer.
In the fridge up to 3-4 days.
In the freezer at least few weeks.
Don’t worry about the taste, just make just to taw the pie before.