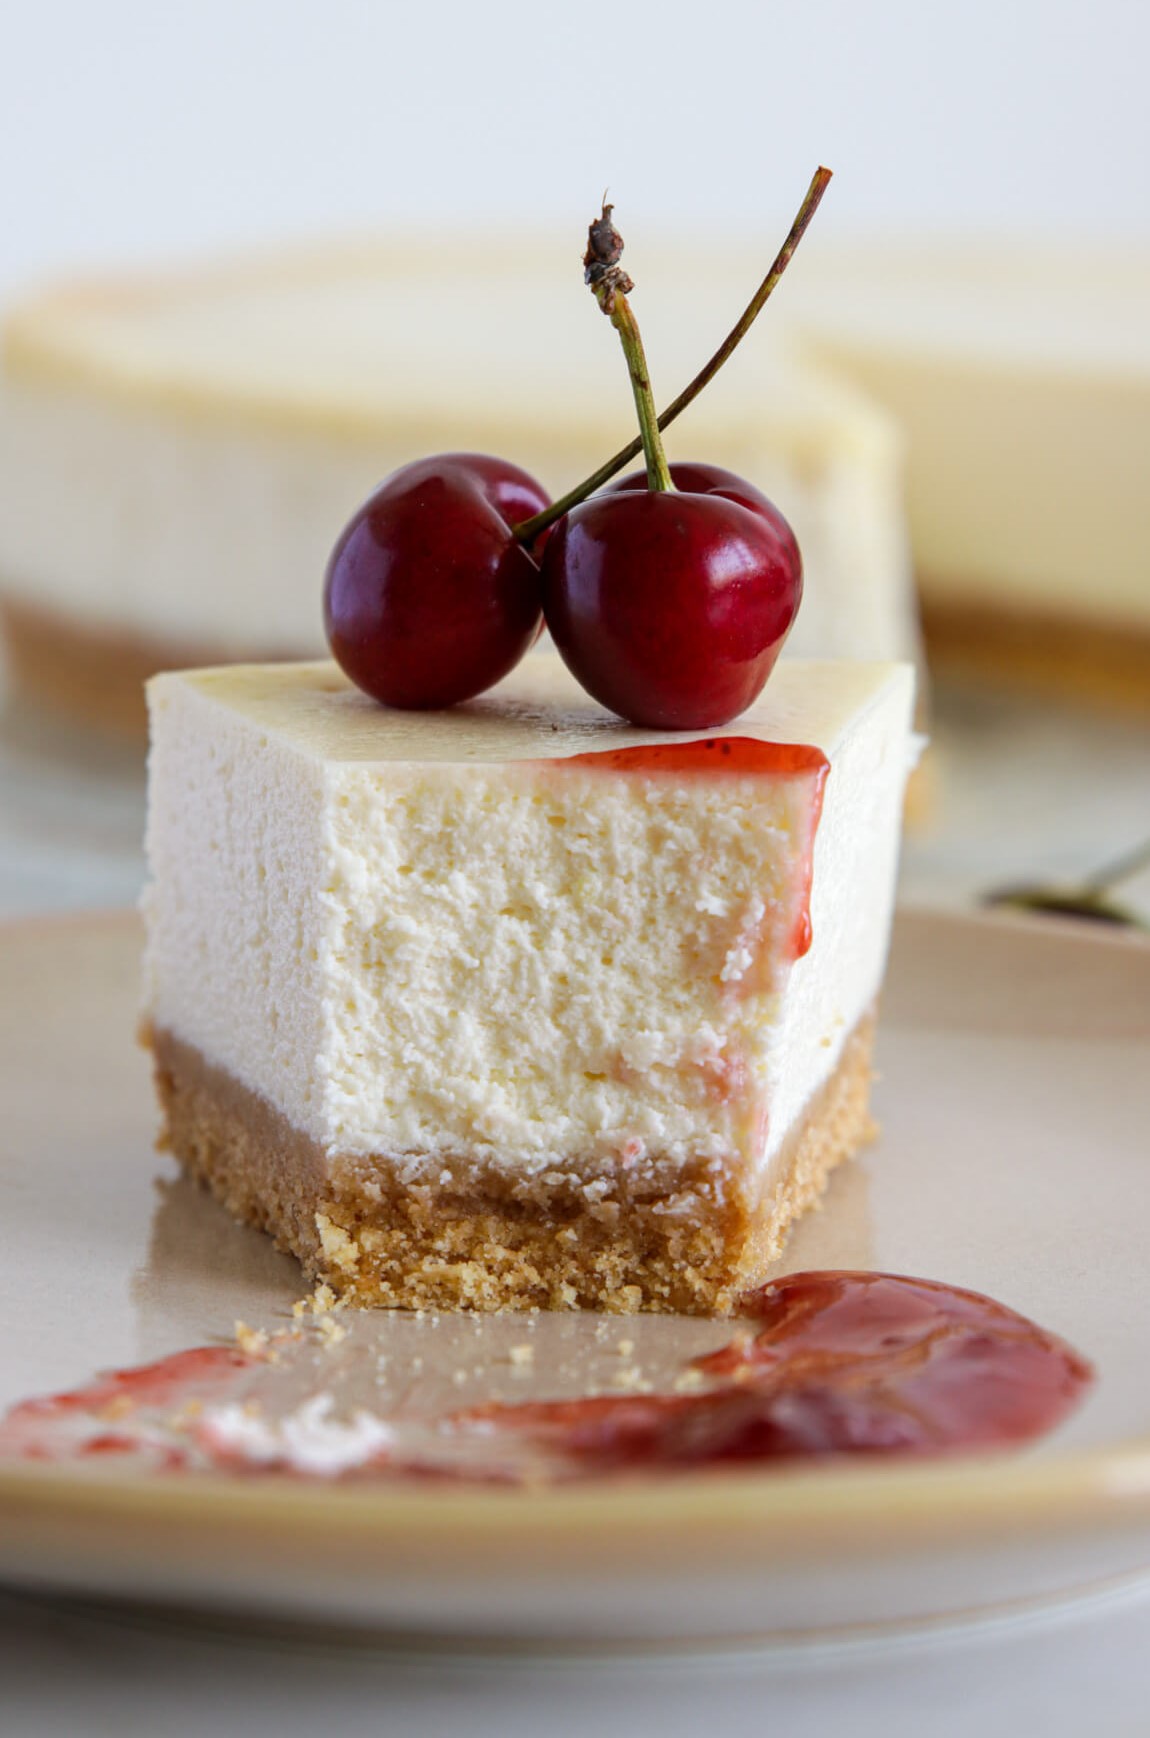
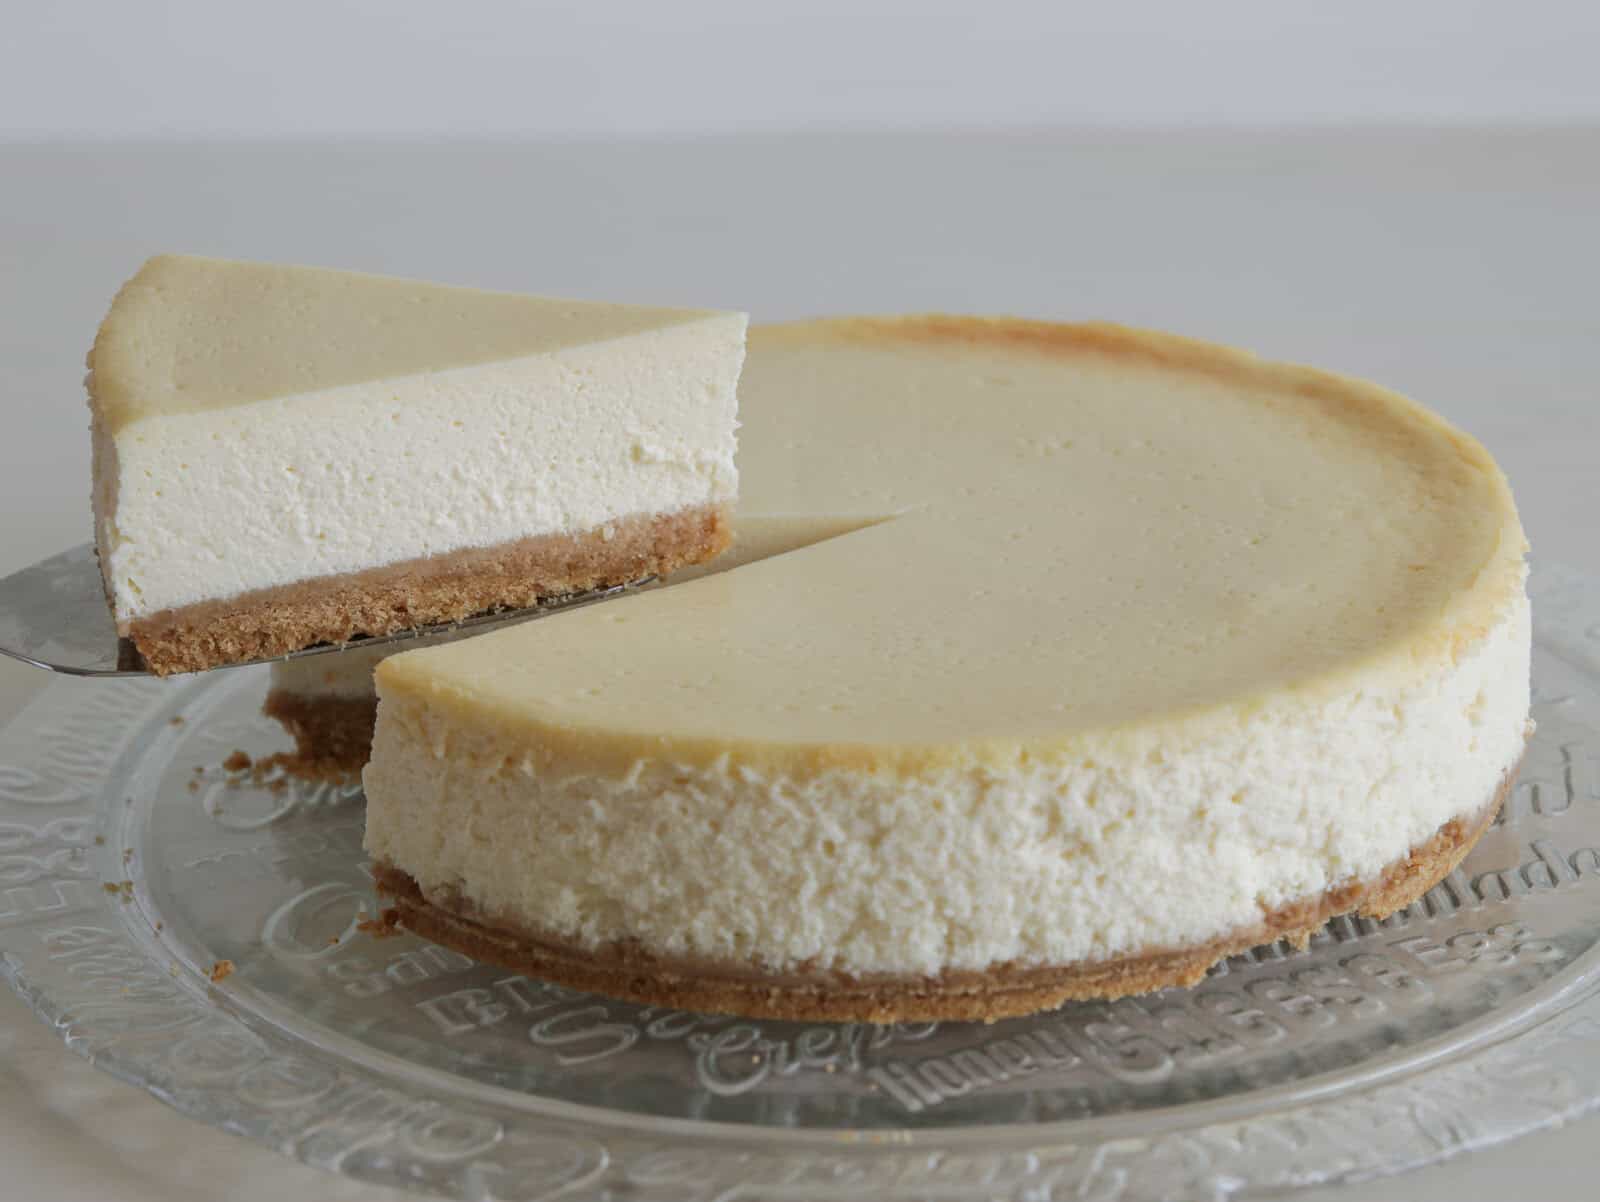
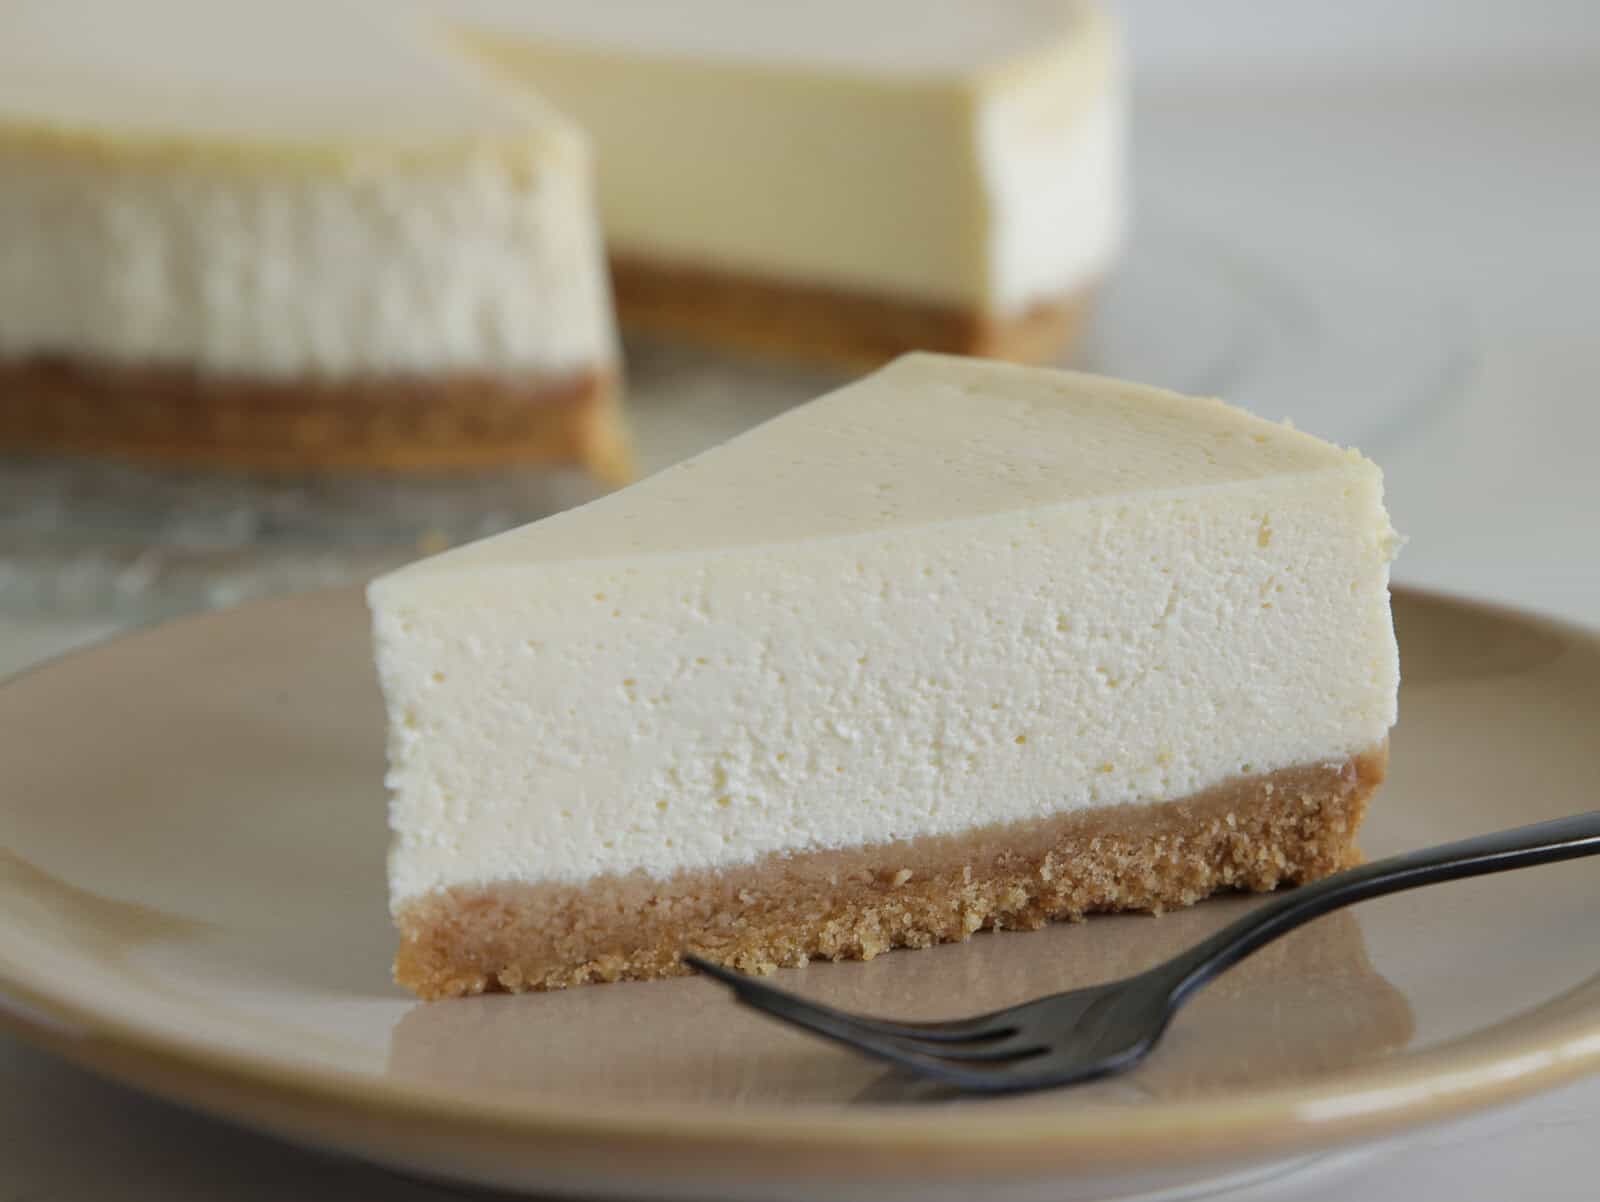
The Best Classic Cheesecake Recipe (Creamy & Crack-Free)
While I love all desserts, this Classic Cheesecake recipe takes the proverbial cake. It’s light, creamy, and tangy-sweet with a buttery crust—everything you could want from a slice. Best of all, it’s made with just 11 ingredients and is the foundation of nearly all of my 100+ cheesecake recipes, including my fan favorite pistachio cheesecake.
If you’re ever struggling to find a dessert recipe for a special occasion, take it from me: you can’t go wrong with classic cheesecake! It’s simple yet elegant, decadent but not heavy, and is a guaranteed crowd-pleaser—just ask the 1,300+ happy YouTubers who gave it an enthusiastic thumbs up.
How to Make Classic Cheesecake
Watch the full video recipe to learn how to make the best baked cheesecake. This step-by-step tutorial simplifies the process, offering tips and tricks to guarantee perfect results every time.
Prefer the written recipe? Scroll down to the recipe box 👇
Why You’ll Love My Original Cheesecake Recipe
- Consider this your ultimate guide to baked cheesecakes! Once you learn my basic cheesecake recipe, you can let your creativity shine—just customize with the toppings and mix-ins of your choosing! Use fresh fruit, jam, or chocolate shavings to add color that’ll match any party theme.
- Coco Chanel once said, “simplicity is the keynote of all true elegance,” and nothing could be truer about my plain cheesecake. Whether you’re hosting a casual family dinner or putting on the ritz, this sophisticated, stylish dessert is sure to impress.
- My foolproof method ensures perfect results every time, even if you’re a kitchen newbie! With just 15 minutes of active prep, you’ll have a beautiful cheesecake ready for baking.
Ingredients & Substitutions
- Digestive Biscuits/Crackers: These form the base of the crust, providing a crunchy, slightly sweet layer that complements the creamy filling. Feel free to swap in honey or cinnamon graham crackers, or warmly spiced gingersnaps or speculoos.
- Melted Butter: For adding luxurious richness and flavorful depth to the crust. I like to use salted, preferably cultured and European-style butter, which has a higher fat content and more complex flavor profile than American-style butter.
- Full-Fat Cream Cheese: The heart of any classic cheesecake! Make sure to use a high-quality brand of block-style cream cheese, not cream cheese spread. You can also use mascarpone, but it will not taste as tangy if you do.
- Granulated Sugar: Neutral white sugar adds sweetness to the filling while letting the other flavors shine more brightly. Note that “superfine” or “caster” sugar are the same as granulated, but with smaller granules—they can be used in a 1:1 ratio. Cane sugar is also acceptable.
- Heavy Cream: Also known as “double cream,” this gives our filling an extra light, extra creamy consistency. Feel free to swap in slightly lighter “whipping cream” which has a minimum of 30% milk fat, compared to heavy cream’s 36%.
- Vanilla Extract: A classic addition to most dessert recipes, perfect for adding a subtle, sweet aroma and warming flavor.
- Eggs: Provide structure to our baked cheesecake recipe and help it set, while also contributing to its creamy texture. Note that I use large eggs unless otherwise noted, which is equivalent to roughly ¼ cup per egg.
- Sour Cream: Adds extra creaminess and a slight tang, balancing out the sweetness of the sugar. Make sure to use full-fat dairy for the best results.
- Cornstarch: This thickener helps stabilize the cheesecake and prevent cracks. Can’t do corn? Potato starch is a perfect 1:1 substitute.
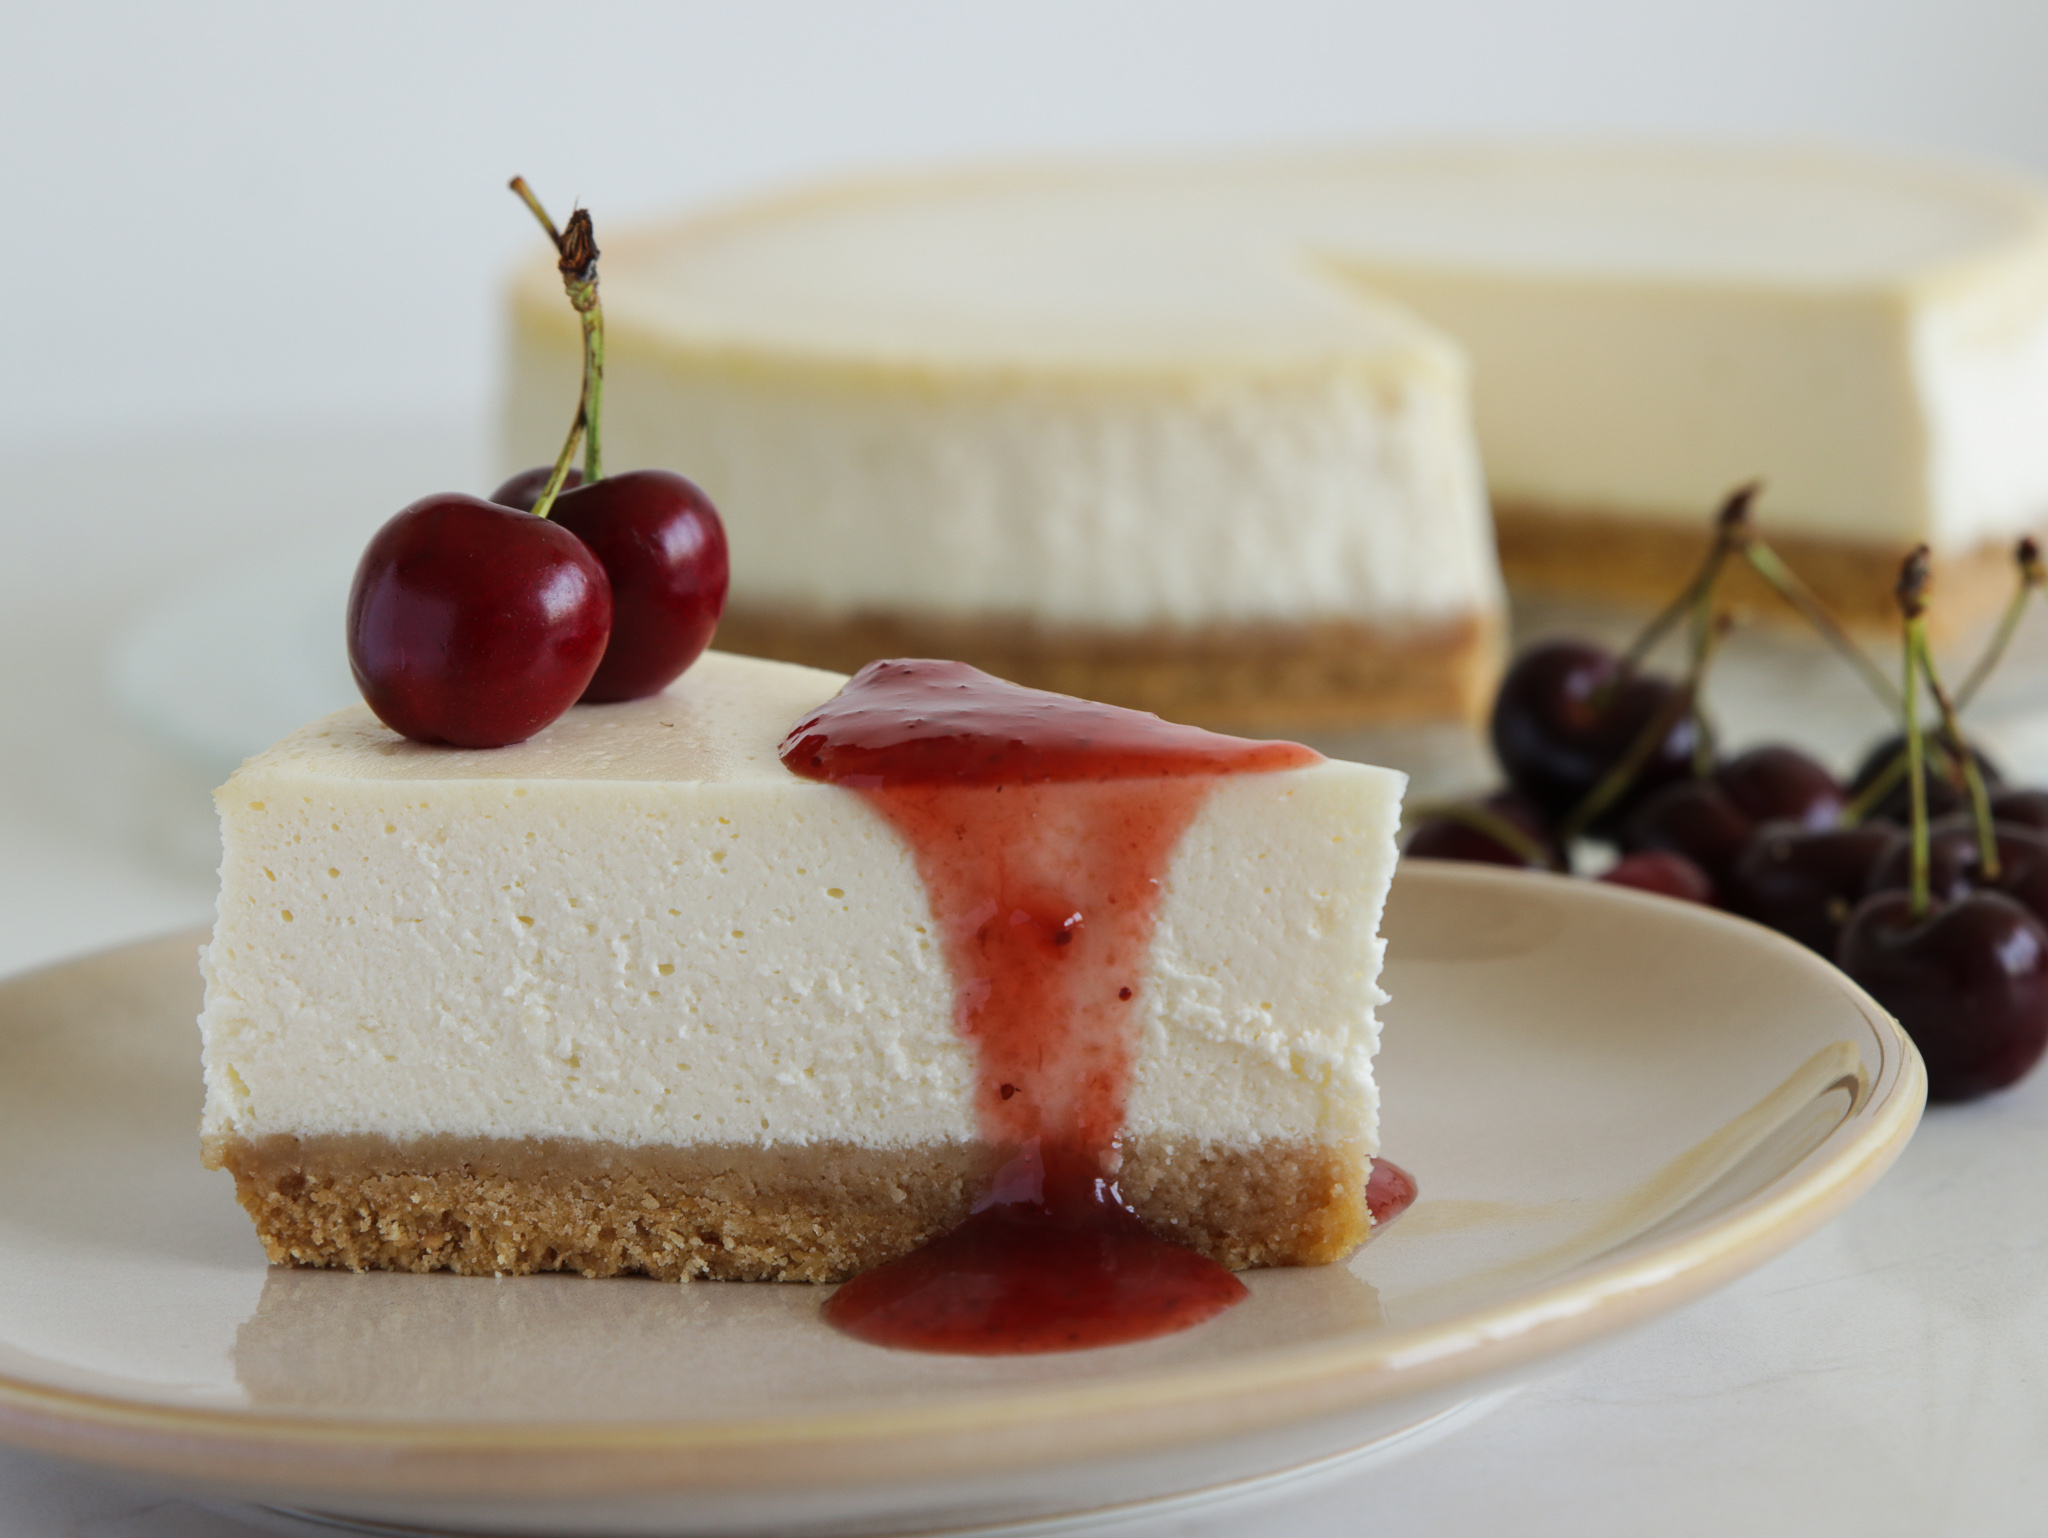
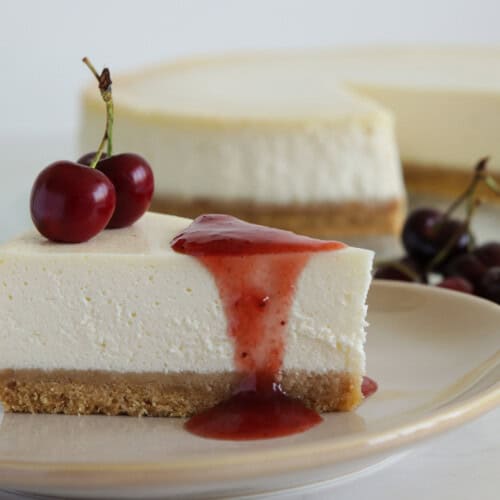
- Fresh Berries & Strawberry Chia Jam: Optional, but excellent for adding a pop of color, juicy sweetness, and a bit of acidity to cut through the rich cheesecake base.
This is just a short review of the ingredients; for the complete recipe, including quantities, scroll down to the recipe card. 👇
Do I have to make my cheesecake in a water bath?
Baking your cheesecake in a water bath might sound a little fussy, but it’s actually a simple trick that makes a big difference in the final result. Cheesecake filling is essentially a custard, which means it loves gentle, even heat. A water bath—also called a bain-marie—helps you achieve just that.
Here’s how it works: by placing your springform pan in a larger pan filled with hot water, you create a moist, steamy environment in the oven. This keeps the temperature surrounding the cheesecake steady and even, which helps prevent the edges from baking too quickly while the center catches up.
The steam from the water also keeps the oven environment humid, reducing the chance of the top drying out and splitting. The result? A smooth, creamy, luscious cheesecake with a flawless top that looks as good as it tastes.
Want a detailed, step-by-step tutorial? Check out my complete guide to making a water bath for cheesecake — includes photos, equipment tips, and troubleshooting.
Optional Variations & Dietary Adaptations
- Gluten-Free – Swap in your favorite gluten-free digestive biscuits, cookies, or graham crackers.
- Fruity Fun – Add fresh berries and compote to give this classic cheesecake a colorful glow-up. Try my blueberry cheesecake or mango cheesecake to see what I mean!
- Add Chocolate – Use chocolate cookies to make your cheesecake crust, add some mini chocolate chips to the filling, or add a layer of fudgy ganache. Or, go big with my triple chocolate cheesecake instead!
- Mini Cheesecakes – Rather than fuss with slicing a dessert to serve, go with pre-portioned bite-sized cheesecakes instead. As a bonus? You can make a bunch of different types of cheesecake all in one go by adding different toppings!
Expert Tips & Tricks
Despite what you might think, this is truly an easy cheesecake recipe, even for beginners. Here are just a few things to keep in mind:
- Use room temperature ingredients. Starting with room temperature cream cheese is essential for beating it well, but don’t forget the other ingredients. Make sure your eggs and dairy are also at room temp so they don’t cause the cream cheese to seize—we want a smooth, lump-free batter.
- Avoid overbeating: Too much air in the batter can cause cracks. I like to use the low setting on my mixer to ensure everything gets mixed in without incorporating air bubbles.
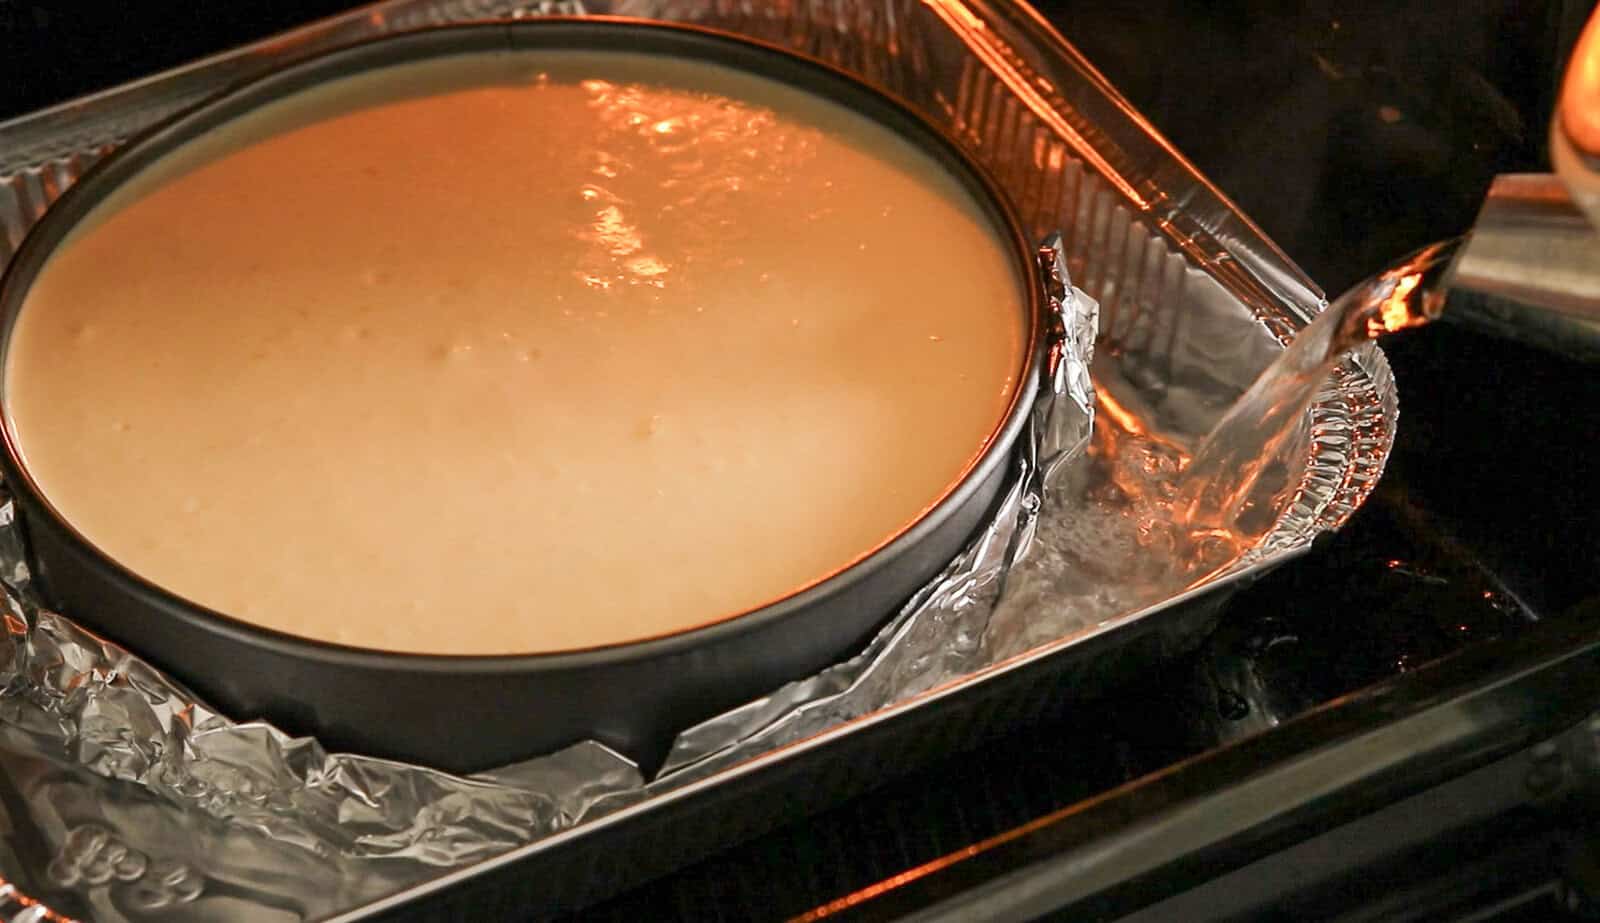
- Use a water bath: It provides even heat distribution and prevents cracking. To prevent burning yourself, I recommend placing the foil-wrapped springform pan inside a larger empty pan, then pouring in the boiling water once the pan is on the racks.
- Temperature matters: Do yourself a favor and invest in an oven thermometer to make sure you’re baking your cheesecake at the right temperature.
- Be patient: Opening the door during baking can cause sudden temperature changes of 30ºF or more, which can cause cracks to form across the top of the cheesecake. Don’t open the door until you reach the lower limit of baking time listed in the instructions.
- Cool gradually: I like to let my cheesecake cool in the oven with the door open about halfway. This prevents a big temperature swing, which can shock the custard into cracking. Once the cheesecake is cool enough to handle without oven mitts, place it on a wire cooling rack and let it continue to cool to room temperature before wrapping with cling wrap and refrigerating.
- Refrigerate before serving: Allow the cheesecake to chill for a minimum of 6 hours for the best texture and flavor. It needs some time to properly set up!
How to Serve Classic Cheesecake
A classic cheesecake is a showstopper all on its own, but how you serve it can take it from simply delicious to unforgettable.
- For a timeless presentation, slice it with a warm knife (wiping between cuts for clean edges) and serve chilled, straight from the fridge.
- Want to dress it up? Try topping each slice with a dollop of homemade whipped cream, a drizzle of fruit compote or caramel sauce, or a few seasonal berries. Finish with a fresh mint leaf for a beautiful presentation.
- Hosting a party? Pre-slice the cheesecake and serve a variety of toppings buffet-style so guests can customize their slices—think fresh fruit, jam or lemon curd, chocolate ganache, toasted nuts, crushed Oreos, or even pretzels for a salty-sweet crunch.
What are your favorite ways to serve cheesecake? Let me know in the comments below. The way I see it, however you serve it, classic cheesecake never goes out of style!
How To Refrigerate & Freeze Cheesecake
- Refrigerate: After the cheesecake cools to room temperature, cover it tightly with plastic wrap or place it in an airtight container. It will keep well in the fridge for up to 5 days.
- Freeze: To store it longer, wrap the cheesecake securely in a few layers of plastic wrap to ward off freezer burn, then add a layer of aluminum foil or place it in a freezer-safe container. Make sure to put it in the coldest part of the fridge (i.e. as far from the door as possible). It can be frozen for up to 3 months. When you’re ready to enjoy it, thaw overnight in the fridge. Pro Tip: Pre-slice the cheesecake before freezing—that way you can defrost only what you need when you need it!
- Toppings Tip: If you’re adding fresh fruit or other toppings, wait until just before serving. This keeps everything looking and tasting fresh—and prevents soggy cheesecake!
More Cheesecake Recipes
If you love this classic creamy cheesecake but want to try something unique and new, here are some cheesecake recipe ideas for you:
The Best Classic Cheesecake Recipe (Creamy & Crack-Free)
Ingredients
For the crust:
- 250 g Digestive biscuits/crackers
- 6 tablespoons (90 g) Butter melted
For the cheesecake:
- 4 cups (900 g) Cream cheese room temperature
- 1 cup (200 g) Sugar
- ¼ cup (60 ml) Heavy cream
- 1-2 teaspoons Vanilla extract
- 4 Eggs large
- 1 cup (225 g) Sour cream
- 1 ½ tablespoons (15 g) Cornstarch
- Lemon zest
- Pinch Salt
For topping:
- Fresh berries
- Strawberry jam
Instructions
- Prepare the crust: Preheat oven to 325°F (160°C).
- In a food processor, crush the biscuits into fine crumbs (or use a Ziploc bag and rolling pin). Add melted butter and pulse or mix until evenly combined.
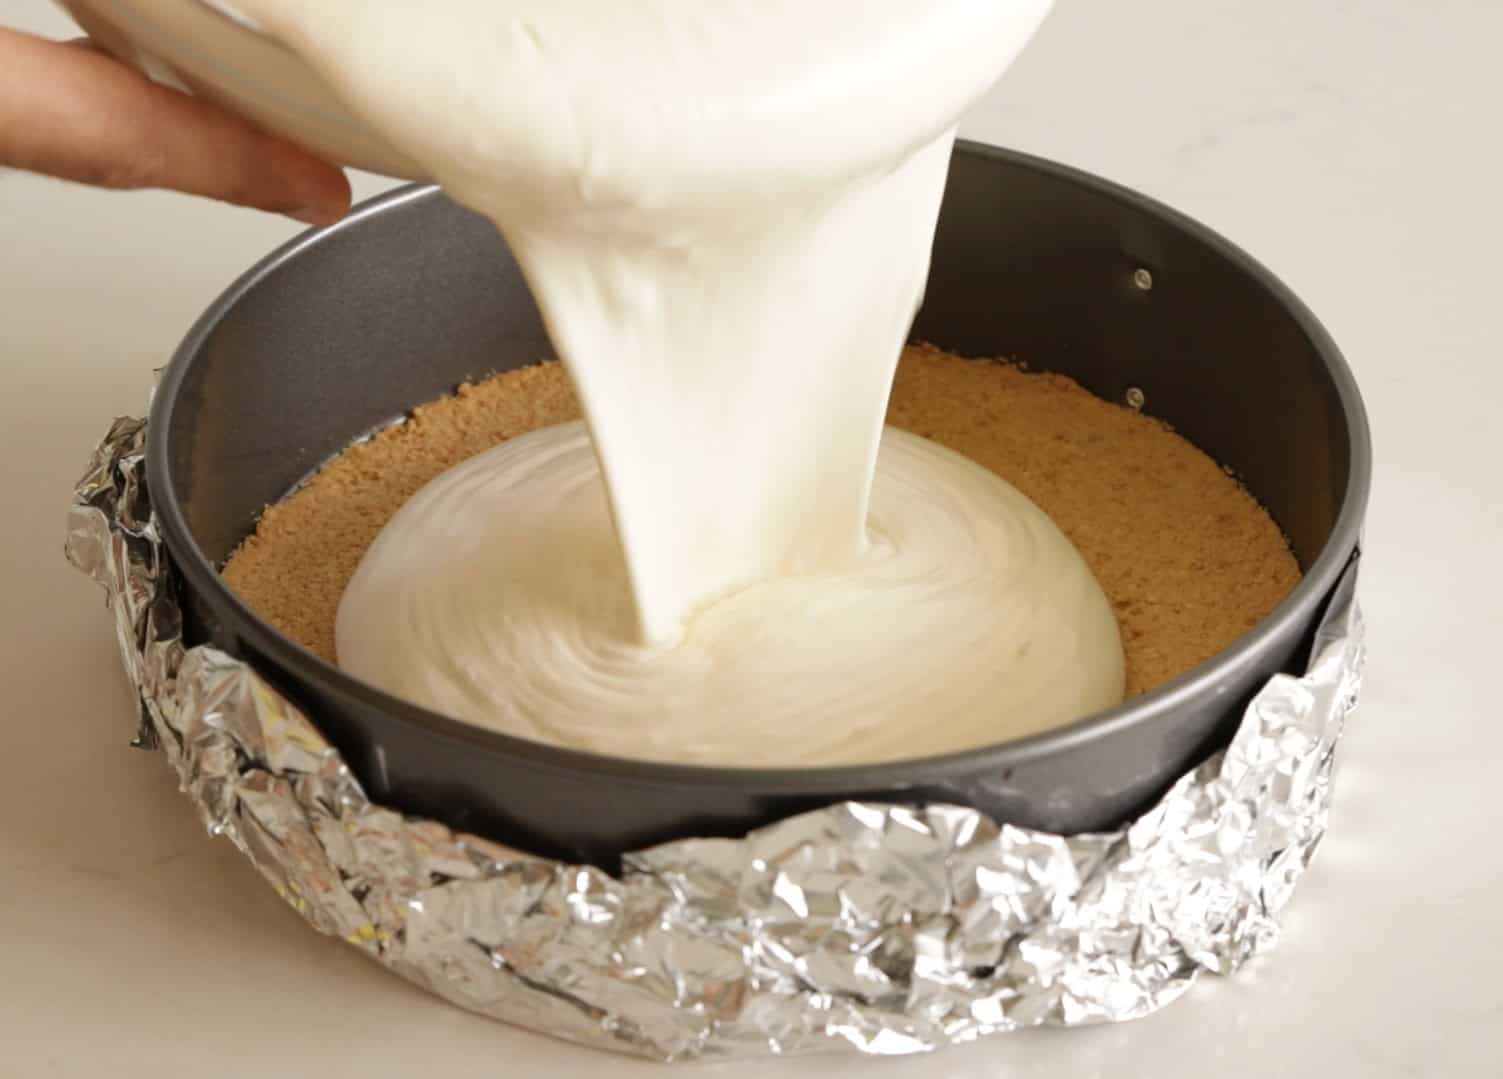
- Press the mixture firmly into the bottom of a 9-inch (23 cm) springform pan. Bake for 7–8 minutes, then remove from the oven. Reduce heat to 300°F (150°C).
- Make the cheesecake filling: In a large bowl, using a hand or stand mixer, beat the cream cheese and sugar until completely smooth (about 2 minutes).
- Add the eggs, one at a time, mixing just until incorporated. Do not overmix. Add vanilla, sour cream, heavy cream, salt, lemon zest, and cornstarch. Beat just until smooth and well combined.
- Bake with water bath: Wrap the bottom of the springform pan tightly with aluminum foil to prevent water from leaking in.
- Pour the batter over the crust and smooth the top. Place the pan inside a large roasting pan, and carefully pour hot water into the roasting pan until it reaches halfway up the sides of the springform pan.
- Bake for 45–50 minutes, or until the edges are set but the center still slightly jiggles.
- Turn off the oven, crack the door slightly, and let the cheesecake rest inside for 1 hour. Remove from the oven, cool at room temperature for another hour, then refrigerate for at least 4 hours, preferably overnight.
- Decorate: Before serving, top with fresh berries and a light glaze of warmed strawberry jam, if desired.
Video
Notes
- Avoid overmixing: Too much air in the batter = potential cracks.
- Baking time: Ovens vary. If the center still has a wobble and the edges are firm, it’s done!
- Chilling: Chill at least 4 hours, but overnight gives the best flavor and texture.
- Water bath: Prevents cracks and promotes even baking. Wrap your pan tightly in 2-3 layers of foil to avoid leaks, or use a cheesecake pan with a silicone wrap. For more about this, read my complete guide on how to make a water bath for cheesecake.
- Watch the video: For visual learners, I highly recommend watching the full video tutorial—you’ll see each step in action and get extra tips.
- Have questions? Make sure to read the full blog post—I cover lots of tips, tricks, and useful info. And don’t miss the FAQs section below the recipe card for troubleshooting, substitutions, and more.
Nutrition
Common Questions
Yes! Cheesecake freezes well. Hop up to the storage section for more details.
At first glance, traditional and New York-style cheesecakes might look pretty similar—but take one bite and the differences become clear. Traditional cheesecake’s texture is silky and custard-like, and it often relies on a water bath during baking to help it stay delicate and crack-free.
New York cheesecake is far heavier from a texture perspective. While the main ingredients are the same, this style amps things up with extra cream cheese, egg yolks and fat. It’s baked at a higher temperature initially, then finished at a lower temp—often without a water bath—which gives it that signature dense, ultra-rich, and slightly tangy bite with a subtle browned top.
There’s a few: use full-fat ingredients for the best mouthfeel, make sure they’re room temperature for making a smooth batter, don’t overmix the filling, use a water bath for even baking, bake low and slow, cool gradually, and give it plenty of time to firm up in the fridge.
They’re both delicious! Baked cheesecake is the classic preparation. It’s made with eggs and often baked in a water bath for that ultra-creamy, custard-like texture. It’s rich, tangy, and feels like a true indulgence. If you want that dense, velvety slice that holds its shape and melts in your mouth, baked is the way to go.
No-bake cheesecake recipes (like my no-bake strawberry cheesecake and no-bake lemon cheesecake) skip the oven and rely on whipped cream and/or gelatin for structure. It’s lighter, fluffier, and a bit more mousse-like. It also comes together quickly, making it perfect for warm weather or when you don’t want to turn on the oven.
Absolutely! Cheesecake is a great make-ahead dessert. You can prepare it 1-2 days in advance and store it in the refrigerator. Just cover it tightly to maintain freshness.
Oops! Cracks are usually caused by either overbaking or rapid temperature changes. Using a water bath helps prevent cracks by creating a gentle, even baking environment, while cooling the cheesecake in the oven first ensures no wild temperature swings. If your cheesecake has already cracked, don’t worry—it’ll still taste delicious. You can also use some strategically placed berries to cover it up!
For a creamy cheesecake, use high-quality dairy, make sure your eggs and dairy are at room temperature, avoid overbeating the filling, bake using a water bath, and stop baking while there’s still a bit of jiggle left in the center.
Yes, but it’s not recommended. A water bath ensures even baking and prevents cracking. If you skip it, reduce the oven temperature by 25F and monitor the cake closely.


")


Best cheesecake I’ve ever made! 100% recommended 👌
Thank you 🙂
Made it for the weekend and it was a hit 👍
Glad you like it 🙂
Making this right now, wish me luck 🤞
Good luck, how was it? Hope you enjoyed baking this cheesecake 🙂
worked perfect! last month I also made you blueberry cheesecake. MY family loved it.
Did you put the pan inside the roasting pan filled with water as described in the recipe or the roasting pan under the pan as shown in the video, please?
It doesn’t really matter. What you want to do here, is to create a steamy environment. Both ways are good.
Dear David, I made this recipe for my birthday and everybody loved it! They even want me to do it again without occasion sometimes 🙂 Thank you so much!
I really appreciated how detailed you were in terms of the cooking process.
And I already have chosen some other recipes of yours to try. Thank you for staying humble and giving your knowledge to others to help them. It’s so rare. Thank you for your work. God bless you
Wow Niya! Your cheesecake looks so good! Glad you liked it, It’s one of my favorite desserts.
And thank you for your kind words.
Absolutely delicious! Thank you 🤗