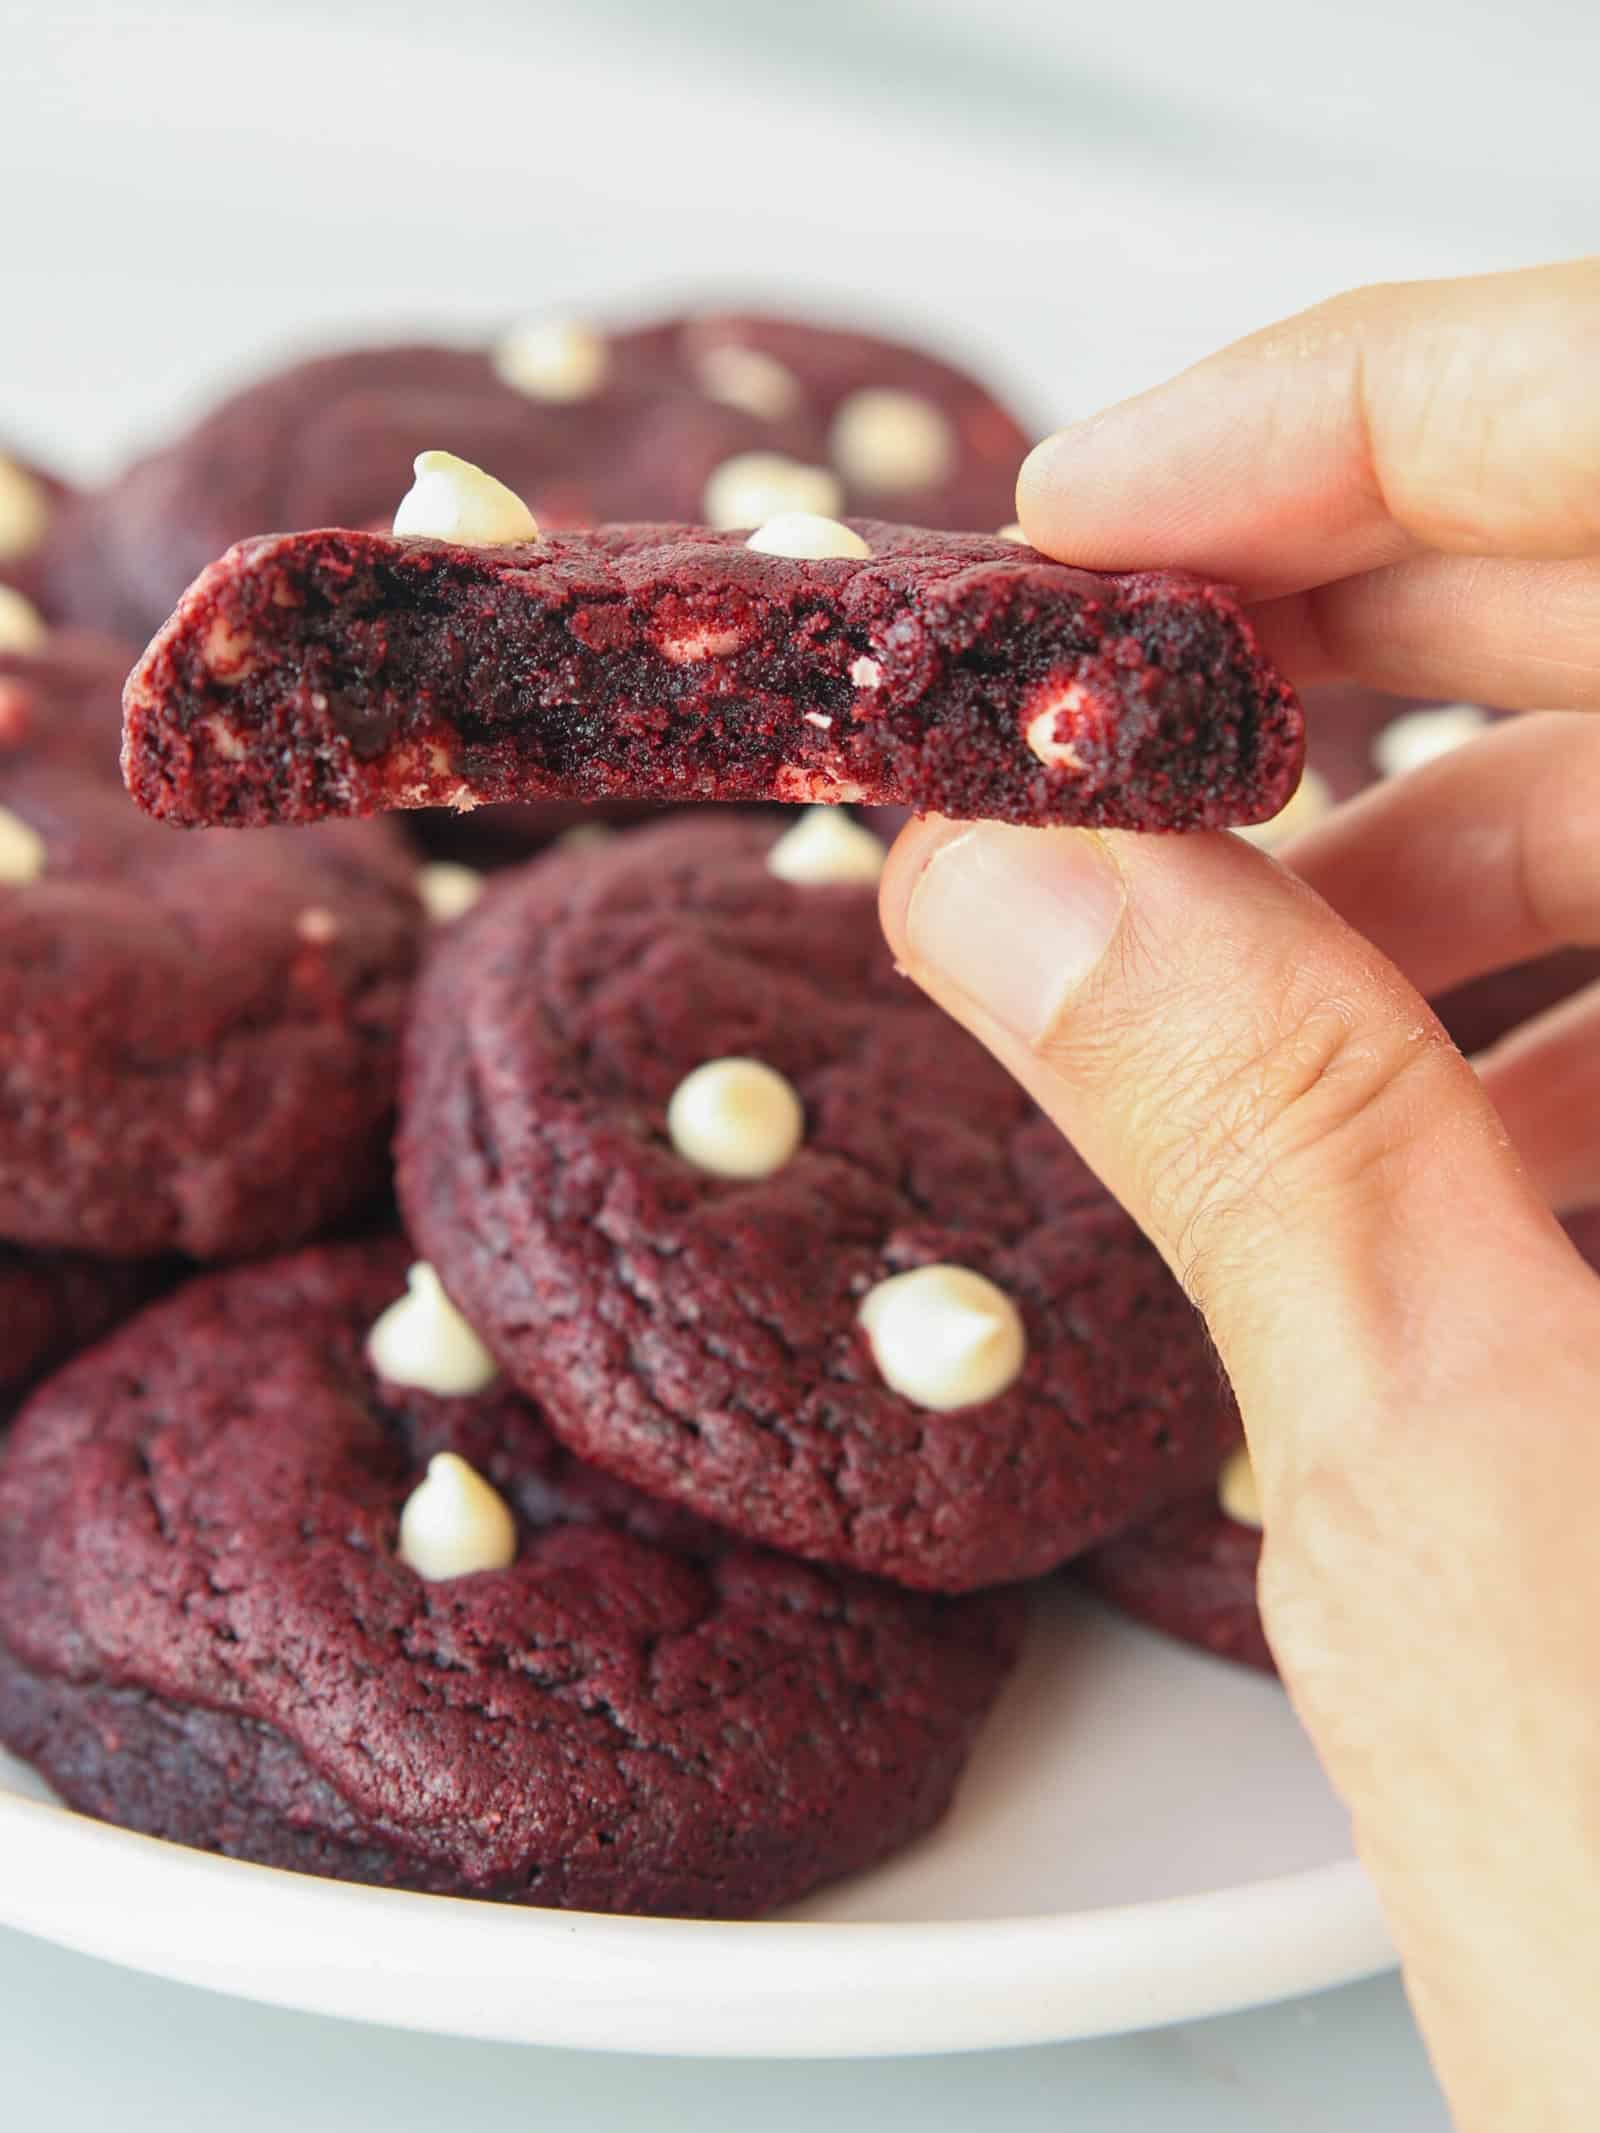
My deliciously chewy, mildly chocolatey, and surprisingly simple recipe for Red Velvet Cake Cookies is a fantastic way to transform your favorite bakery slice into a perfectly portable treat. These radiantly colored rounds are studded with creamy white chocolate chips, offering a delightful contrast to the cocoa-flavored cookie base.
I originally published this recipe in 2019 and have since updated it with new photos, improved instructions, and extra success tips.
If you’re a fan of classic red velvet cake with cream cheese frosting but don’t want to fuss with making layer cake, these white chocolate chip red velvet cookies are for you. They have all the cheerful, cherry-colored appeal and chocolatey goodness you crave, but in a much easier-to-make, easier-to-serve package!
Why You’ll Love Red Velvet Cake Cookies
As a recipe developer with a serious sweet tooth, it’s hard to pick favorites. But, my accompanying YouTube video for these red velvet cookies has amassed a whopping 455,000 views and more than 10,000 likes, so you can rest assured this one is a winner!
While everyone loves a classic chocolate chip cookie, sometimes something a bit more exciting is in order. Whether you’re looking for a festive Christmas cookie, a Valentine’s dessert, or a fun addition to your game day spread, these vibrantly colored, cake-inspired sweets are just the thing to shake up your routine.
With just a few basic ingredients and 30 minutes of active prep, you can have a batch of red velvet cake cookies ready to go. They’re the ideal last-minute, low-lift snack!
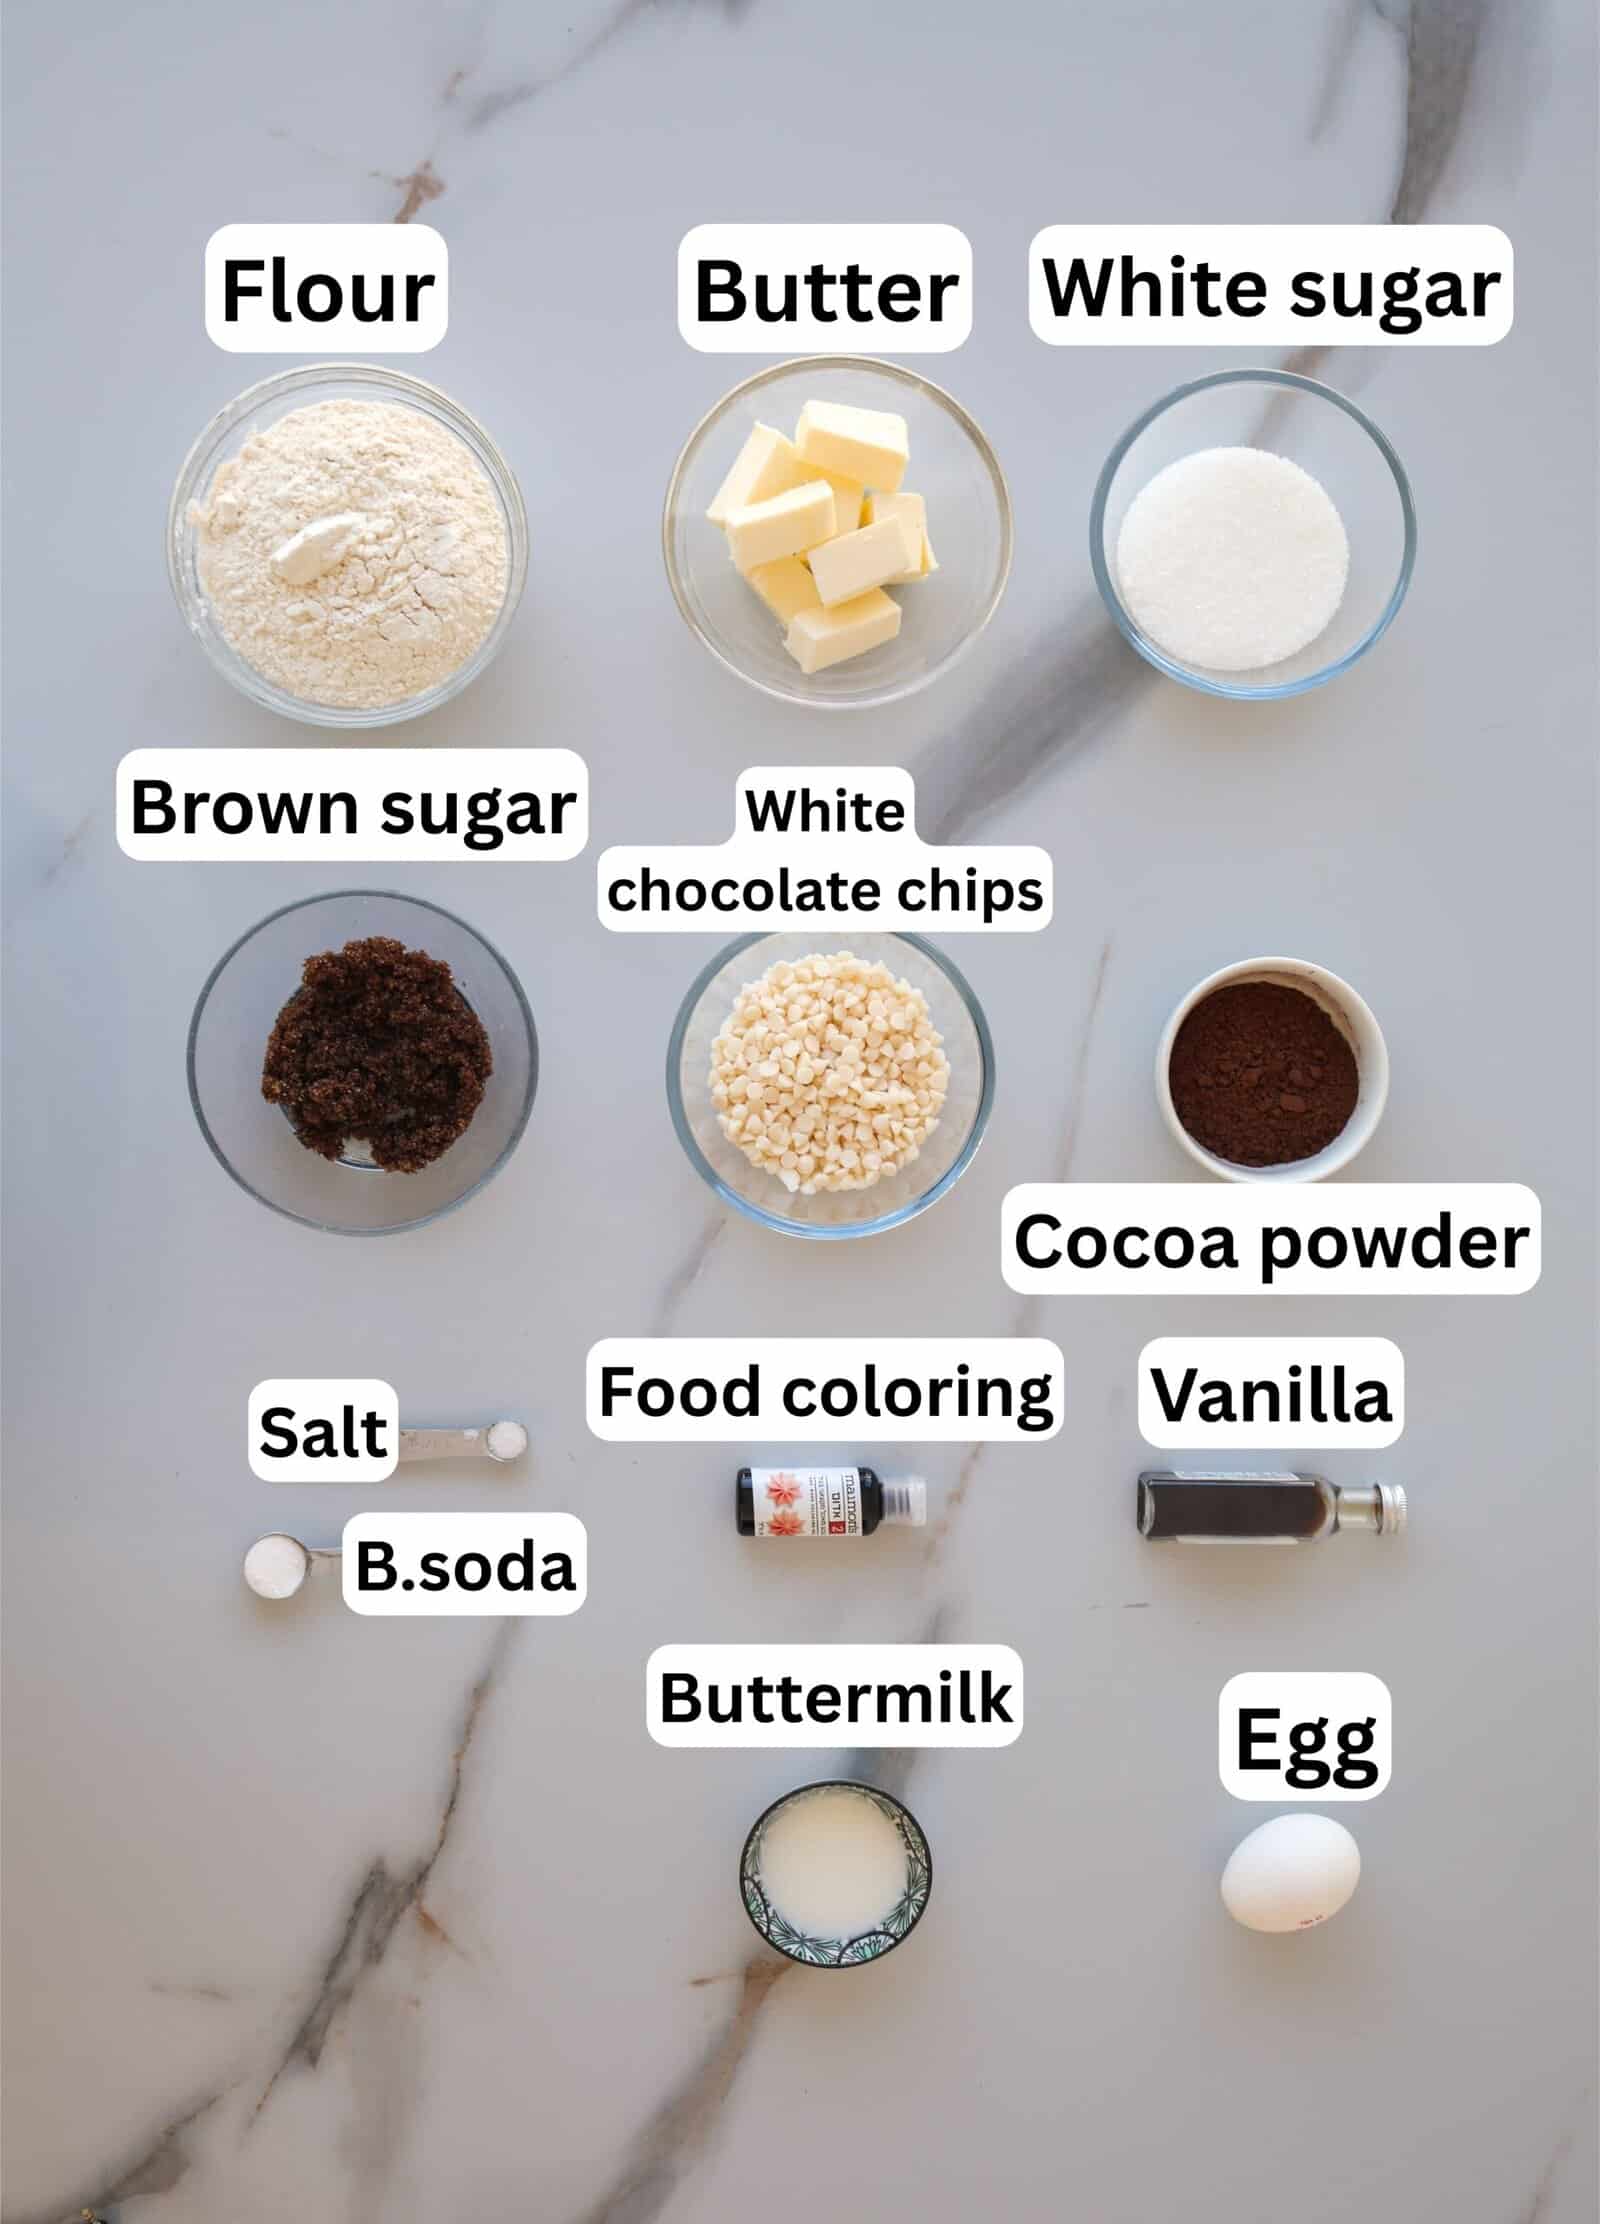
Ingredients & Substitutions
Unsalted Butter & Salt – Starting with unsalted butter and adding salt to taste is the easiest way to ensure consistently delicious results every time.
Brown Sugar & White Sugar – These common sweeteners react differently in cookie recipes, so make sure to use both for the best of both worlds. Fresh out of brown sugar? Mix granulated sugar and molasses in a 1 cup to 1-2 tablespoon ratio (depending on whether you want light or dark brown sugar).
Large Egg – For binding the dough and adding structure. If you’re using liquid eggs, aim for a scant ¼ cup.
Buttermilk – This is what gives red velvet its signature soft, tender bite and a little hint of tang. No buttermilk on hand? No worries, just mix 1 tablespoon of milk with ¼ teaspoon of lemon juice or vinegar and let it sit for about 5 minutes for a quick DIY.
All-Purpose Flour – A pantry staple!
Unsweetened Cocoa Powder – While I’m normally a big fan of Dutch-processed cocoa powder, the added acidity of conventional cocoa is great here. It echoes the tangy flavor of cream cheese frosting you’d get from a slice of red velvet cake!
Baking Soda – This is what helps our cookies puff to perfection. Note that it reacts differently than baking powder, so they are not interchangeable.
Red Gel Food Coloring – Gel or paste food coloring is super concentrated, so you get a rich “red velvet” hue without watering down the dough. Start with about ½ teaspoon and add a little more if you want a deeper shade. Just don’t add too much, as it can affect the taste of your cookies. Prefer a more natural option? You can use beet powder instead! It won’t be quite as vibrant, but it gives a lovely earthy red tone.
White Chocolate Chips – I love the color contrast of red velvet and white chocolate chip cookies, but feel free to swap in any type of chocolate chunks or chips you prefer.
This is just a short review of the ingredients; for the complete recipe, including quantities, scroll down to the recipe card 👇
The Origins (and Many Variations) of Red Velvet Cake
Most food historians trace its roots back to the early 20th century, when “velvet” cakes were all the rage. The plush, tender crumb of these cakes was achieved by combining cocoa powder with acidic ingredients like buttermilk or vinegar. The chemical reaction created a naturally reddish-brown tint even without added food coloring.
The version we recognize—the striking, vibrant red layers with cream cheese frosting—really took off in the 1930s and 40s. Some believe the Waldorf-Astoria Hotel in New York helped popularize it; others credit the Adams Extract Company during the Great Depression, who promoted their red dye with a simple cocoa cake recipe.
Over the decades, it became a symbol of celebration, especially in the American South, where it remains a beloved dessert for holidays like Valentine’s Day, Juneteenth and Christmas. Since then, bakers have given it all kinds of playful twists, from red velvet cupcakes and red velvet cheesecake, to red velvet truffles and the red velvet cookies we’re making today.
How to Make Red Velvet Cookies With White Chocolate Chips
Watch the full video to learn how to make the BEST Red Velvet Cookies Recipe. This step-by-step tutorial simplifies the process, offering tips and tricks to guarantee perfect results every time.
Prefer the written recipe? Scroll down to the recipe box👇
Optional Variations & Dietary Adaptations
Gluten-Free – Swap the all-purpose flour for a high-quality 1:1 gluten-free baking blend that includes xanthan gum for structure. Make sure to chill the dough for a minimum of 30 minutes before baking to give the flour time to rehydrate, preventing a gritty texture and extra spreading.
Dairy-Free – Use a plant-based butter (choose one with at least 75-80% fat for the best texture), dairy-free chocolate chips, and replace the buttermilk with a mixture of unsweetened dairy-free milk and a splash of vinegar or lemon juice.
Egg-Free – Replace the egg with a flax egg (1 tablespoon ground flax mixed with 3 tablespoons water, rested for 5 minutes).
Sandwich Cookies – Bake the cookies slightly smaller (with a slightly shorter bake time) and pair them up with cream cheese frosting for adorable red velvet whoopie pies.
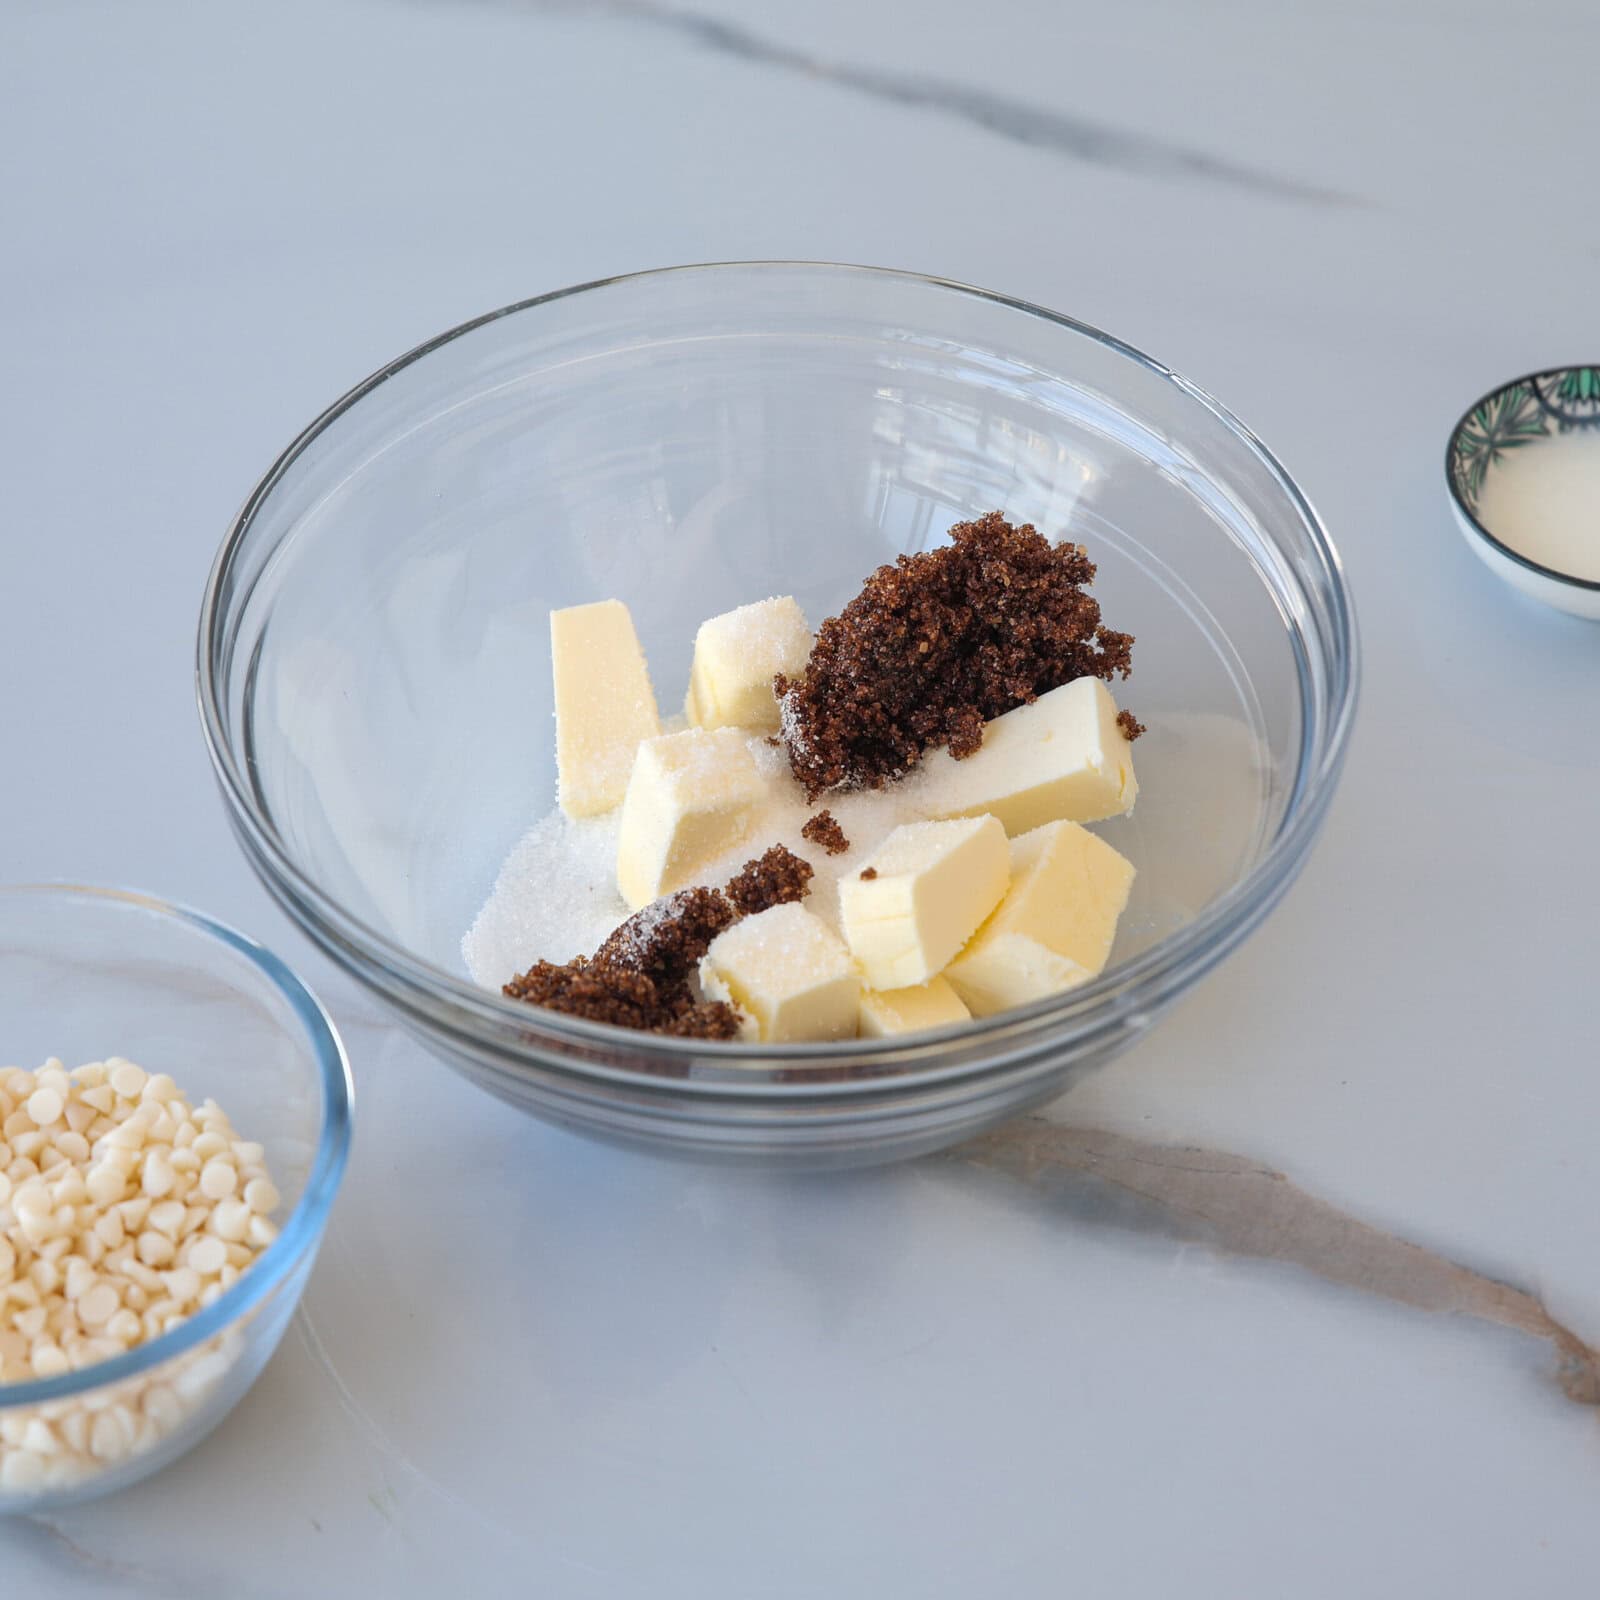
Start with the basics: cream butter and sugarA tablespoon of buttermilk adds a subtle tang and helps create the classic soft red velvet texture.
Expert Tips & Tricks
Measure your flour correctly. Too much flour leads to dense, cakey cookies. Use the spoon-and-level method (don’t scoop straight from the bag!) to keep the texture soft and tender.
Use room-temperature ingredients. A room-temp egg and softened butter blend more smoothly into the sugar, giving your cookies better structure and lift.
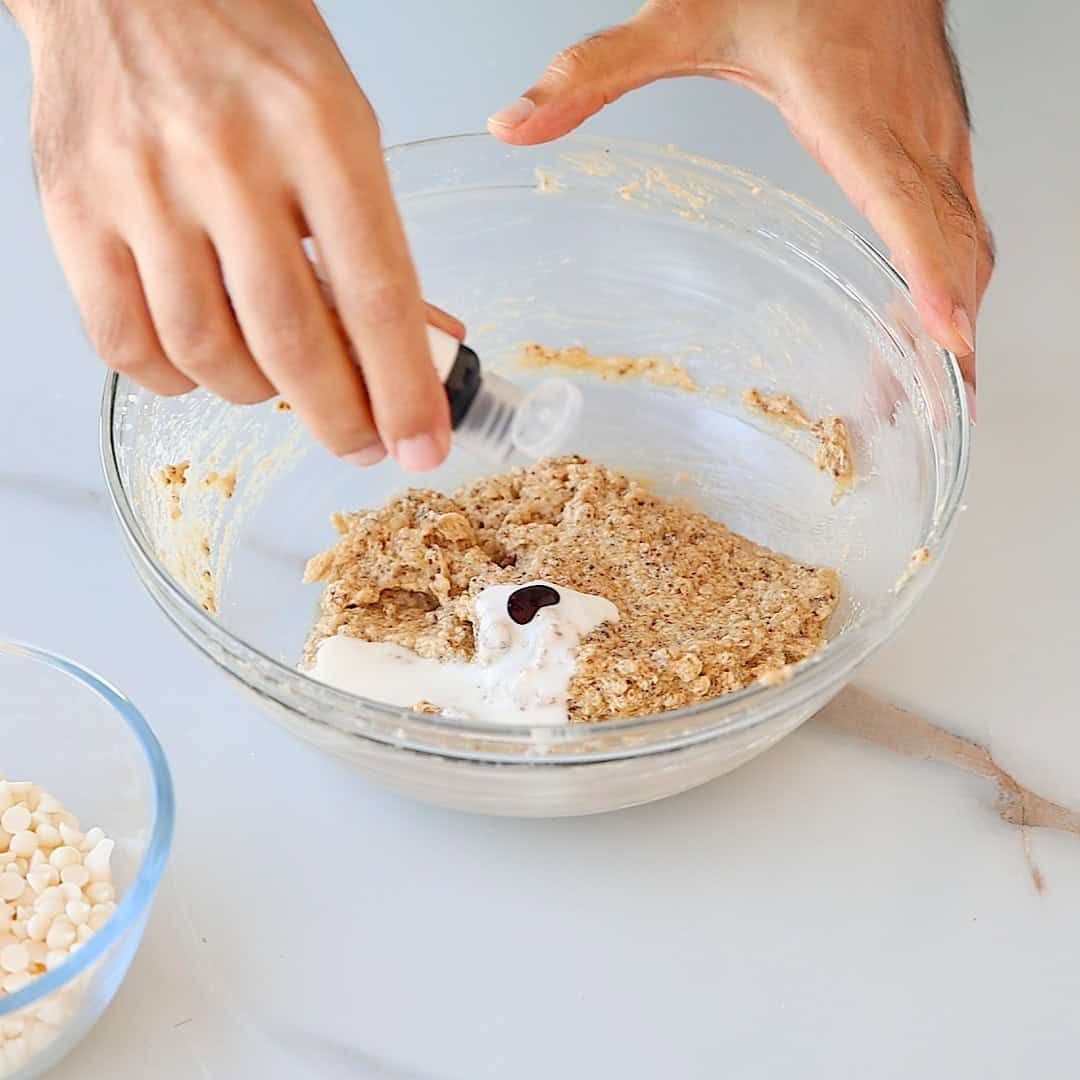
Add food coloring gradually. Start small, then build up the red hue. Too much gel coloring can leave a bitter aftertaste, so aim for just enough to achieve the classic hue.
Chill the dough! This helps control spreading and improves the chewy texture.
Don’t overbake. Red velvet cookies should look slightly underdone in the center when you pull them out. They’ll continue setting on the baking sheet thanks to carryover cooking.
Let them rest on the baking sheet. Allow the cookies to cool for 5-10 minutes before transferring to a rack so they can firm up a bit.
Be like Michael Jackson and beat it. Creaming the butter and sugars thoroughly adds air to the dough, helping your cookies bake up fluffier and more tender.
Fold in mix-ins gently. If you’re adding white chocolate chips or other chocolate chunks, fold them in at the end to avoid overworking the dough. Press a few extra chocolate chips on top right before baking for a professional look!
Add food coloring graduallyAdd chocolate chips or chunks
How to Store Red Velvet Cookies
Make-Ahead: The only thing better than homemade red velvet cookies is homemade red velvet cookies on demand! Chill the dough in the fridge for up to 48 hours, or roll it into balls and freeze them on a baking sheet before transferring to a freezer bag. Frozen dough balls will keep for up to 2 months and can go straight into the oven if you add an extra minute or two of baking time.
Room Temperature: Once baked and cooled, store your cookies in an airtight container at room temperature for 3-4 days.
Refrigerator: Red velvet cookies stay fresh in the fridge for up to a week.
Freezer: For longer storage, freeze baked cookies for up to 2 months. Make sure to separate layers with parchment to keep them from sticking together.
1cup(180g)White chocolate chipsor any chocolate, adjust amount to taste
Instructions
Mix the dry ingredients: In a medium bowl, whisk together the flour, cocoa powder, baking soda, and salt. Set aside.
Cream butter & sugars: In a large bowl, beat the softened butter with both sugars until creamy and smooth (you can use a spatula, hand whisk, or mixer).
Add egg, buttermilk & vanilla: Mix in the egg, buttermilk, and vanilla extract until fully combined.
Add food coloring: Stir in the red food coloring. If the color isn’t as vibrant as you’d like, add a little more until you reach your preferred shade.
Combine wet & dry ingredients: Add the dry mixture to the bowl and mix on low speed (or fold with a spatula) just until combined, do not overmix.
Fold in chocolate chips: Gently fold in the white chocolate chips.
Chill the dough: Cover the bowl with plastic wrap and refrigerate for at least 30 minutes.
Preheat & prepare the baking sheet: Preheat the oven to 350°F (175°C) and line a baking sheet with parchment paper.
Portion the dough: Scoop the dough into 2-tablespoon portions (about 2-inch balls) and place them 2 inches apart on the baking sheet.
Bake: Bake for 10–11 minutes, or until the edges are lightly set and the centers are still soft.
Cool the cookies: Allow the cookies to cool on the baking sheet for 10 minutes, then transfer to a wire rack to cool completely.
Video
Notes
Buttermilk: Buttermilk adds a subtle tang and helps create the classic soft red velvet texture. If you don’t have buttermilk, substitute with 1 tablespoon milk mixed with ¼ teaspoon lemon juice or vinegar and let it rest for 5 minutes.
Food Coloring: Use gel or paste food coloring, as it is more concentrated and doesn’t add extra liquid. Start with ½ teaspoon and gradually add more until the dough reaches a deep red cocoa-toned color. Avoid adding too much, as it may affect the taste.
Chilling the Dough: Chilling prevents overspreading, deepens the flavor, and improves the chewy texture. Don’t skip this step.
Chocolate Chips: Use any chocolate you like, white chocolate (classic pairing), milk chocolate, dark chocolate, or chocolate chunks. The amount is flexible, so adjust to taste.
Make-Ahead: The dough can be chilled for up to 48 hours, or rolled into balls and frozen for up to 2 months. Bake frozen dough straight from the freezer and simply add 1–2 extra minutes to the baking time.
Storage: Store baked cookies in an airtight container at room temperature for 3–4 days, refrigerate for up to 1 week, or freeze for up to 2 months.
For Bakery-Style Presentation: Press a few extra chocolate chips on top right before baking for a professional bakery-style look.
Nutrition information is automatically generated and thus we can not guarantee it is 100% accurate.
Keyword baking, chocolate, cookies, sweet
FAQs
Are red velvet cookies just chocolate cookies with food coloring?
Not exactly. While red velvet cookies do contain cocoa powder, they use much less than classic chocolate cookies. What sets them apart is the combination of cocoa, acidic ingredients like buttermilk, and a touch of food coloring, which creates a softer texture, subtle chocolate flavor, and the signature red hue rather than a deep chocolate taste.
What are common red velvet cookie mistakes?
Like all cookie recipes, using too much flour can make the cookies dry and cakey, while overbaking leads to a crumbly, less tender cookie. Using melted or overly soft butter can cause the cookies to spread too much, as can skipping the chill time. Finally, adding too much food coloring can create a bitter aftertaste, so use it judiciously!
Can I make red velvet cookies without food coloring?
Yes. You can simply leave out the food coloring and still enjoy the same soft, chewy texture and mild cocoa flavor. The cookies just won’t have the classic red velvet color and will look more like light chocolate cookies. For a natural option, you can use beet powder, though the color will be more muted.
Why are my red velvet cookies cakey instead of chewy?
Cakey cookies are usually caused by too much flour, overbaking, or not enough fat. Make sure to measure flour using the spoon-and-level method, avoid baking past the point where the centers look just set, and chill the dough to help control spreading and improve chewiness.
Made these Red Velvet Cookies for the first time and they turned out exactly as the picture show. Definitely on my repeat list. They taste great as well, and my work colleagues were pleased as punch with them!
Hi… As promised on my feedback on using home made yogurt as a sub to buttermilk…
The cookies turned out great and was a hit … Am now itching on the idea of adding rum into the cookies to spice things up… ;D
I’ve made these red velvet cookies twice already and they’re officially in my “repeat forever” list. I added a handful of chopped white chocolate chunks instead of chips and slightly underbaked them, and wow, super soft, chewy, and not overly sweet. I think the buttermilk really makes a difference in texture.
Thank you for the recipe.


")
")


Made these Red Velvet Cookies for the first time and they turned out exactly as the picture show. Definitely on my repeat list. They taste great as well, and my work colleagues were pleased as punch with them!
Hi… As promised on my feedback on using home made yogurt as a sub to buttermilk…
The cookies turned out great and was a hit … Am now itching on the idea of adding rum into the cookies to spice things up… ;D
I’ve made these red velvet cookies twice already and they’re officially in my “repeat forever” list. I added a handful of chopped white chocolate chunks instead of chips and slightly underbaked them, and wow, super soft, chewy, and not overly sweet. I think the buttermilk really makes a difference in texture.
Thank you for the recipe.
Hi, How long can the cookie dough balls be refrigerated for?
Up to 3 days.
Could this red velvet cookie recipe, could the white chocolate chips be replaced into dark chocolate chips or chocolate?
yes actually
tho i think the flavour of the white chocolate is better for this recipe and white and red look good together