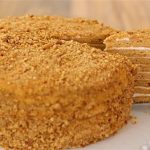
Medovik - Russian Honey Cake Recipe
Servings: 14
Calories: 369kcal
Ingredients
For the cake layers:
- 7 tablespoons Butter unsalted
- 4 tablespoons Honey
- 1 teaspoon Baking soda
- 3½ cups All-purpose flour see notes
- 3 Eggs large
- ¾ cup Sugar
For the cream:
- 2¼ cups Sour cream
- 1 cup Heavy cream
- 1½ cups Powdered sugar
- 1 teaspoon Vanilla extract
Instructions
- Prep: Preheat oven to 350°F (175°C).
- Make the dough: In a heatproof bowl, whisk eggs and sugar until pale. Add butter and honey, then place over a bain-marie (double boiler). Stir until butter melts and sugar dissolves.
- Add baking soda while the mixture is still over the bain-marie or very hot and mix; the mixture will foam slightly, which is essential for the cake’s texture.
- Remove from heat. Gradually add about 85–90% of the flour, mixing until a soft, slightly sticky dough forms. Add the remaining flour only if needed.
- Cover and let the dough rest for 20–30 minutes.
- Roll and bake: Divide dough into 8 equal pieces. Roll each piece very thin (about 2mm), preferably on parchment paper or a lightly floured surface. Trim using a 7-inch (18 cm) ring.
- Pierce with a fork. and bake each layer for 7–8 minutes, until golden.
- When finished baking the layers, bake the scraps as well, then crush into fine crumbs. Cool completely.
- Make the cream: In a bowl, whisk the sour cream until smooth and lump-free.
- In a separate large bowl, whip heavy cream, powdered sugar, and vanilla to medium-stiff peaks. Gently fold into the sour cream until smooth.
- Tip: If your sour cream is loose, strain it slightly for a thicker, more stable cream.
- Assemble: Spread 4–5 tablespoons of cream between each layer. Stack all 8 layers.
- Coat the top and sides with remaining cream, then cover with cake crumbs.
- Chill: Refrigerate at least 8–12 hours (preferably overnight) before serving.
Video
Notes
Nutrition
Calories: 369kcal | Carbohydrates: 55g | Protein: 6g | Fat: 20g | Saturated Fat: 12g | Polyunsaturated Fat: 1g | Monounsaturated Fat: 5g | Trans Fat: 0.2g | Cholesterol: 91mg | Sodium: 154mg | Potassium: 114mg | Fiber: 1g | Sugar: 18g | Vitamin A: 706IU | Vitamin C: 0.5mg | Calcium: 61mg | Iron: 2mg