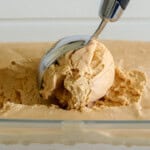
Easy Salted Caramel Ice Cream Recipe
If you are a fan of salted caramel, you will love this homemade salted caramel ice cream! You can make this no-churn ice cream easily at home without an ice cream machine and with just 3 simple ingredients.
Servings: 20 yields
Calories: 81kcal
Equipment
Ingredients
- 2 cups Heavy cream cold
- 1 jar Dulce de leche/Caramel sauce
- 1/4-1/2 teaspoon Salt depending on the saltiness you prefer
Instructions
- In a large bowl, place cold heavy cream. Whip to stiff peaks.
- Add dulce de leche/caramel sauce, salt and whisk on low speed until incorporated.
- Transfer into a freezer-safe container and freeze for at least 6 hours or overnight.
Video
Notes
- Watch the Video Recipe – For a better understanding of the recipe, I recommend watching the step-by-step video tutorial. It will guide you through the whipping and texture of the ice cream to help you achieve the best results.
- Check the FAQs – If you have any questions about ingredient substitutions, cooking methods, or storage tips, be sure to check the FAQs section located under the recipe card and the post above.
- Make-Ahead & Storage Tips – Keep in an airtight container in the freezer for up to 2-3 months. Fill the container to the brim to avoid freezer burns, or cover with plastic wrap before freezin
- Serving Tips – Remove the ice cream from the freezer and let it sit at room temperature for 5–10 minutes. This makes scooping easier.
- Whip the cream properly – Be sure to whip the cream to stiff peaks before folding it in. This helps create that light, airy texture we all love in homemade ice cream.
- Cool your caramel – If you use homemade caramel, make sure it's completely cool before adding it to the whipped cream. This keeps the airiness and prevents deflating the cream.
- Fold gently – When combining the ingredients, always fold gently with a spatula instead of stirring. This keeps the mixture light.
- Cover the ice cream – To minimize ice crystals, press a piece of parchment paper or plastic wrap directly on top of the ice cream before sealing the lid.
Nutrition
Calories: 81kcal | Carbohydrates: 1g | Protein: 1g | Fat: 9g | Saturated Fat: 5g | Polyunsaturated Fat: 0.4g | Monounsaturated Fat: 2g | Cholesterol: 27mg | Sodium: 35mg | Potassium: 23mg | Sugar: 1g | Vitamin A: 350IU | Vitamin C: 0.1mg | Calcium: 16mg | Iron: 0.02mg