Salted Caramel Cheesecake Recipe
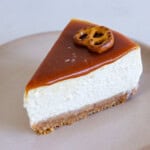
Salted caramel lover? Then you must try this amazing salted caramel cheesecake! Creamy, rich with a touch of salted caramel and mini pretzels. The best cheesecake ever.
Servings: 12 yields
Calories: 649kcal
Ingredients
Fort the crust:
- 190 g Digestive biscuits/crackers
- 60 g Mini pretzels
- 6 tablespoons Butter melted
- 1-2 tablespoons Milk
For the cheesecake filling:
- 4 cups Cream cheese room temperature
- 1 cup Sugar
- ¼ cup Heavy cream
- 1-2 teaspoons Vanilla extract
- 4 Eggs large
- 1 cup Sour cream
- 1½ tablespoons Cornstarch
- Lemon zest from one lemon
- ¼ teaspoon Salt
For the caramel topping:
- 1 cup Sugar
- 6 tablespoons Butter room temperature
- ½ cup Heavy cream room temperature
- 1/2-1 teaspoon Flaky salt
For decoration:
- Mini pretzels
- Flaky salt
Instructions
Make the crust
- Preheat oven to 325°F (160°C).
- In a food processor or Ziploc bag crush cookies into fine crumbs. Add melted butter and pulse until combined.
- Press into bottom of 9-inch (23cm) springform pan. Bake for 7-8 minutes. Set aside while making the filling.
Make the filling:
- Preheat oven to 325°F (160°C).
- In a large bowl beat cream cheese and sugar until smooth. Add eggs, one at the time, beating to combine after each addition. Do not over beat. Add vanilla extract, sour cream, heavy cream, salt and beat until smooth. Add cornstarch and lemon zest, beat until incorporated. Do not over beat.
Bake the cheesecake:
- Place the pan on a large piece of foil, and fold the foil up the sides of the pan. Pour the filling over the crust, place the pan inside a roasting pan. Fill the roasting pan with enough hot water to go halfway up the sides of the springform pan. Bake for 50-65 minutes or until the edge is set but the center jiggles slightly.
- Turn off the heat and leave it another hour in the oven.
- Let cool to room temperature for one hour, then refrigerate for at least 4 hours or overnight.
Make the salted caramel topping:
- Place the sugar into a saucepan and heat it over medium-low heat, stirring occasionally with a spatula or wooden spoon. Sugar will form clumps and eventually melt into a thick golden brown colored liquid as you continue to stir. Once all the sugar has melted and turned golden in color, remove the sauce pan from heat, add in the butter right away. Stir quickly until the butter is incorporated. Then add in the room temperature heavy cream and stir quickly again to incorporate everything together. Add salt and cook over medium heat for about 1 minute. Allow to cool.
- Pour over the cheesecake and spread evenly, decorate with mini pretzels and sea salt.
Video
Notes
- Watch the Video: For a better understanding of the recipe, I always recommend watching the video recipe, which includes a step-by-step guide to help you succeed.
- FAQs: Make sure you read the FAQs for this recipe which are located below the recipe box for additional tips and troubleshooting! For extra tips and variations read the article.
- If you enjoyed this recipe, I would appreciate hearing your honest opinions about it in the comments. It means a lot to me! 😊
Nutrition
Calories: 649kcal | Carbohydrates: 68g | Protein: 10g | Fat: 39g | Saturated Fat: 22g | Polyunsaturated Fat: 3g | Monounsaturated Fat: 10g | Trans Fat: 0.04g | Cholesterol: 159mg | Sodium: 573mg | Potassium: 218mg | Fiber: 1g | Sugar: 48g | Vitamin A: 1436IU | Vitamin C: 0.3mg | Calcium: 158mg | Iron: 1mg