Honeycomb Mousse Cake | Honey Cake Recipe | Beehive Cake
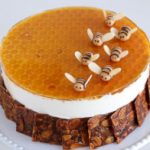
This stunning Beehive Cake combines a pecan honey financier base, creamy honey mascarpone mousse with a beehive pattern, and a glossy honey jelly topping. A showstopping honey mousse cake perfect for special occasions!
Servings: 16 yields
Calories: 521kcal
Equipment
Ingredients
Pecan-Honey financier:
- 140 g Butter
- 170 g Powdered sugar
- 80 g Flour
- ½ teaspoon Baking powder
- ½ teaspoon Cinnamon
- ⅓ teaspoon Cloves
- 120 g Ground pecans
- Pinch salt
- 5 egg whites
- 40 grams Honey
Mascarpone Mouse:
- 3 teaspoons Gelatin
- 5 egg yolks
- 80 g Sugar
- 40 ml Water
- 40 g Honey
- 2 cups Mascarpone room temperature
- 1 teaspoon Vanilla bean paste
- 450 ml Heavy cream
Honey Jelly:
- 2 teaspoons Gelatin +40ml water
- ¾ cup Water
- 35 g Sugar
- 100 g Honey
Almond-honey Florentines:
- 50 g Butter
- 40 ml heavy cream
- 65 g sugar
- 35 g Honey
- 50 g sliced almonds
- Pinch salt
For the bees:
- Marzipan
- 10 g Melted chocolate
Instructions
- Make the pecan honey financier: Heat the oven to 180C (350F). line a 9-inch (23cm) round baking pan with parchment paper and set aside.
- In a small pot, melt the butter on a low flame. After it has completely melted, increase the flame, and cook while lightly bubbling, until the butter acquires a golden-brown color and emits a nutty aroma. Pass through a sieve to filter the small lumps. Allow to cool.
- Sift the powdered sugar with flour, baking powder, cinnamon and cloves into a large bowl. Add the ground pecans, pinch of salt and mix.
- In the large bowl, lightly whip the egg whites together with the honey for about a minute, just until a light foamy. Gradually add the dry ingredients to the whipped egg whites and fold just until combined.
- Pour in the brown butter that has cooled in a thin stream while folding just until a smooth mixture is obtained.
- Pour the batter into prepared pan. Bake for about 18 minutes, until the cake gets a nice golden-brown color. Allow to cool well before you continue with the preparation.
- For the mascarpone mousse: Wash and dry the bubble wrap, place our baking pan on top, mark the diameter of the pan on the plastic, and cut into a circle exactly the size of the pan. Set aside.
- Sprinkle the gelatin in a bowl with 3-4 tablespoons of water, mix lightly and let sit for 5-10 minutes to absorb the liquid.
- In a large bowl, start beating the egg yolks on high speed. At the same time, cook sugar, water and honey in a small pot. Bring to a boil and cook while bubbling for about another 6 minutes, until you get a very thick syrup that bubbles strongly for a few seconds even after you remove the pot from the heat. For those who have a thermometer 118cC/244F degrees, for those who don't and want to be sure that the syrup is ready, can also drip a drop of the syrup into a glass of cold water, and watch the syrup quickly settle into a soft ball.
- Immediately pour the hot sugar syrup in a thin stream while whipping at low speed, at the end of the addition, increase the mixer back to high speed and whip well for about 5 minutes or until the whipping becomes very light and puffy and is no longer warm to the touch.
- Dissolve the soaked gelatin for 15 seconds in the microwave and mix with a spoon to a smooth mixture without lumps. Pour the gelatin into the egg yolks while stirring lightly to incorporate.
- Add the mascarpone and vanilla bean paste to the bowl of egg yolks. Whisk well until smooth. To finish, whip the cream into soft peaks and fold into the cream to obtain a smooth mousse.
- Line the sides of the pan/cake ring with a cake collar or parchment paper and the financier at the bottom.
- Create the beehive pattern: Place the bubble wrap on the work surface with the bubbles facing up, spread a few tablespoons of mousse on it so that the mousse fills all the spaces between the bubbles. Pour the rest of the mousse into the mold on top of the cake base and smooth it.
- Gently turn the bubble wrap over the mousse with the bubbles facing the cake. Lightly press, and transfer the cake to the freezer for at least good 5 hours or until the cake is frozen.
- After the mousse has set, very gently peel the plastic sheet from the frozen cake. Keep the cake in the freezer until the jelly layer is poured.
- Make the Honey Jelly: Sprinkle the gelatin in a bowl with 2-3 tablespoons of water, mix lightly and let sit for 5-10 minutes to absorb the liquid.
- In a small saucepan, cook the sugar until a very light caramel is obtained. At the same time, in a separate pan, bring the water together with the honey to a boil. As soon as the caramel reaches the desired color, pour the mixture of water and honey into the sugar while continuously stirring to a liquid with a honey shade.
- Remove from heat and place bloomed gelatin into the mixture. Mix until dissolved.
- Cool the jelly well to room temperature so that it is not hot to the touch at all. Pour the jelly very slowly on top of the mascarpone mousse, a little at a time so that it fills all the holes with honey liquid and creates a beehive look (Be very careful to pour really slowly and gradually, otherwise small pieces of the honeycomb will break off from the mousse and cloud the jelly).
- Transfer to the refrigerator so that the jelly will set, and the frozen cake will slowly thaw.
- For the almond-honey Florentines: Heat an oven to 170C (340F) and line a baking tray with parchment paper or silicone mat.
- In a small pot, cook together butter, whipping cream, sugar and honey, cook until the mixture comes to a boil. Continue to cook while bubbling, until the mixture gets a light golden color.
- Stir in the sliced almonds. Immediately transfer the mixture to the pan, place baking paper on top, and using a rolling pin, roll the mixture thinly as possible.
- Remove the baking paper very gently, and bake for about 7-10 minutes, until the whole leaf gets a beautiful caramel-brown color. (The exact baking time depends on the duration of the initial cooking of the mixture, so you should wait by the oven until the Florentine reaches the desired color).
- Remove from the oven, let the mixture sit for a few minutes to set, and while it is still warm and slightly soft, cut it with a sharp knife into squares of about 4.5 cm.
- Keep the squares in a single layer in a sealed box on baking paper until ready to decorate.
- Make the bees: take a small portion of the marzipan and shape it into small rolls. Using melted dark chocolate create black stripes and eyes on each roll. Stick 2 sliced almonds on the sides of each roll to form wings.
- Decorate the cake: Close to the time of serving, unmold the cake, decorate the cake with bees, and attach the Florentine squares around the cake as shown in the video.
- Serve and enjoy!
Video
Notes
- Watch the Video: For a better understanding of the recipe, I always recommend watching the video recipe, which includes a step-by-step guide to help you succeed.
- FAQs: Make sure you read the FAQs for this recipe which are located below the recipe box for additional tips and troubleshooting! For extra tips and variations read the article.
- In this recipe I don't recommend using measuring cups and spoons, I would suggest using a kitchen scale for accurate results.
- If you enjoyed this recipe, I would appreciate hearing your honest opinions about it in the comments. It means a lot to me! 😊
Nutrition
Calories: 521kcal | Carbohydrates: 41g | Protein: 8g | Fat: 42g | Saturated Fat: 22g | Polyunsaturated Fat: 3g | Monounsaturated Fat: 10g | Trans Fat: 0.4g | Cholesterol: 149mg | Sodium: 136mg | Potassium: 122mg | Fiber: 1g | Sugar: 24g | Vitamin A: 1229IU | Vitamin C: 0.3mg | Calcium: 95mg | Iron: 1mg